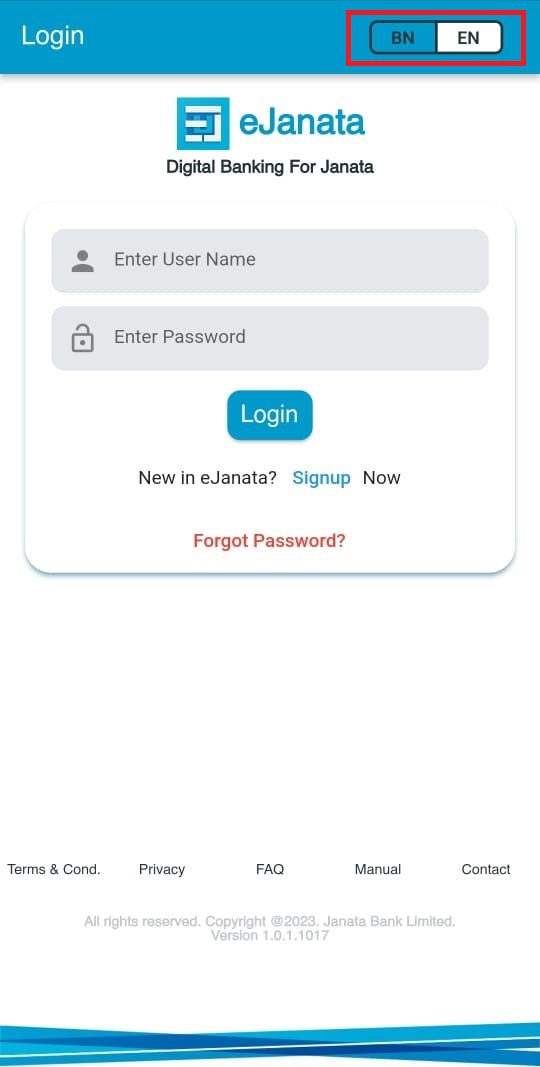
Description: Please select your language (Bangla/English). দয়া করে আপনার ভাষা (বাংলা/ইংরেজি) নির্বাচনের জন্য এখানে ট্যাপ করুন।
Step 1:
Description: Please tap on Signup for registration screen. দয়া করে registration (রেজিস্ট্রেশন) স্ক্রিন এ প্রবেশ এর জন্য Signup (সাইন আপ) এ স্পর্শ করুন। অবশ্যই, যে ডিভাইসে অ্যাপ ইন্সটল করা হয়েছে সেই ডিভাইসে, একাউন্টে প্রদত্ত মোবাইল নাম্বারের SIM টি একটিভ থাকতে হবে। ডিভাইসে ইন্টারনেট সংযোগ চালু রাখতে হবে।

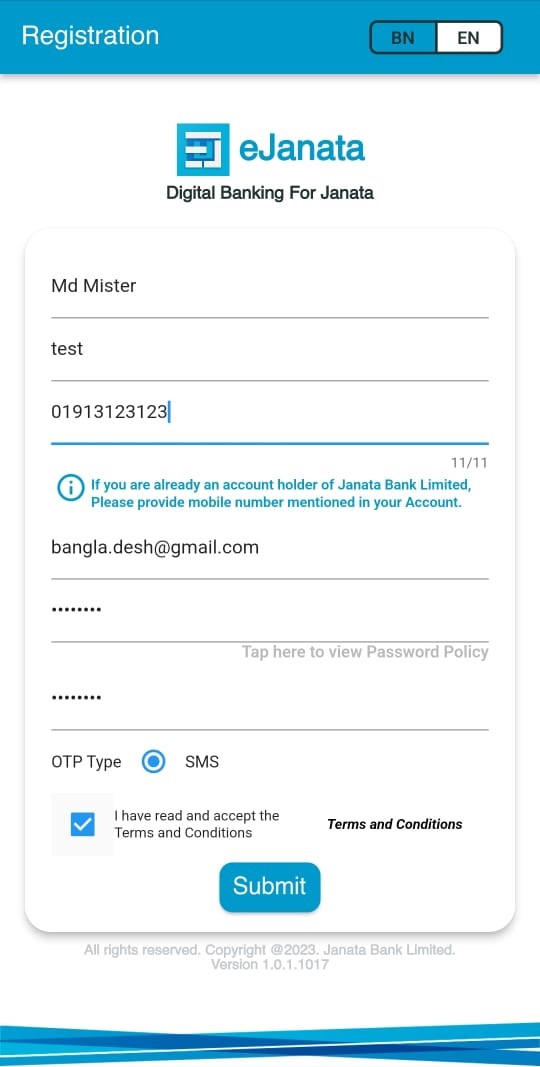
Step 2:
Description: Please fill up the form using valid mobile number (must be the number given in the Janata Bank account number of the user) and email address. Password should be minimum 8 digits long, must contain a number, an upper character and a special character. Before submitting the form user should read and accept the Terms and Conditions. ইংরেজিতে নামের প্রথম অংশ লিখুন [একাউন্ট খোলার ফর্ম মোতাবেক]। ইংরেজিতে নামের শেষ অংশ লিখুন [একাউন্ট খোলার ফর্ম মোতাবেক]। সঠিক মোবাইল নম্বরটি লিখুন [আপনার জনতা ব্যাংক একাউন্টে প্রদত্ত]। সঠিক ইমেইলের ঠিকানা লিখুন। পাসওয়ার্ড কমপক্ষে ৮ অক্ষরের হতে হবে। পাসওয়ার্ড এ অবশ্যই একটি সংখ্যা, একটি বড় হাতের অক্ষর এবং একটি বিশেষ অক্ষর (যেমন *@$#%^ ইত্যাদি) ব্যবহার করতে হবে। পাসওয়ার্ডটি পুনরায় লিখুন। OTP এর ধরণ নির্বাচন করুন। ফর্মটি সাবমিট করার পূর্বে Terms and Conditions (শর্তাবলী) সতর্কতার সাথে পড়ুন এবং সম্মত হলে টিক বক্সটি চাপুন। উপরে প্রদত্ত সকল তথ্য সঠিক হলে সাবমিট চাপুন।
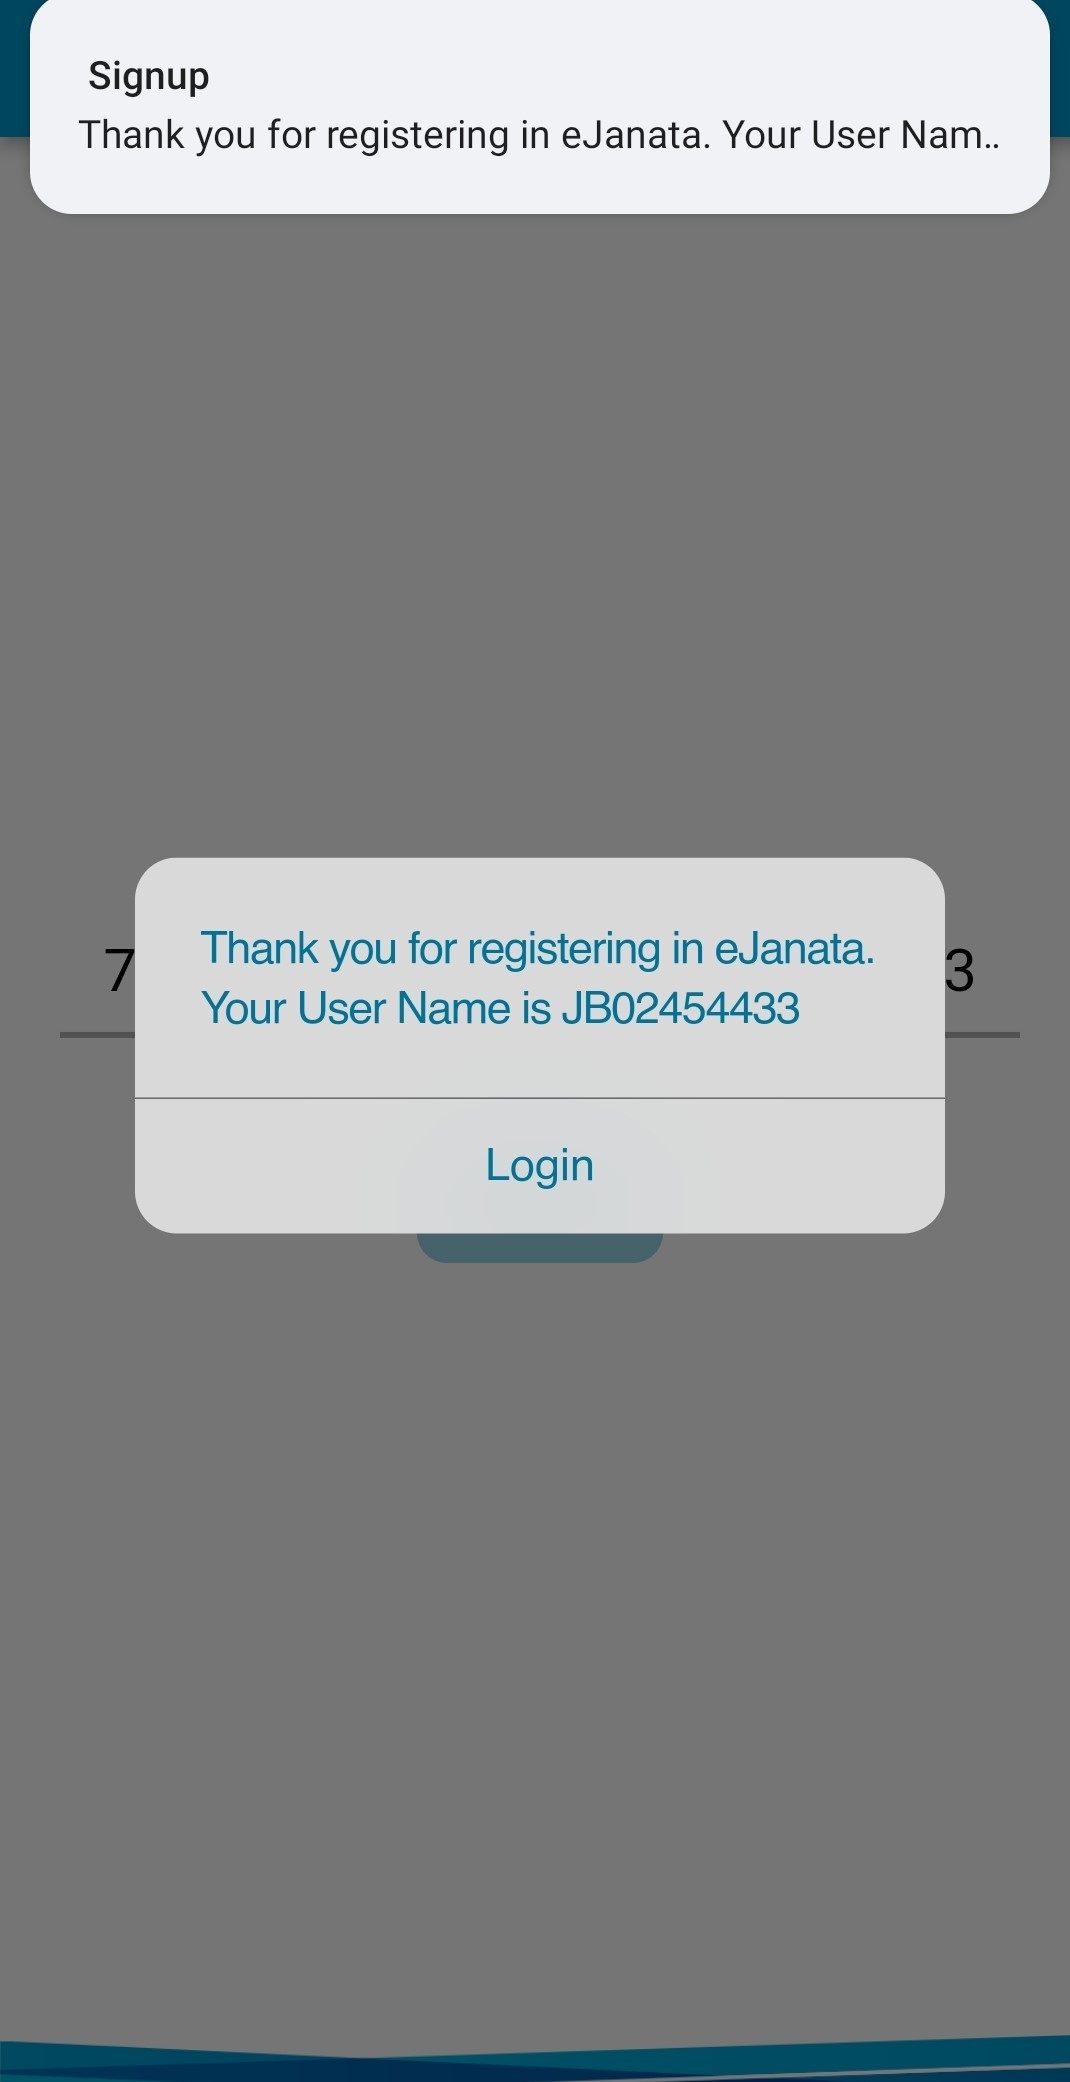
Step 3:
Description: User will get a unique User Name through SMS after verifying device by OTP. ব্যবহারকারীর ডিভাইসটির সফলভাবে ভেরিফাই সম্পন্ন হলে তিনি User Name/User ID সম্বলিত একটি SMS পাবেন।
Step 4:
Description: Now user can login eJanata app by using userid and password. এখন ব্যবহারকারী তাঁর User Name/User ID ও পাসওয়ার্ড ব্যবহার করে Login (লগ ইন) করতে পারবেন।

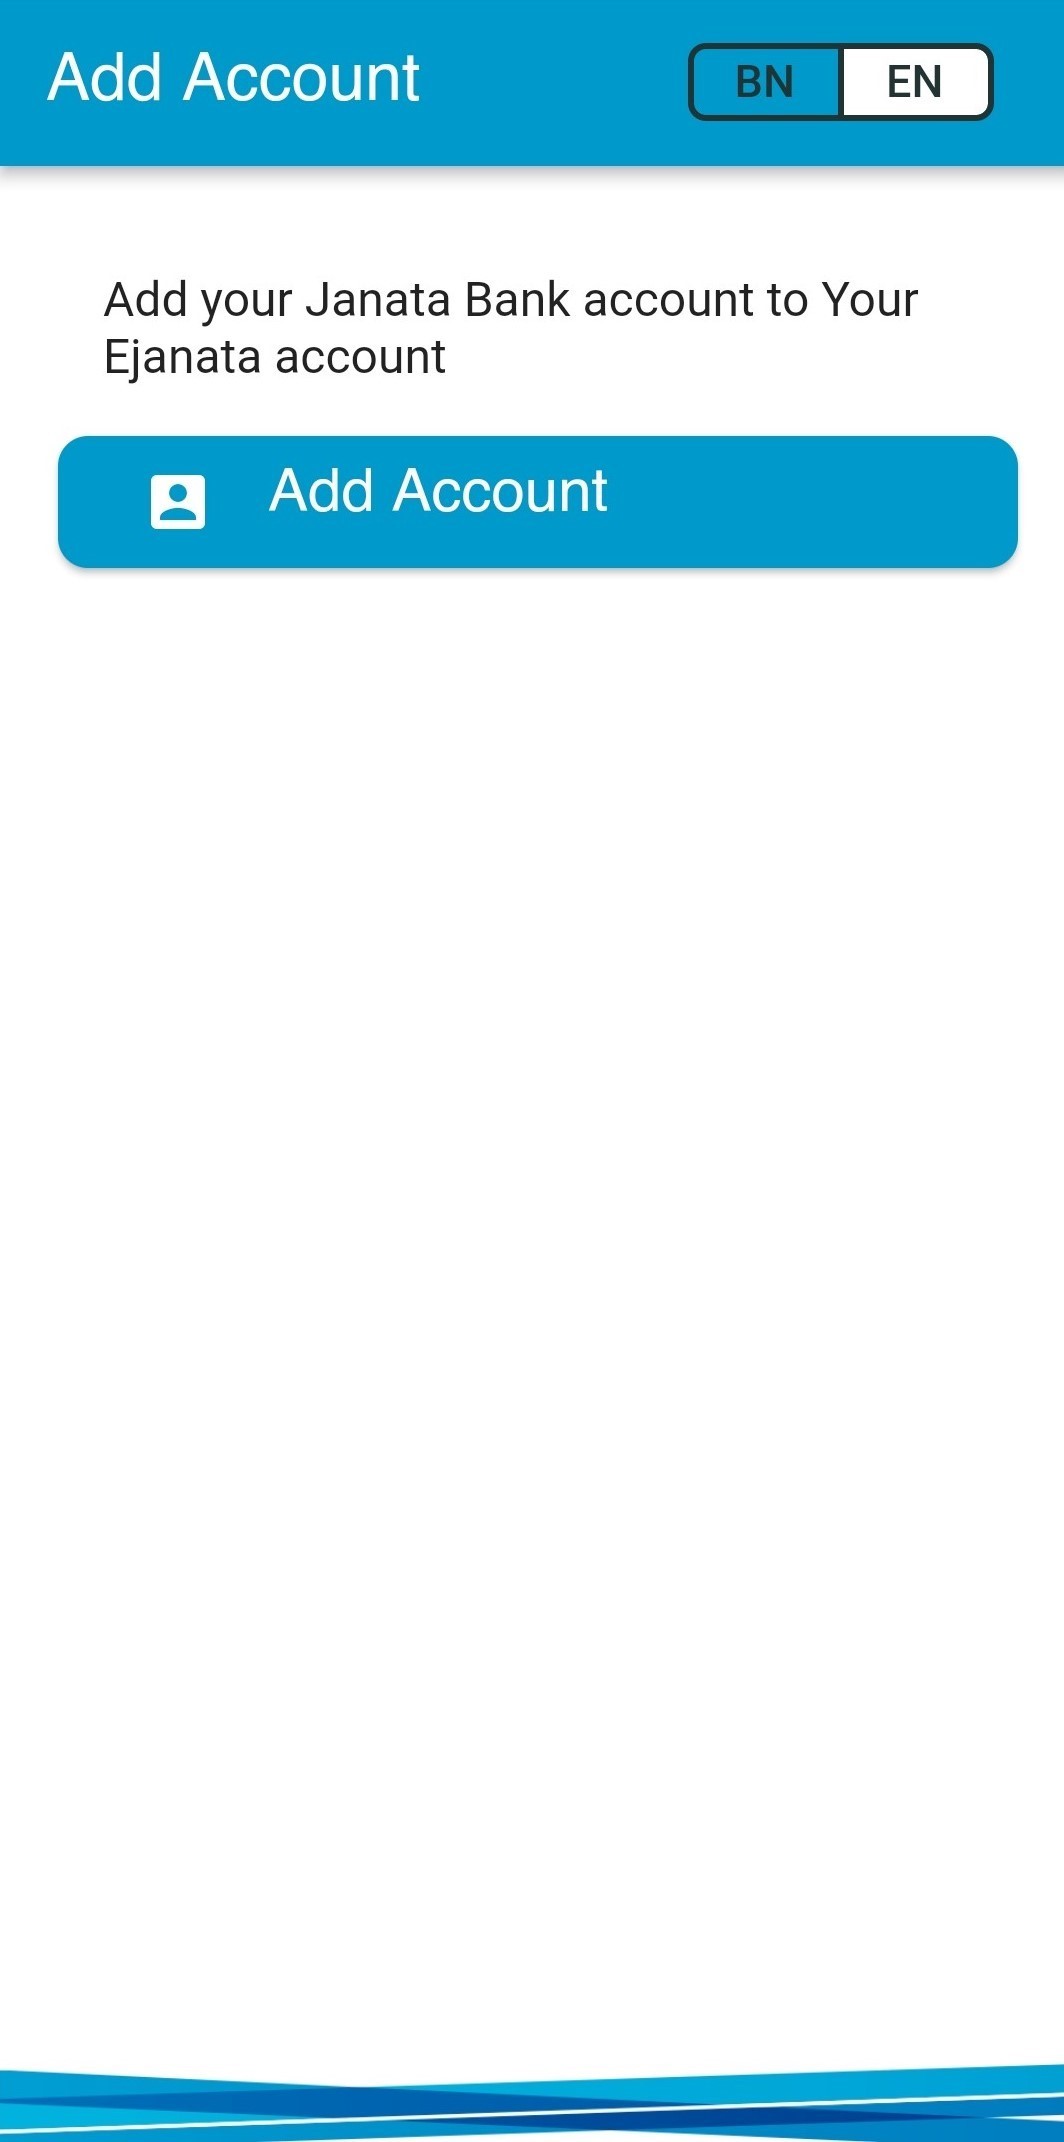
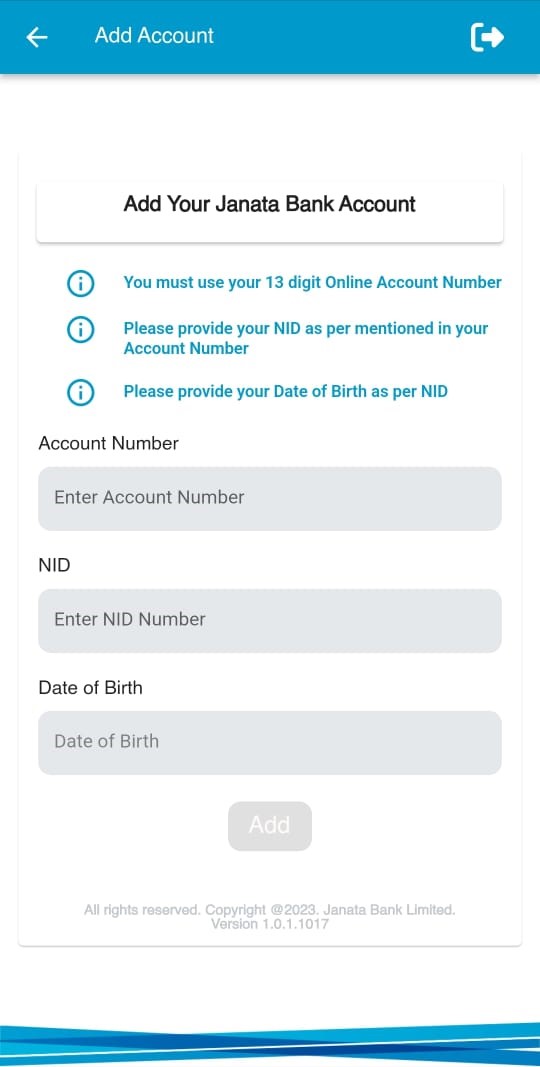
Step 1:
Description: After login new user will see the Add Account screen. Login (লগ ইন) এর পরে একজন নতুন ব্যবহারকারী Add Account এর স্ক্রিনটি দেখতে পাবেন।
Step 2:
Description: User has to use his/her 13 digit Janata Bank Account Number, NID number and date of birth which is mentioned in NID. ১৩ সংখ্যা বিশিষ্ট Online একাউন্ট নম্বরটি লিখুন। Online একাউন্টে প্রদত্ত NID নম্বরটি লিখুন। NID কার্ড অনুযায়ী জন্ম তারিখ নির্বাচন করুন এবং Add চাপুন।
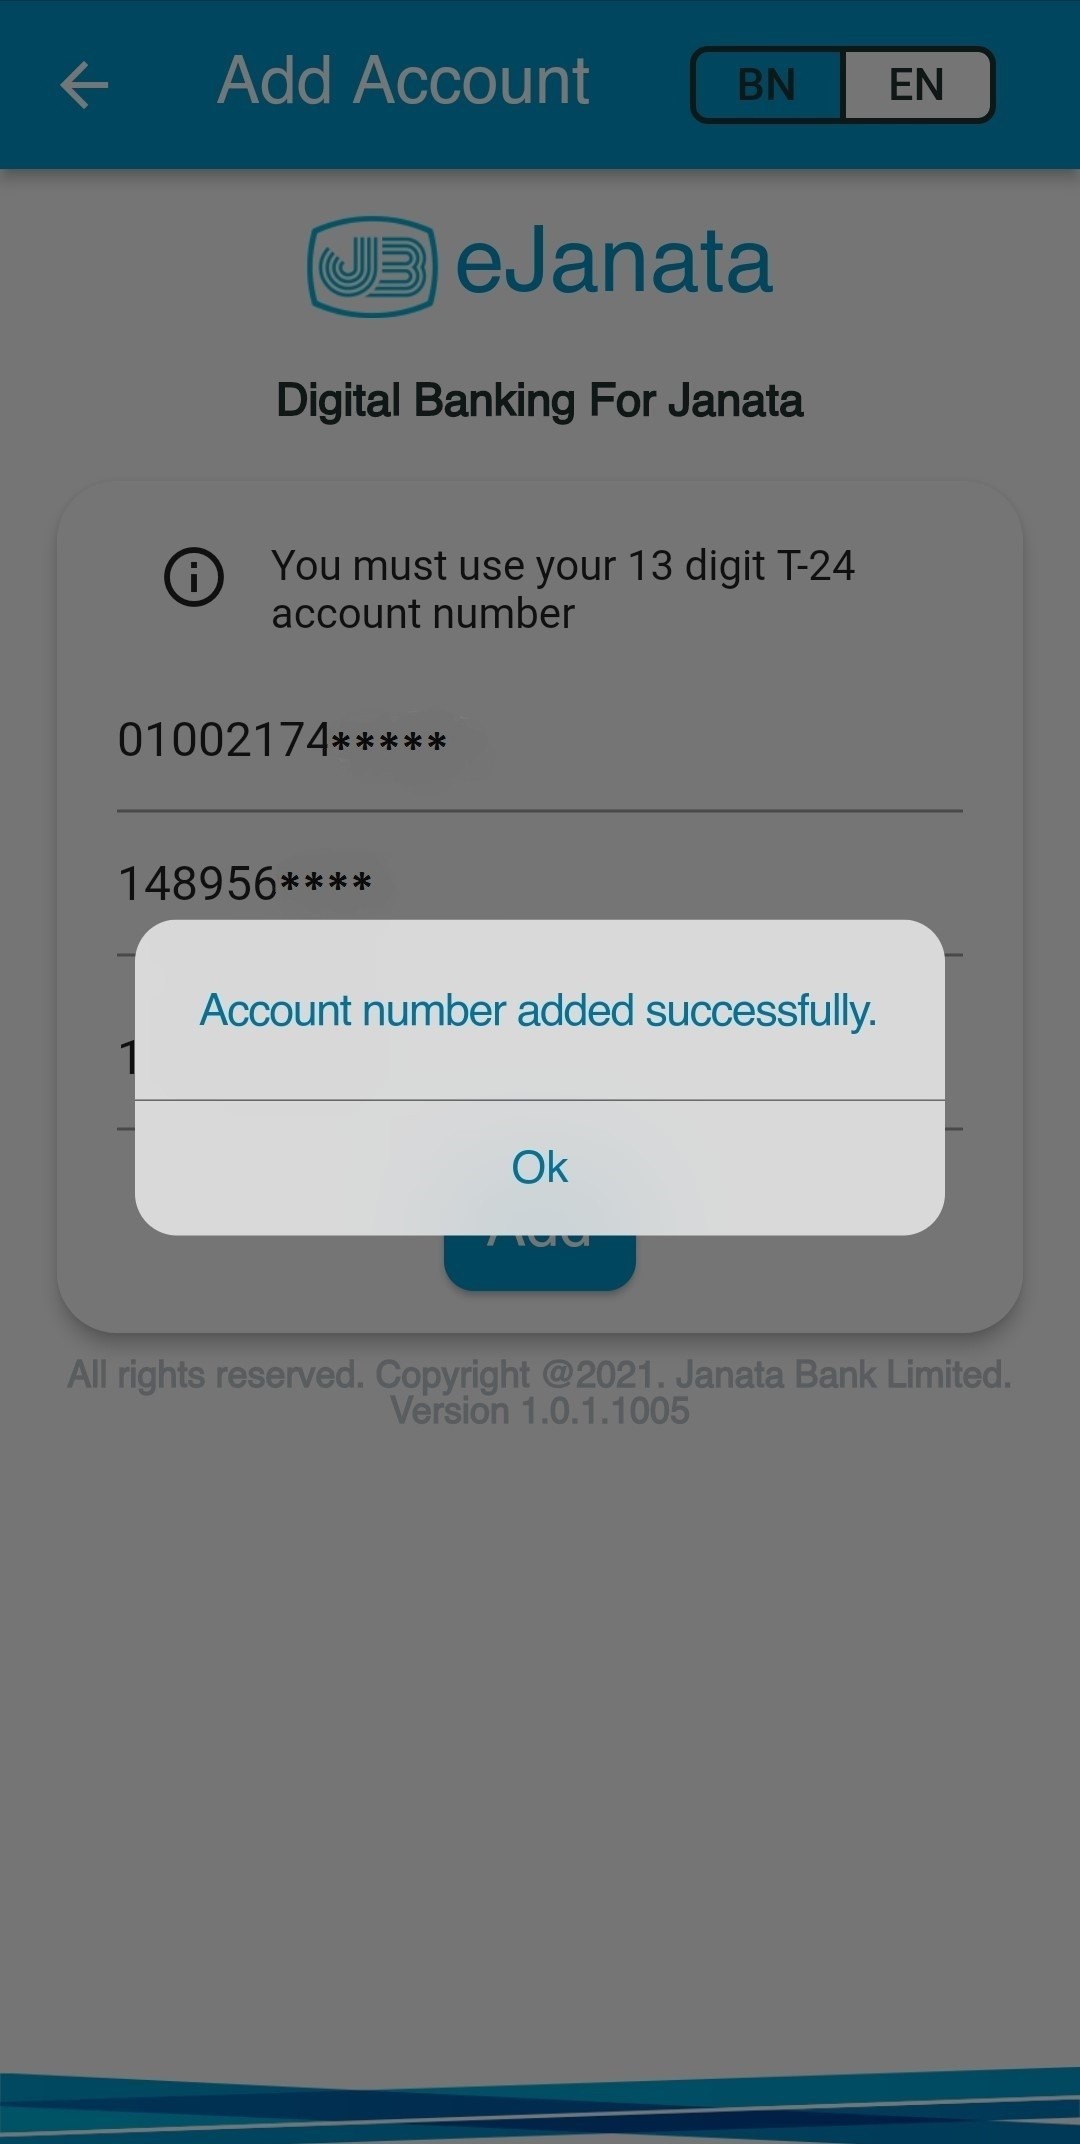
Step 3:
Description: If account is added successfully, user will see a success message. Add Account সফল হলে ব্যবহারকারী একটি সফলতা বার্তা দেখতে পাবেন।
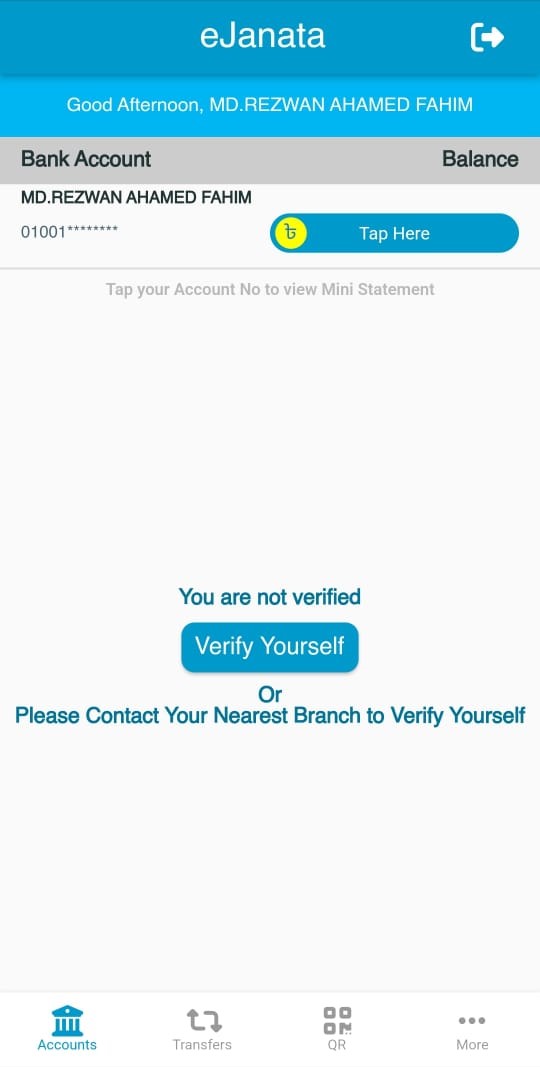
Step-1:
Description: After adding account, user need to verify himself/ herself by using app or visiting to the nearest branch. To verify by app please tap on Verify Yourself. Add Account সফলভাবে সম্পন্ন করার পর ব্যবহারকারী অ্যাপ এর মাধ্যমে নিজে নিজে অথবা নিকটস্থ জনতা ব্যাংকের শাখা থেকে নিজেকে ভেরিফাই করবেন। নিজে নিজে ফেস ভেরিফাই করতে Verify Yourself এ চাপুন।
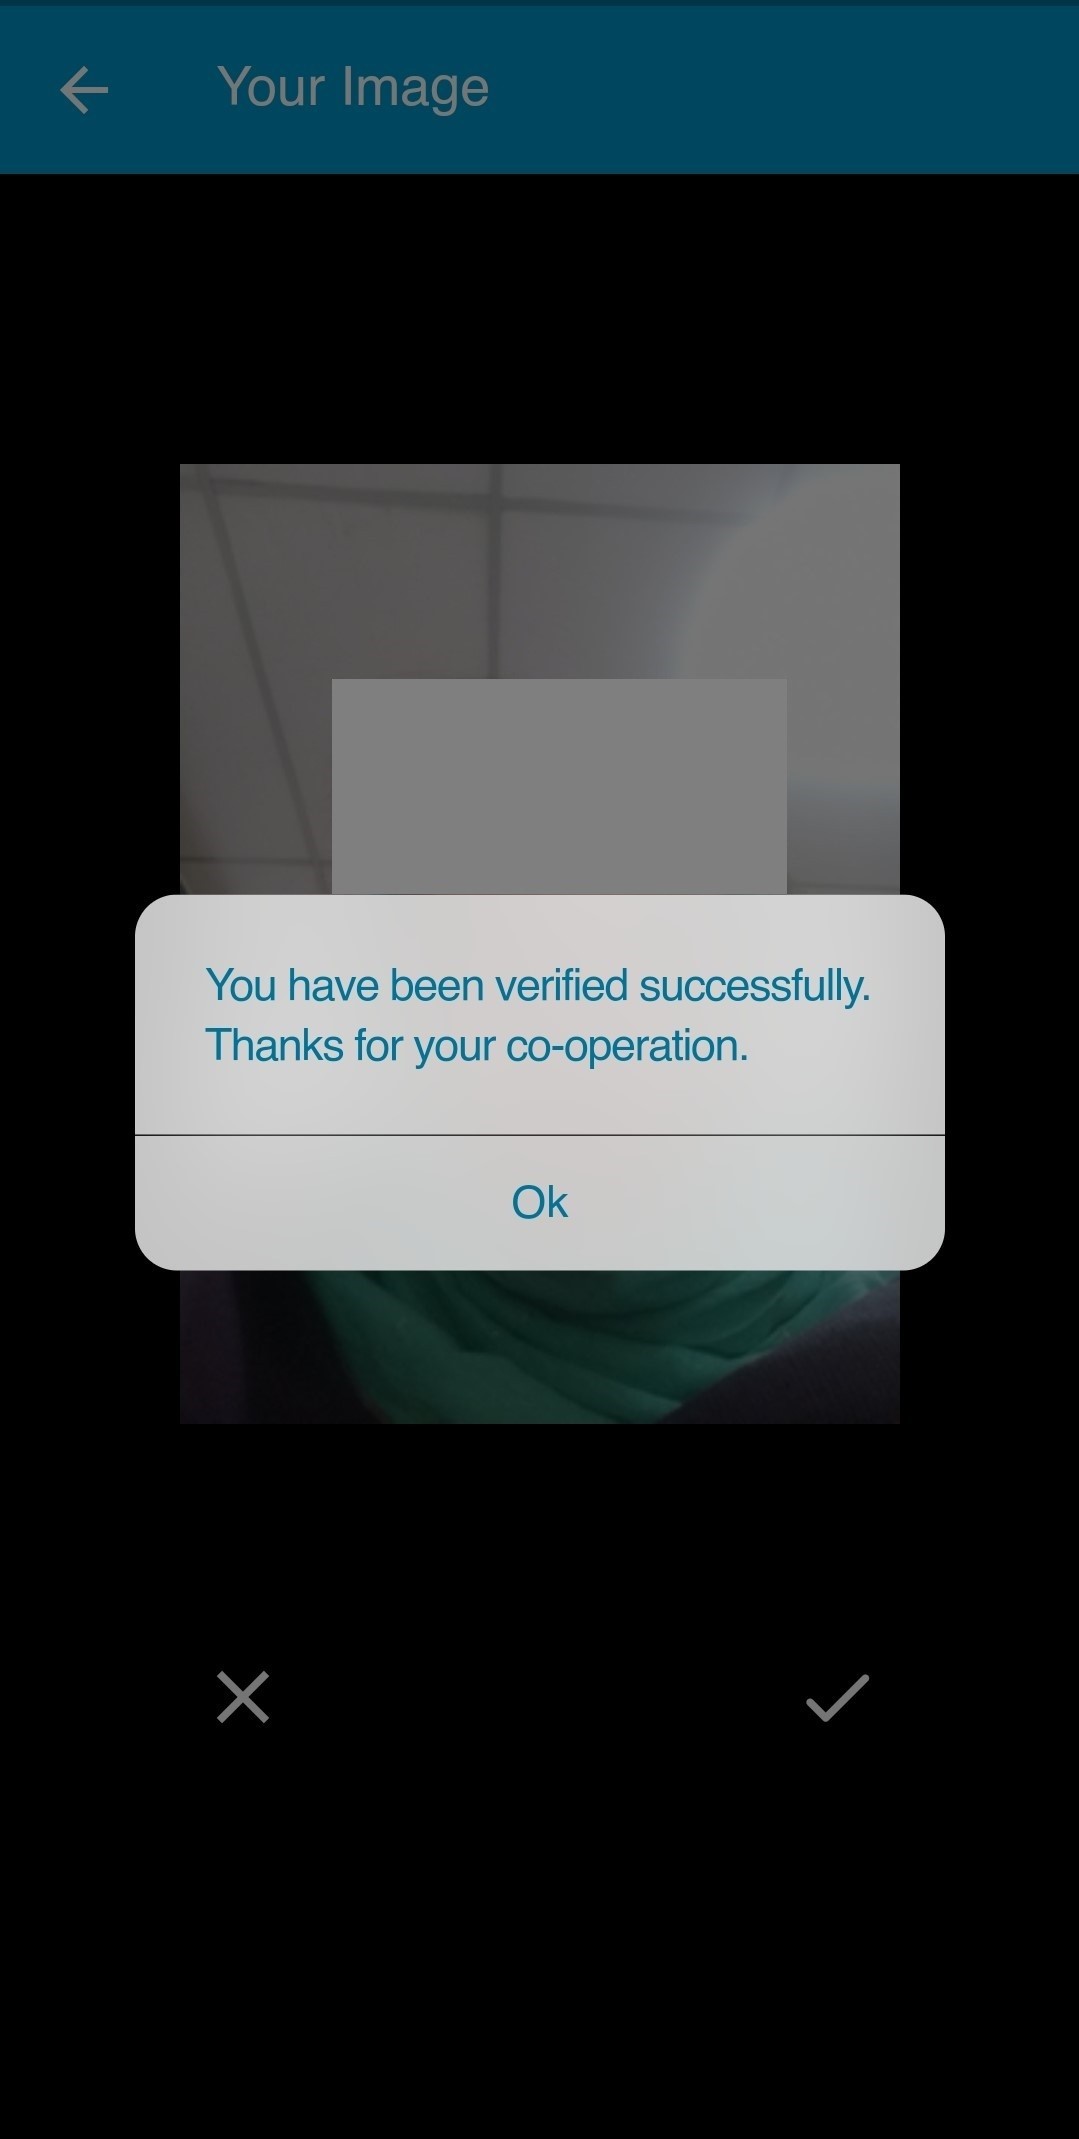
Step-2:
Description: User has to take a picture to verify himself/ herself through app. If user is verified, then a successful message will appear on screen. ভেরিফাই সম্পন্ন করতে অ্যাপ এর মাধ্যমে নিজের ছবি তুলুন। ভেরিফাই সফল হলে একটি সফলতা বার্তা দেখতে পাবেন। দ্রষ্টব্যঃ পর্যাপ্ত আলোর উপস্থিতিতে ছবি তুলুন। ছবি তুলতে একবার চোখ বন্ধ করুন এবং চোখ খুলুন। মনে রাখবেন, ২ (দুই) এর অধিক ছবি তোলার চেষ্টা করলে আপনার ইউসার Auto Lock হয়ে যাবে। সেক্ষেত্রে নিকটস্থ জনতা ব্যাংকের শাখা থেকে ভেরিফিকেশন সম্পন্ন করতে হবে।
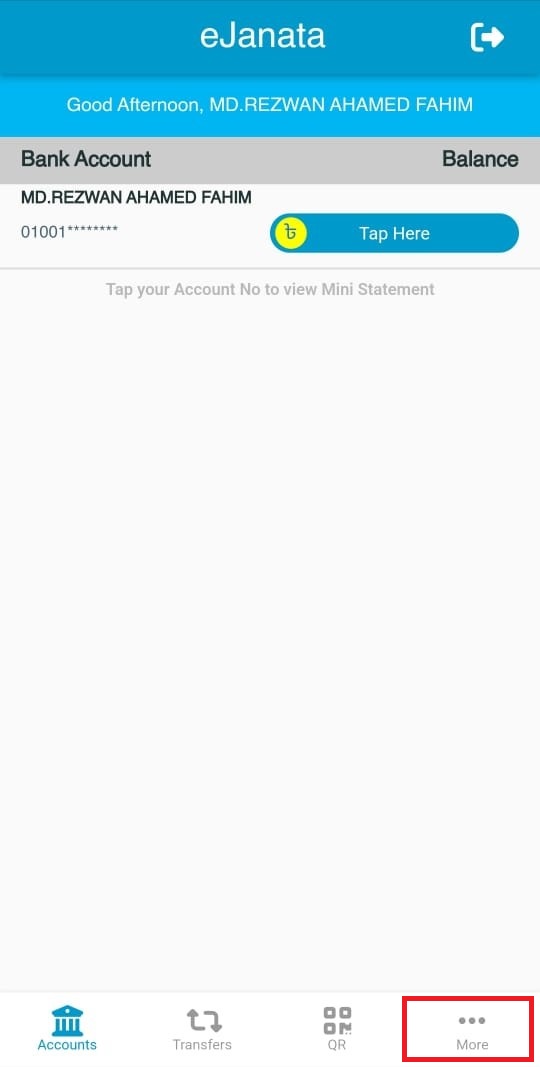
Step-1:
Description: Please tap on More to see email verify menu. ইমেইল ভেরিফাই করতে দয়া করে নিচের মেনু থেকে More/অন্যান্য এ চাপুন। দ্রষ্টব্যঃ আপনার ভেরিফাইকৃত ইমেইলটিঃ ক) পাসওয়ার্ড/ইউসার আইডি পুনরুদ্ধার করতে, খ) OTP পেতে এবং গ) ভবিষ্যতে আপনাকে জরুরী তথ্য প্রদানের প্রয়োজনে যোগাযোগের জন্য ব্যবহৃত হবে।
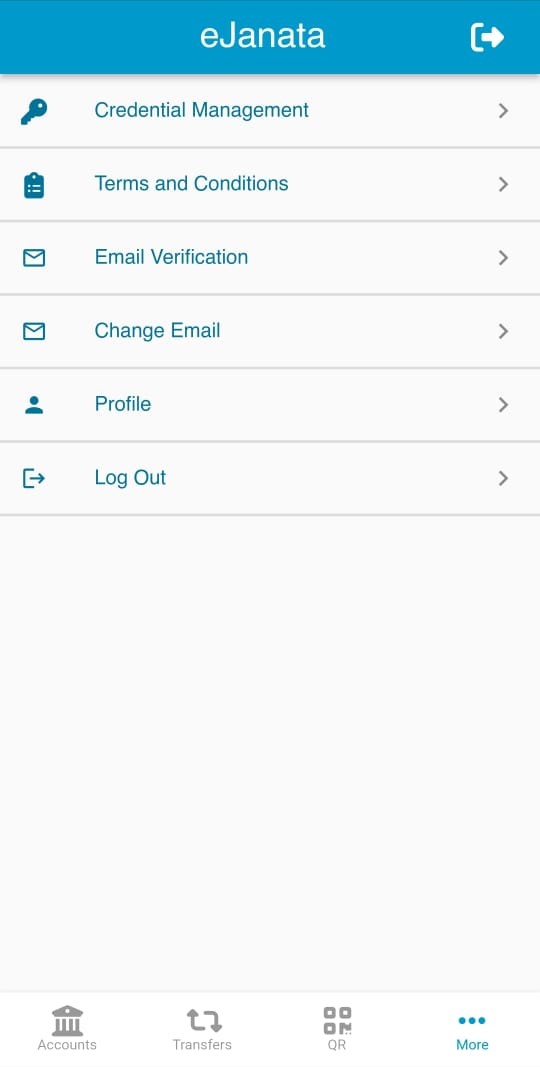
Step-2:
Description: From the menu please select Email Verify. ইমেইল ভেরিফাই করতে দয়া করে Email Verify মেনুটি নির্বাচন করুন।
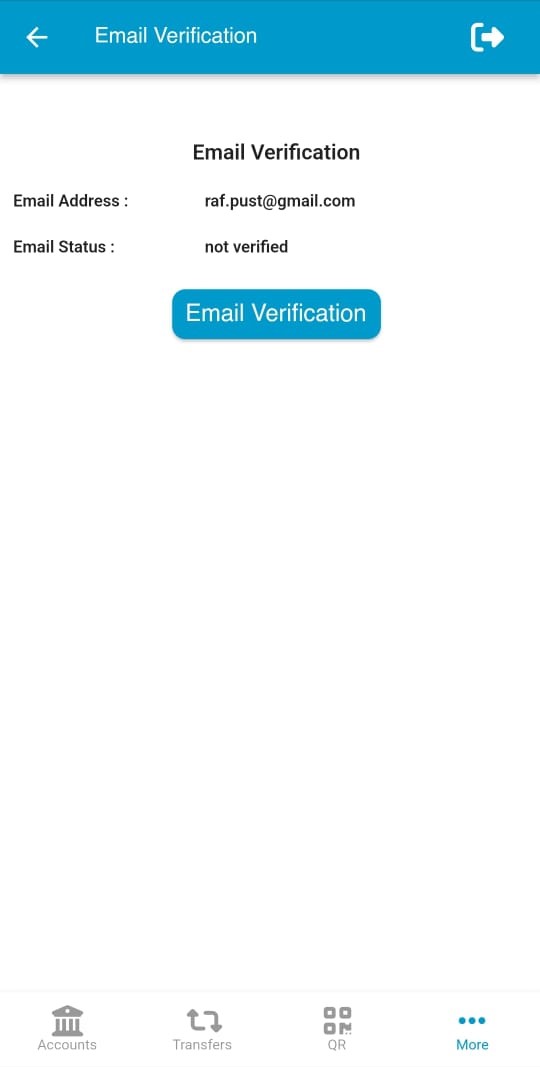
Step-3:
Description: You can see Email Status: not verified. For verifying email, please tap on Email Verify button. এখানে ব্যবহারকারী তাঁর ইমেইল এর বর্তমান অবস্থা not verified পাবেন। ভেরিফাই করতে দয়া করে Email Verify এ চাপুন।
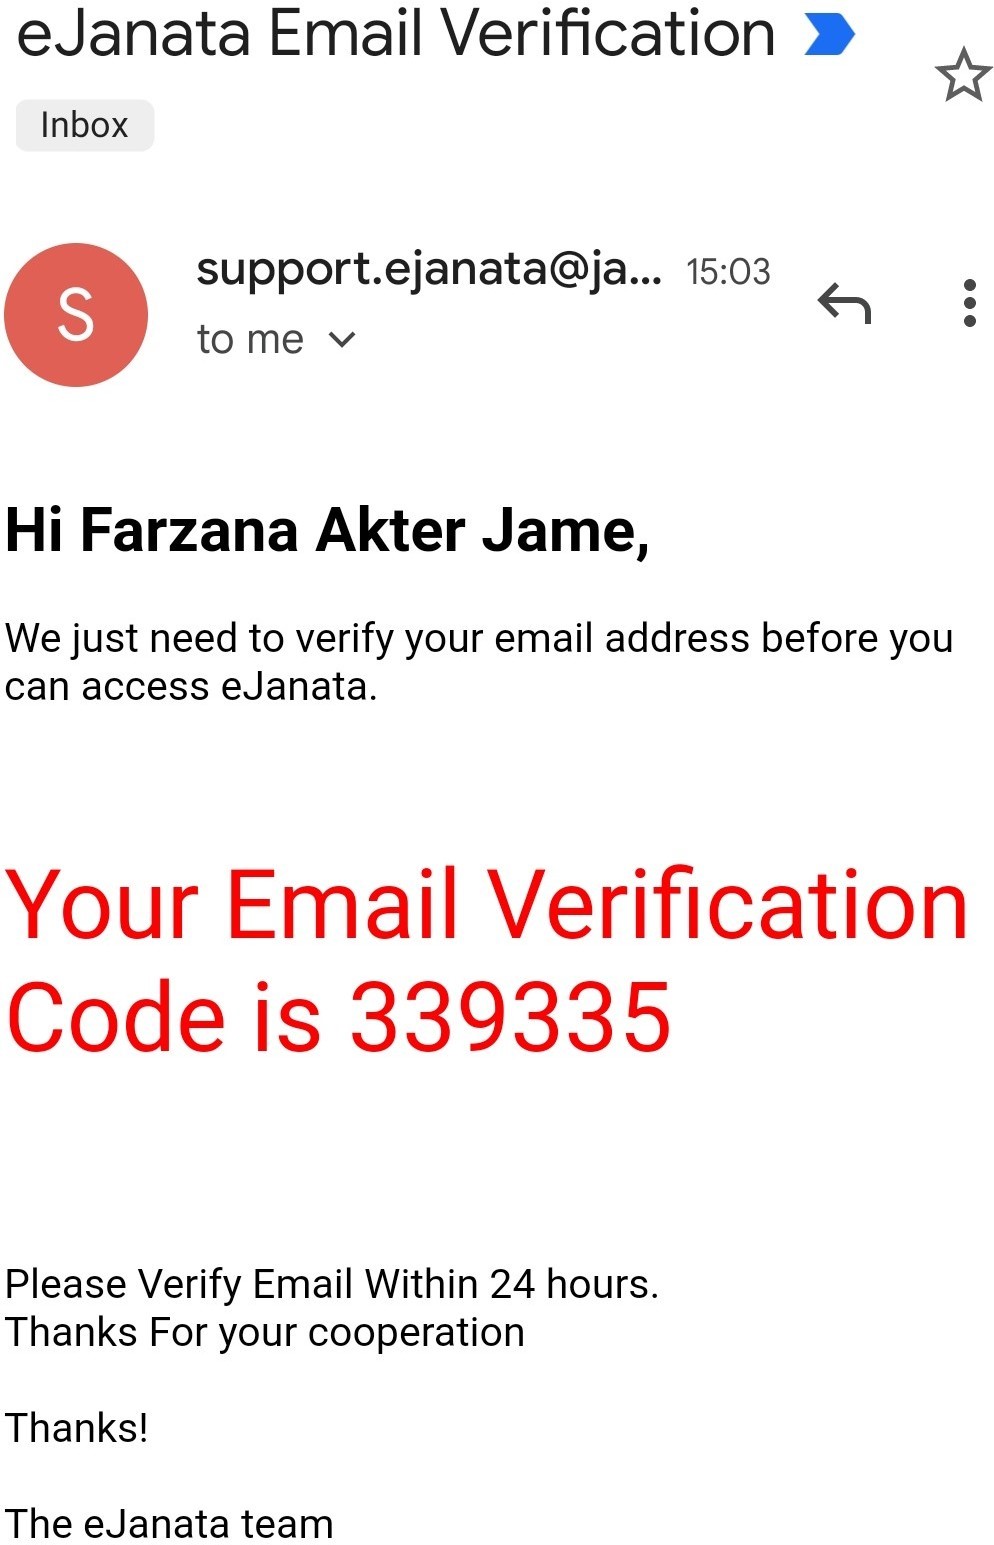
Step-4:
Description: A six digit OTP has been sent to your email address. Please go to your email inbox. ব্যবহারকারীর ইমেইলে একটি ৬ সংখ্যা বিশিষ্ট OTP পাঠানো হয়েছে। দয়া করে আপনার ইমেইলের ইনবক্স দেখুন। দ্রষ্টব্যঃ আপনার ইমেইলে প্রেরিত ৬ সংখ্যা বিশিষ্ট OTP এর মেয়াদ মাত্র ২৪ ঘন্টা। এই সময়ের মধ্যে দয়া করে ইমেইল ভেরিফিকেশন সম্পন্ন করুন।
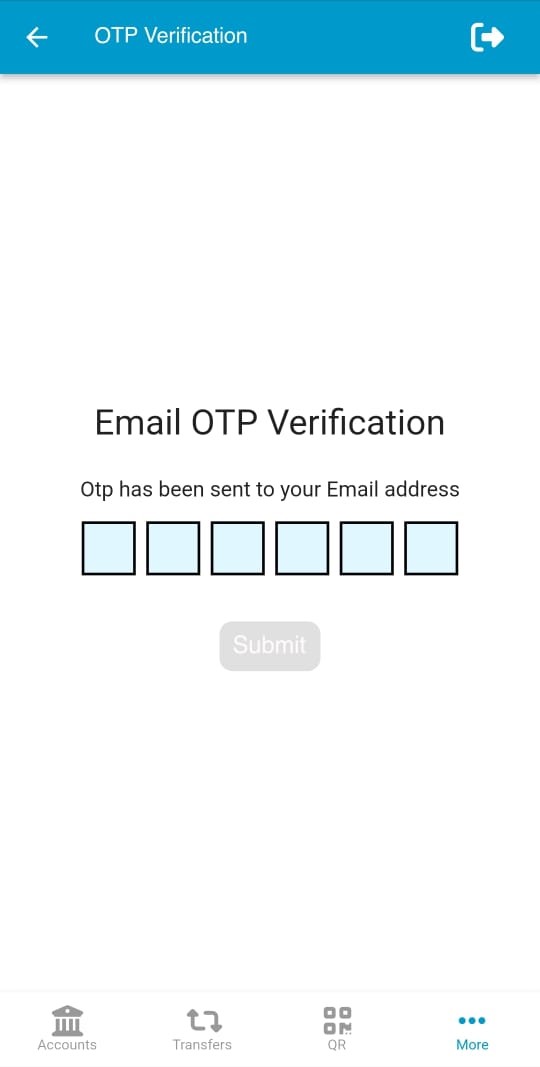
Step-5:
Description: Please input the six digit OTP which is already sent to user's registered email address. দয়া করে আপনার ইমেইলে পাঠানো ৬ সংখ্যা বিশিষ্ট OTP টি প্রবেশ করান।
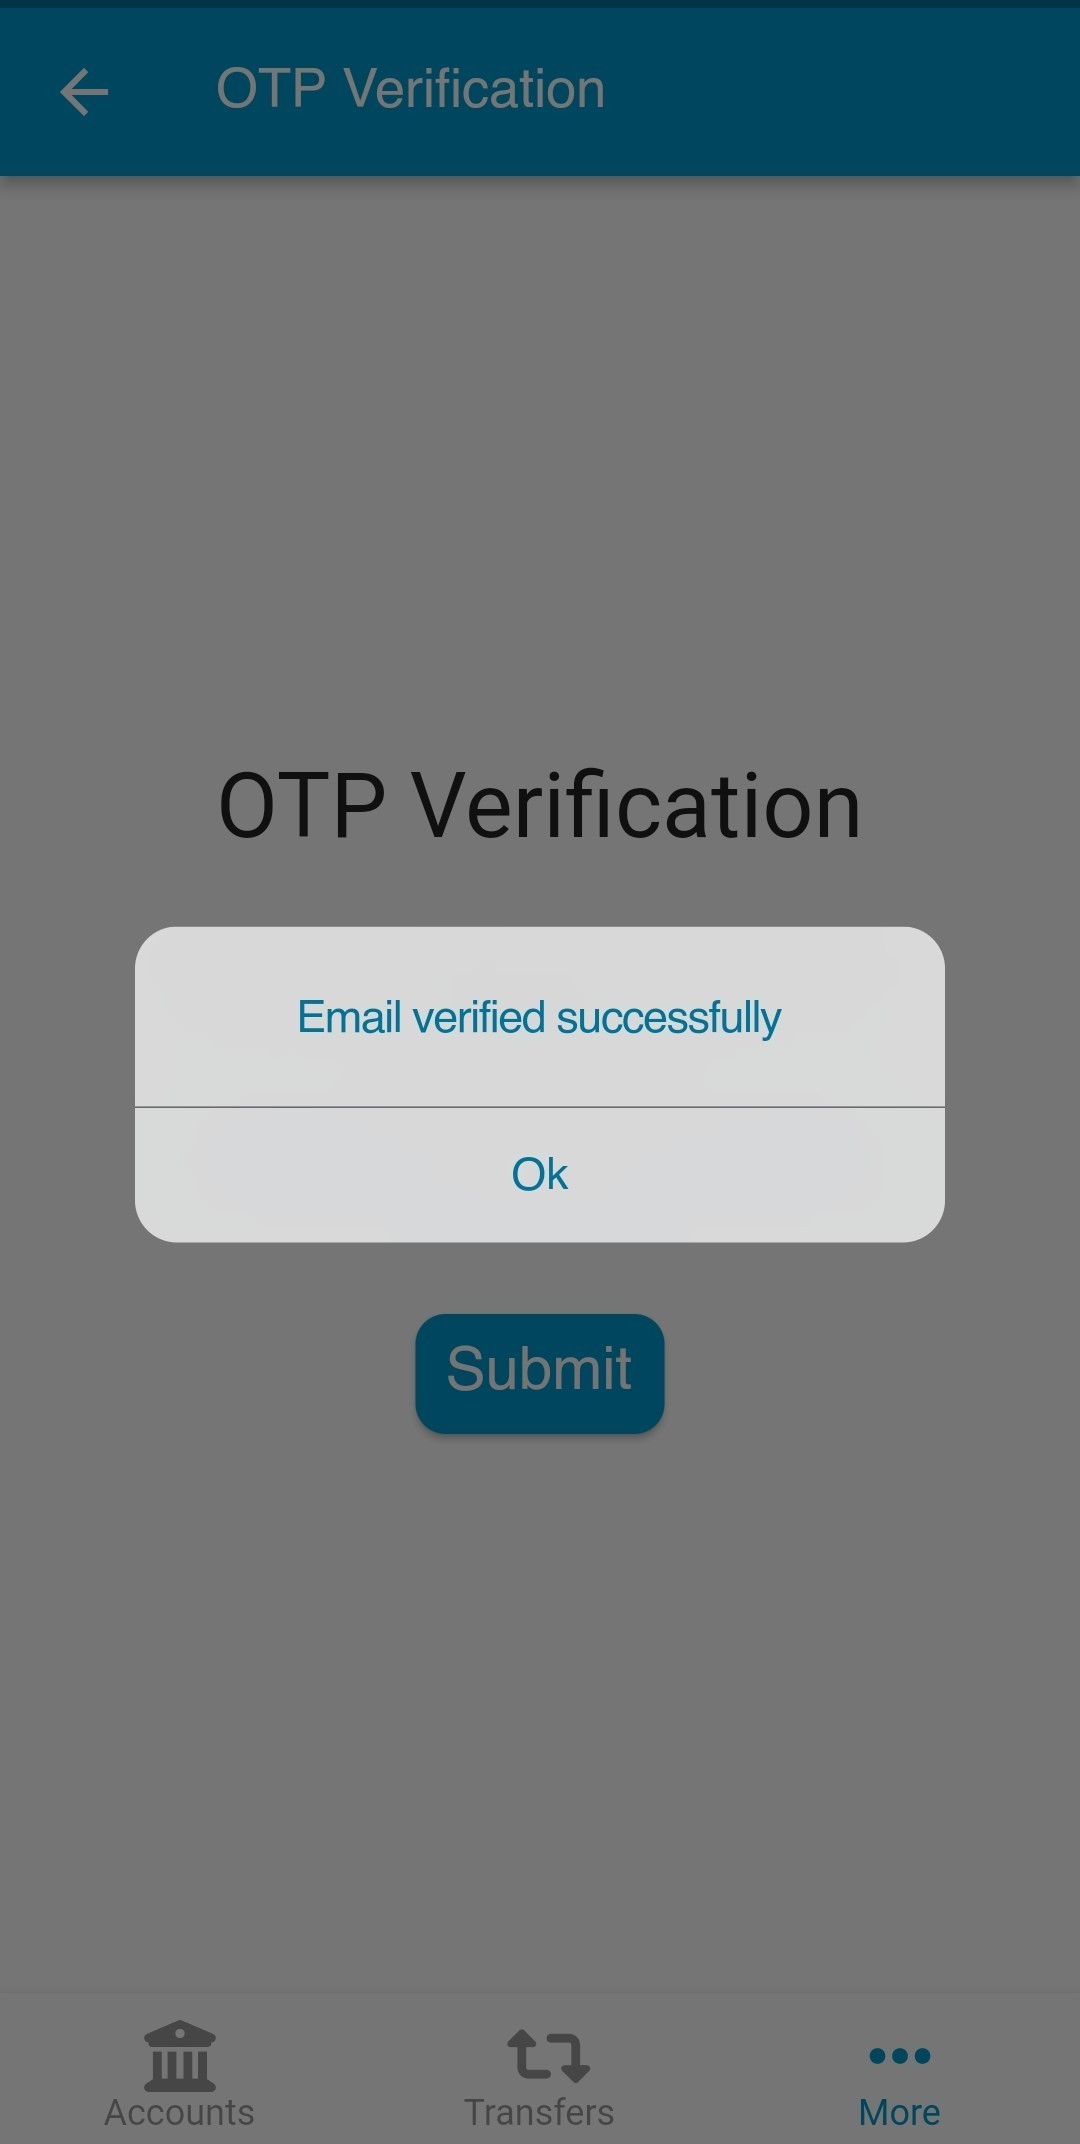
Step-6:
Description: If OTP is matched successfully, user will see a success message for email verification. প্রবেশ করানো OTP সঠিক হলে একটি সফলতা বার্তা দেখতে পাবেন।
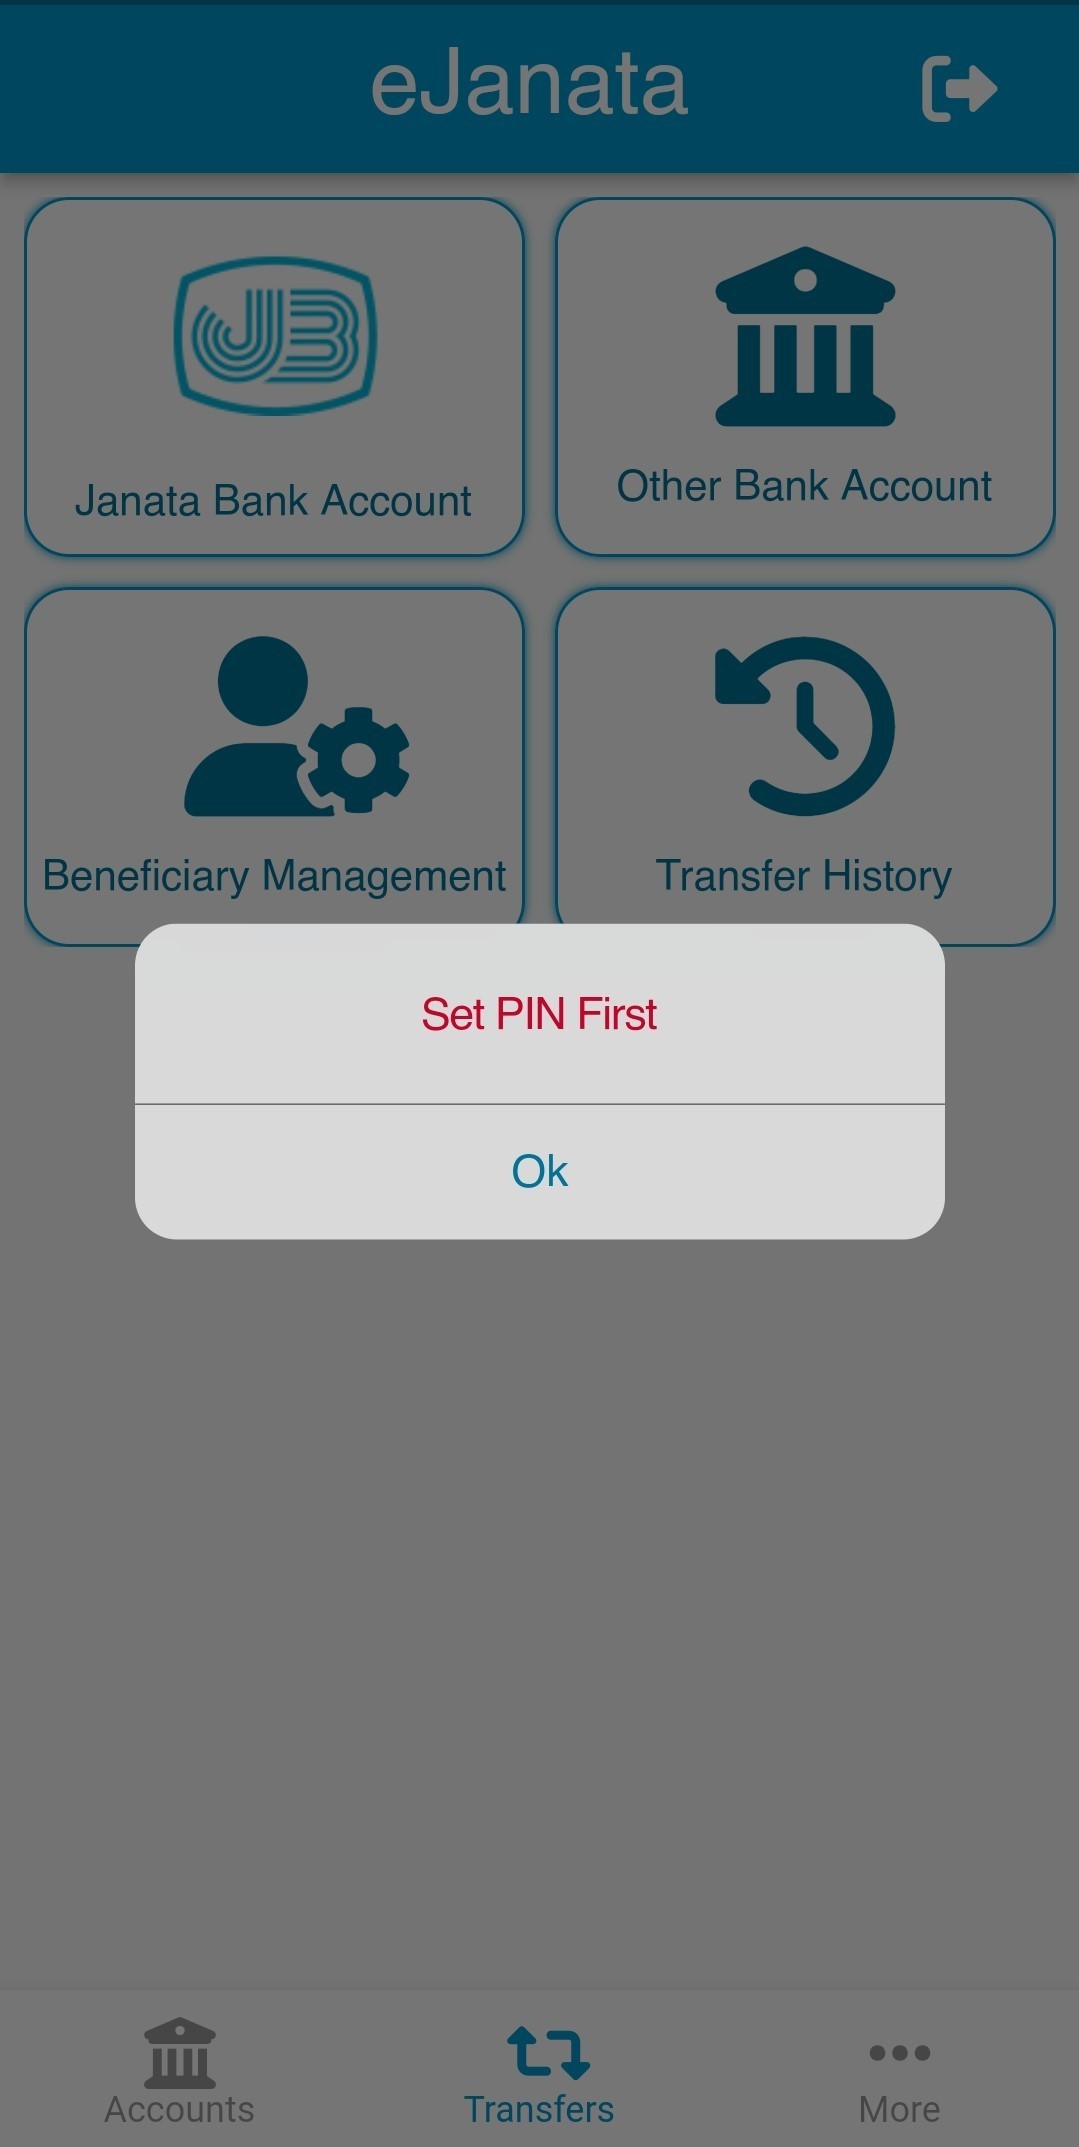
Description: User need to set PIN first before performing any operation using this app. PIN should be six digit long numeric character. অ্যাপ ব্যবহার করে যেকোন কার্যক্রম করতে হলে আগেই PIN নম্বর সেট করতে হবে। PIN নম্বরটি অবশ্যই ৬ সংখ্যা বিশিষ্ট হতে হবে। শুধুমাত্র PIN নম্বর দিয়ে সহজে লগইনঃ লেনদেন সহজ করার সুবিধার্থে PIN নম্বর সেট করুন। PIN নম্বর সেট করার পর দ্রুত ও সহজে লগইন করার জন্য পাসওয়ার্ডের পরিবর্তে শুধুমাত্র PIN নম্বর ব্যবহার করতে পারবেন।
Step-1:
Description: Please tap on More to get Set PIN menu. PIN নম্বর সেট করতে দয়া করে নিচের মেনু থেকে More/অন্যান্য এ চাপুন।

Step-2:
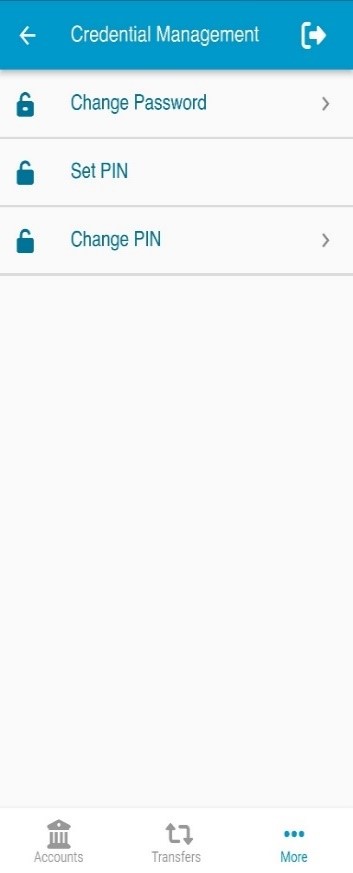
Description: From the menu please select Credential Management. PIN নম্বর সেট করতে দয়া করে Credential Management (ক্রেডেনশিয়াল ব্যবস্থাপনা) মেনুটি নির্বাচন করুন।

Step-3:
Description: Please tap on Set PIN. PIN নম্বর সেট করতে দয়া করে Set PIN মেনুটি নির্বাচন করুন।
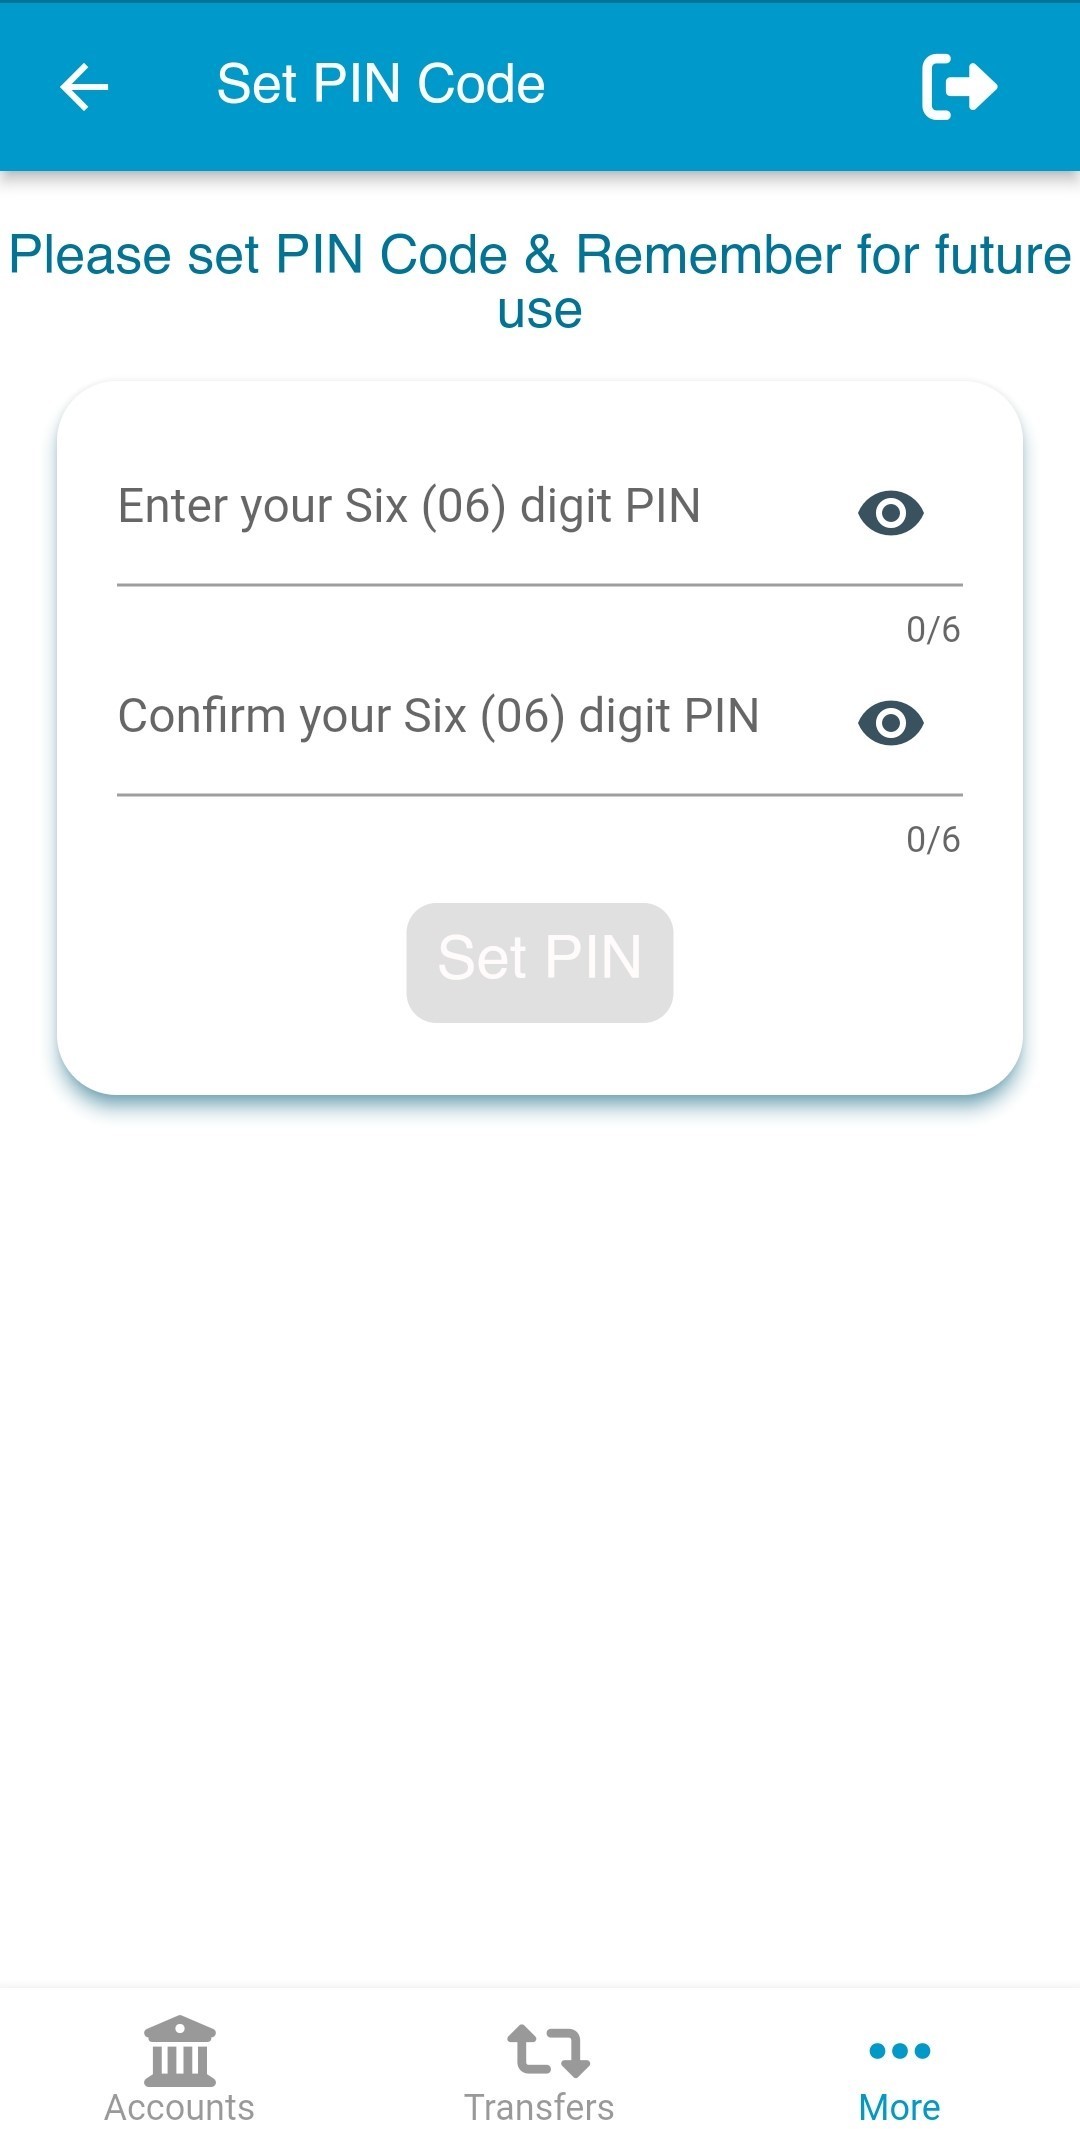
Step-4:
Description: PIN should be 6 digits long numeric number. ৬ সংখ্যা বিশিষ্ট PIN নম্বরটি লিখুন। ৬ সংখ্যা বিশিষ্ট PIN নম্বরটি আবার লিখুন।
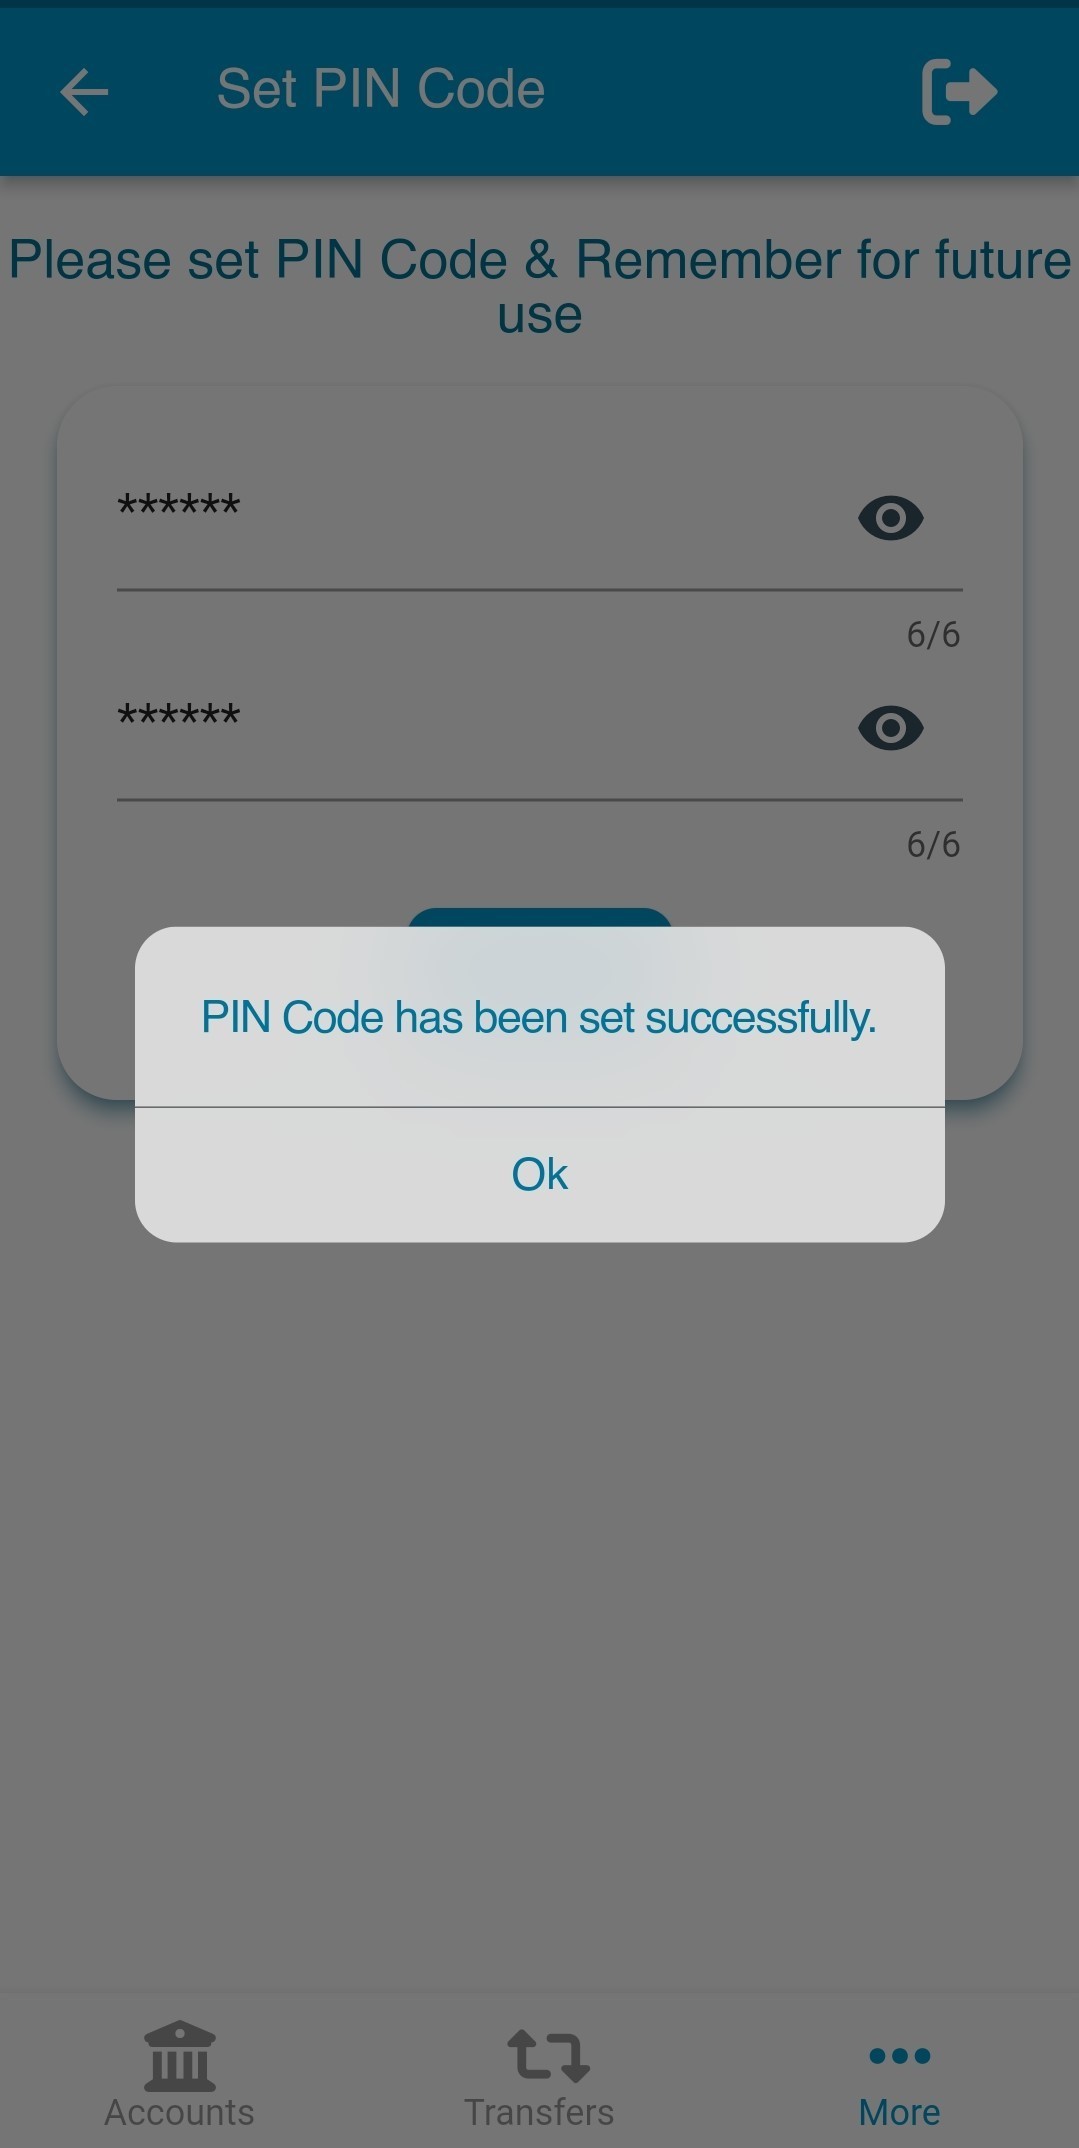
Step-5:
Description: If PIN set is successful, user will see a success message on screen. PIN নম্বর সেট করা সফল হলে একটি সফলতা বার্তা দেখতে পাবেন।
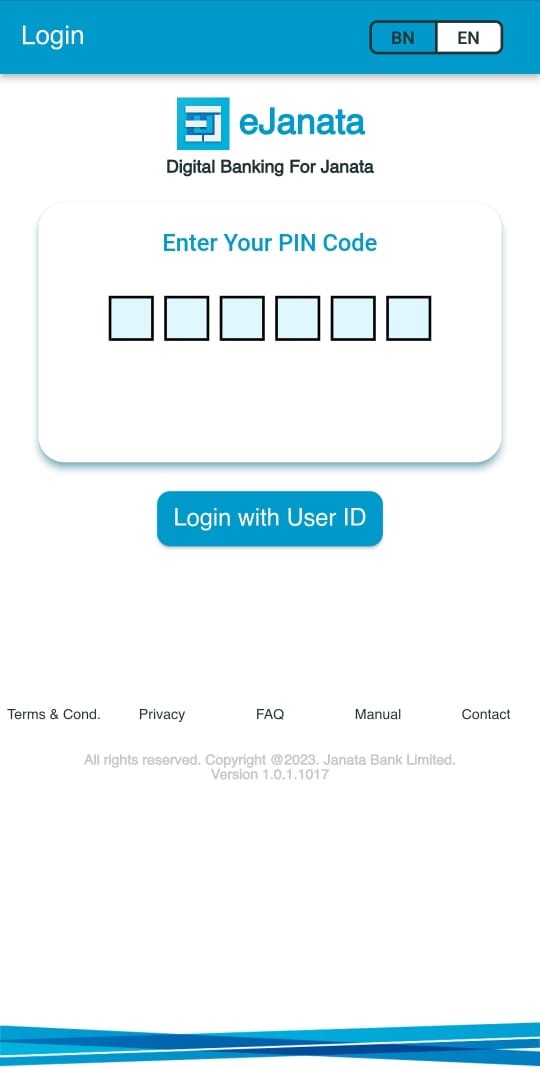
Step-6:
Description: After PIN set, user can login the app by using 6 digits PIN. PIN নম্বর সেট করার পর দ্রুত ও সহজে লগইন করার জন্য পাসওয়ার্ডের পরিবর্তে শুধুমাত্র PIN নম্বর ব্যবহার করতে পারবেন।
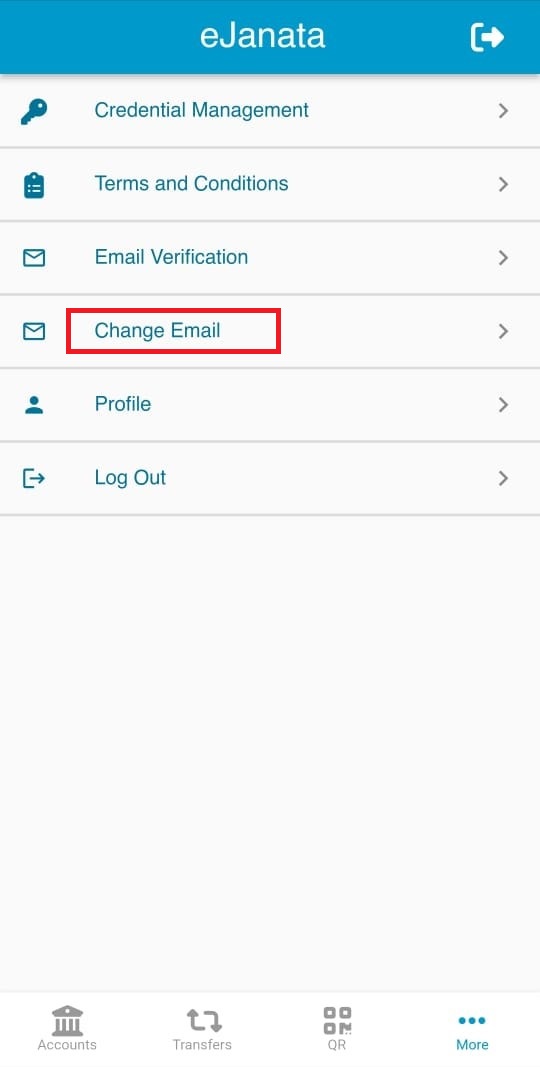
Step-1:
Description: Please tap on More to see Change Email menu. ইমেইল পরিবর্তন করতে দয়া করে নিচের মেনু থেকে More/অন্যান্য এ চাপুন।
Step-2:
Description: From the menu please select Change Email. ইমেইল পরিবর্তন করতে দয়া করে Change Email মেনুটি নির্বাচন করুন।
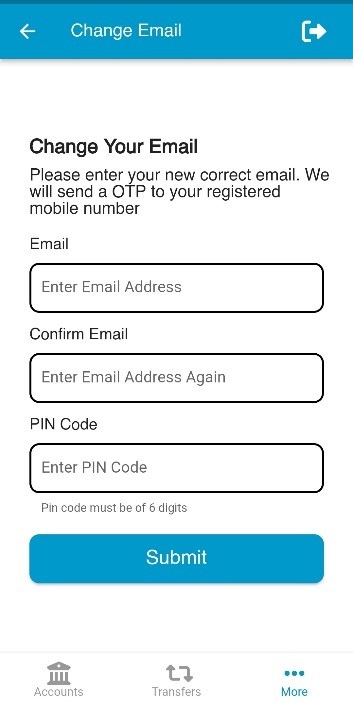
Step-3:
Description: Please enter Email field with change email address, Confirm Email field with the same change email address and before submitting the form, please enter PIN Code. ইমেইল পরিবর্তন করতে Email (ইমেইল) বক্স-এ আপনার পরিবর্তিত নতুন ইমেইলটি প্রবেশ করান। Confirm Email (নিশ্চিতকরণ ইমেইল) বক্সে আপনার পরিবর্তিত নতুন ইমেইলটি আবার প্রবেশ করান। আপনার PIN নম্বর দিন এবং উপরের সকল তথ্য সঠিক হলে Submit (সাবমিট) চাপুন।
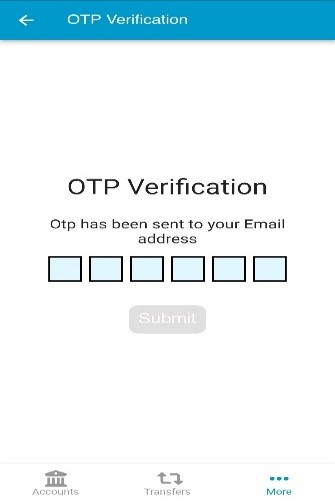
Step-4:
Description: User will get OTP through SMS. ব্যবহারকারী OTP সম্বলিত একটি SMS পাবেন।
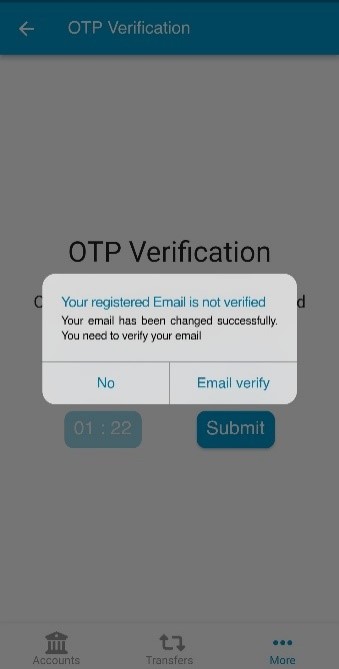
Step-5:
Description: After submitting the valid OTP, user will see a success message on screen. The new email address is now need to be verified. প্রবেশ করানো OTP সঠিক হলে একটি সফলতা বার্তা দেখতে পাবেন। নতুন ইমেইলটি ব্যবহারের পূর্বে ভেরিফাই করতে হবে।
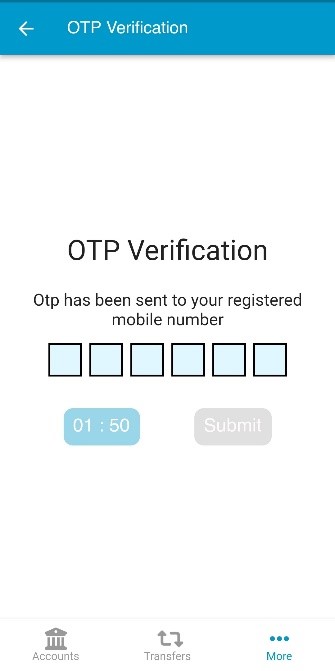
Step-6:
Description: Please input the six digit OTP which is already sent to user's new email address. দয়া করে আপনার নতুন ইমেইলে পাঠানো ৬ সংখ্যা বিশিষ্ট OTP টি প্রবেশ করান।
Step-7:
Description: If OTP is matched successfully, user will see a success message for email verification. প্রবেশ করানো OTP সঠিক হলে একটি সফলতা বার্তা দেখতে পাবেন।

Step-1:
Description: Please tap on More to get Change Password menu. পাসওয়ার্ড পরিবর্তন করতে দয়া করে নিচের মেনু থেকে More/অন্যান্য এ চাপুন।
Step-2:
Description: From the menu please select Credential Management. পাসওয়ার্ড পরিবর্তন করতে দয়া করে Credential Management (ক্রেডেনশিয়াল ব্যবস্থাপনা) মেনুটি নির্বাচন করুন।
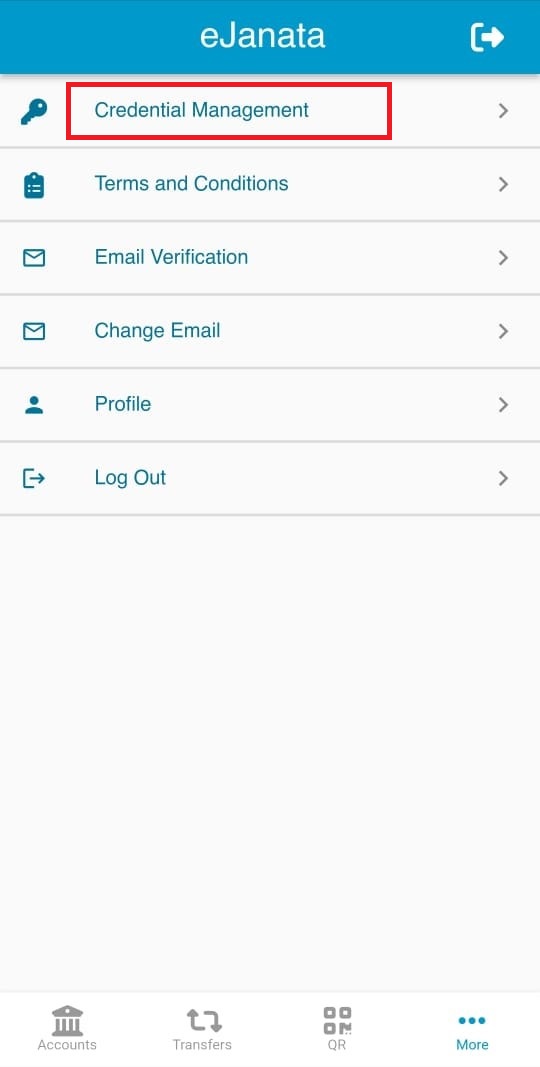
Step-3:
Description: Please tap on Change Password. পাসওয়ার্ড পরিবর্তন করতে দয়া করে Change Password মেনুটি নির্বাচন করুন।
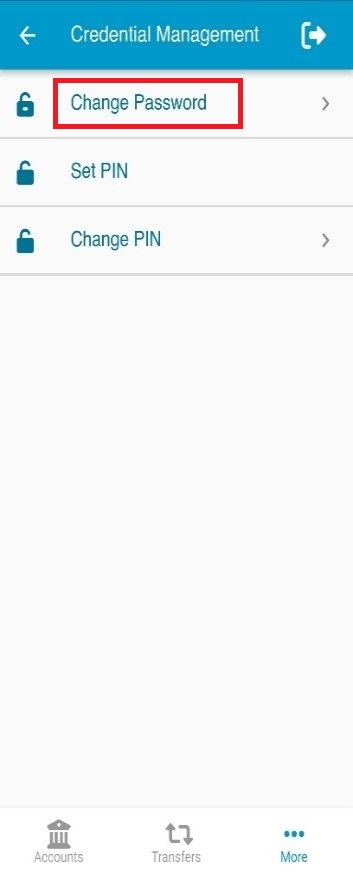
Step-4:
Description: Please enter old password, new password, confirm new password and then tap on Change Password button. New Password must be atleast eight digit long, must contain an upper alphabetic character, a number and a special character. পাসওয়ার্ড পরিবর্তন করতে দয়া করে আপনার পূর্বের পাসওয়ার্ডটি প্রবেশ করান। আপনার নতুন পাসওয়ার্ডটি লিখুন। নতুন পাসওয়ার্ডটি কমপক্ষে ৮ অক্ষরের হতে হবে, পাসওয়ার্ড এ অবশ্যই একটি সংখ্যা, একটি বড় হাতের অক্ষর এবং একটি বিশেষ অক্ষর (যেমন *@$#%^ ইত্যাদি) ব্যবহার করতে হবে। আপনার নতুন পাসওয়ার্ডটি আবার লিখুন। সকল তথ্য সঠিক হলে Change Password (পাসওয়ার্ড পরিবর্তন করুন) এ চাপুন।
Step-5:
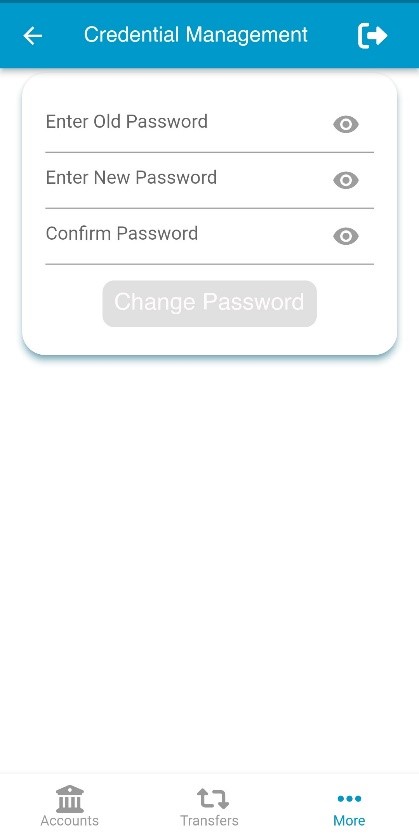
Description: If password change is successful, user will see a success message on screen. পাসওয়ার্ড পরিবর্তন সফল হলে একটি সফলতা বার্তা দেখতে পাবেন।
Step-1:
Description: Please tap on More to get Change PIN menu. PIN নম্বর পরিবর্তন করতে দয়া করে নিচের মেনু থেকে More/অন্যান্য এ চাপুন।
Step-2:
Description: From the menu please select Credential Management. PIN নম্বর পরিবর্তন করতে দয়া করে Credential Management (ক্রেডেনশিয়াল ব্যবস্থাপনা) মেনুটি নির্বাচন করুন।
Step-3:
Description: Please tap on Change PIN. PIN নম্বর পরিবর্তন করতে দয়া করে Change PIN মেনুটি নির্বাচন করুন।

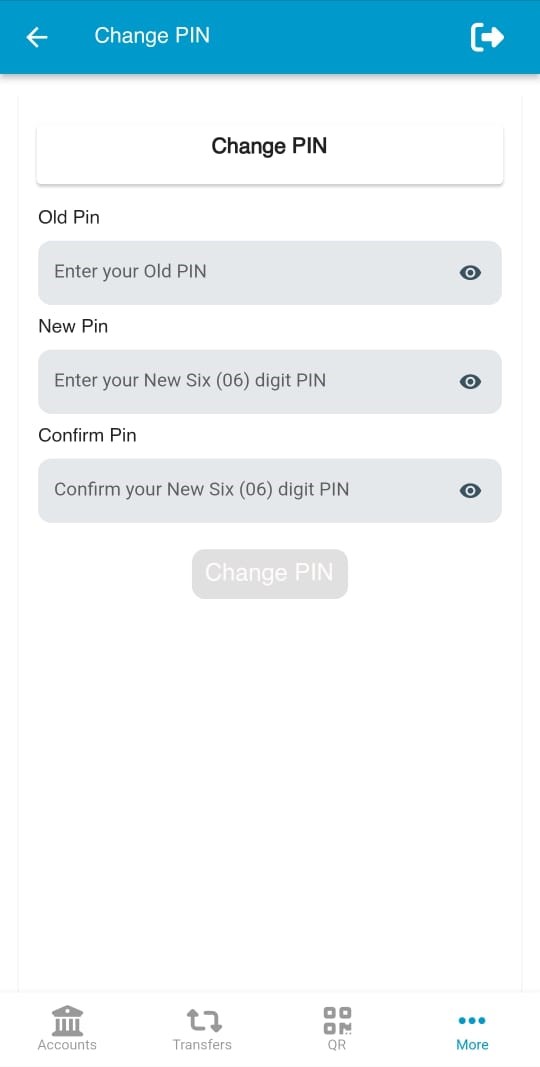
Step-4:
Description: Please enter six digits old PIN, new PIN, confirm new PIN and then tap on Change PIN button. New PIN must be six-digit numeric number. PIN নম্বর পরিবর্তন করতে দয়া করে আপনার পূর্বের PIN নম্বরটি প্রবেশ করান। আপনার নতুন PIN নম্বরটি লিখুন। নতুন PIN নম্বরটি অবশ্যই ৬ সংখ্যা বিশিষ্ট হতে হবে। আপনার নতুন PIN নম্বরটি আবার লিখুন। সকল তথ্য সঠিক হলে Change PIN (পিন পরিবর্তন) এ চাপুন।
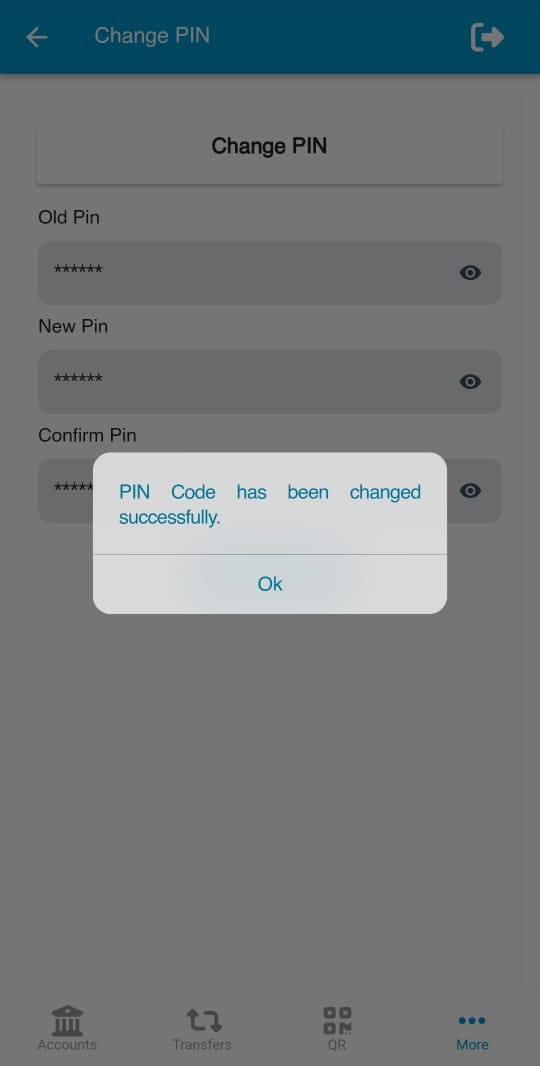
Step-5:
Description: If PIN change is successful, user will see a success message on screen. PIN নম্বর পরিবর্তন সফল হলে একটি সফলতা বার্তা দেখতে পাবেন।
10.1. User lock
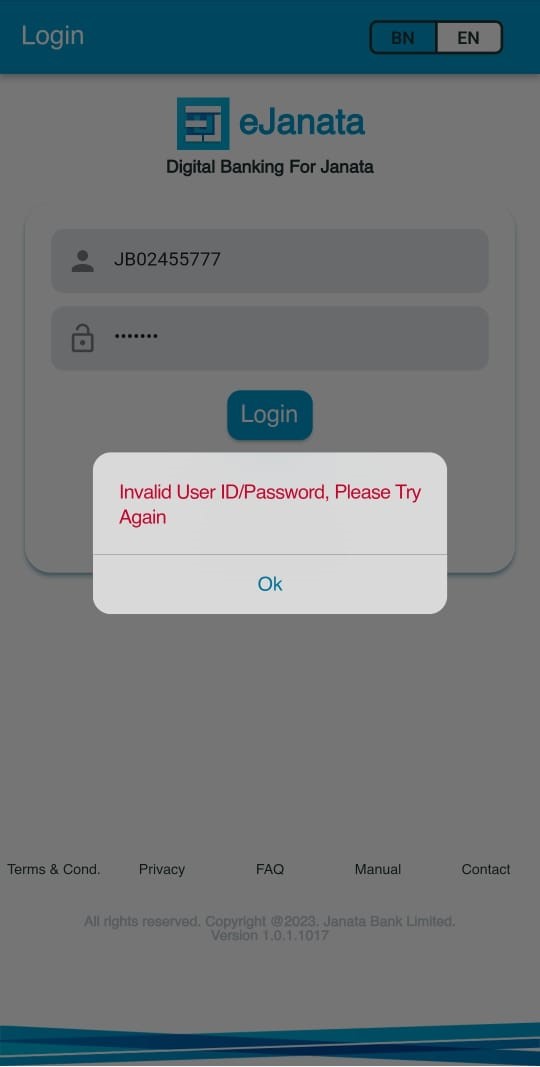
Description: After placing an invalid userid or password, user will see a warning message on screen. ব্যবহারকারী UserID অথবা পাসওয়ার্ড ভুল প্রবেশ করালে একটি সতর্কতা বার্তা দেখতে পাবেন।
Description: For three consecutive wrong try, user account will be locked. পরপর তিনবার ভুল প্রচেষ্টা করলে একাউন্টটি লক হয়ে যাবে।

10.2. User unlock
To unlock eJanata app, please contact to our customer care or visit to our nearest branch. ইজনতা অ্যাপ ইউজার আনলক করতে আমাদের কাস্টমার কেয়ারে অথবা নিকটস্থ জনতা ব্যাংকের যেকোনো শাখায় যোগাযোগ করুন।
Step-1:
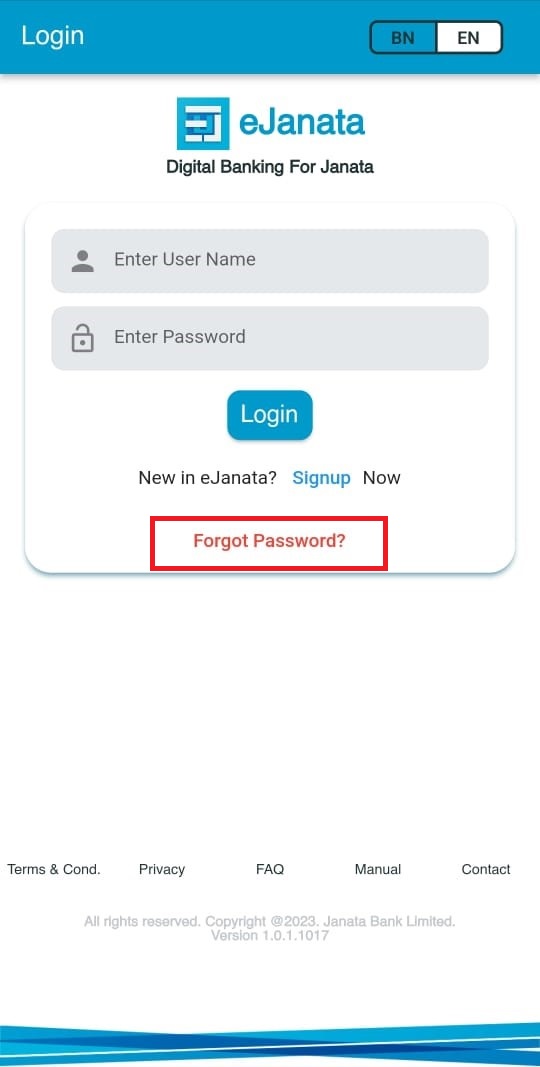
Description: If user forget User ID and/or Password, he/she can retrieve userid by tapping on Forgot Password? ইজনতা অ্যাপের UserID অথবা পাসওয়ার্ড বা উভয় ভুলে গেলে Forgot Password? (পাসওয়ার্ড ভুলে গেছেন?) এ চাপুন।
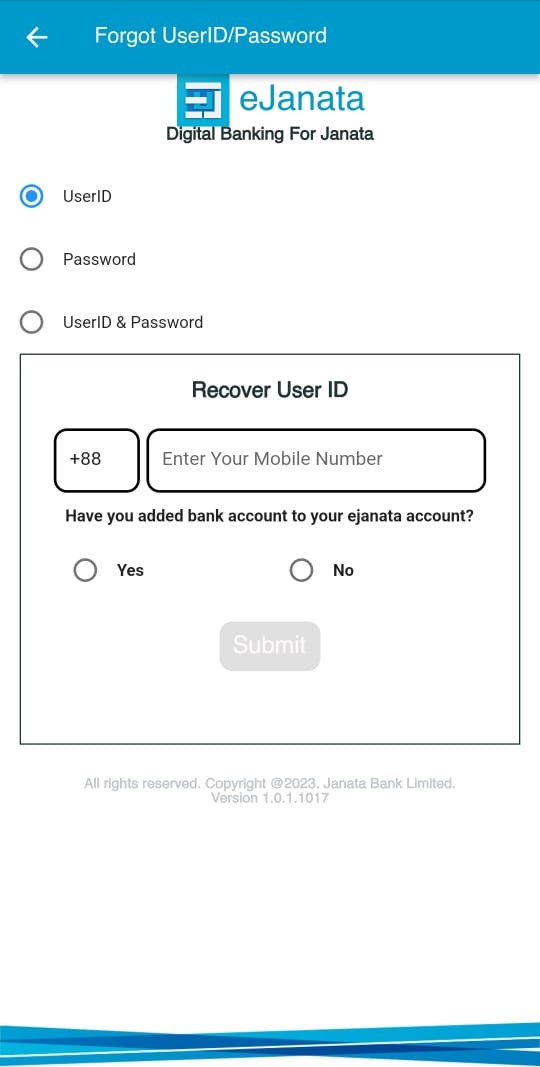
Step-2:
Description: Select UserID or Password or UserID & Password option (as required) and enter registered mobile number to retrieve User ID and/or Password. শুধু UserID (ইউসার আইডি) ভুলে গেলে এই অপশনটি নির্বাচন করুন। শুধু Password (পাসওয়ার্ড) ভুলে গেলে এই অপশনটি নির্বাচন করুন। উভয় UserID (ইউসার আইডি) এবং Password (পাসওয়ার্ড) ভুলে গেলে এই অপশনটি নির্বাচন করুন। নিবন্ধনকৃত মোবাইল নম্বরটি প্রবেশ করান ব্যাংক একাউন্ট এড করেছেন কি না তা নির্দিষ্ট করুন Submit (সাবমিট) চাপুন।
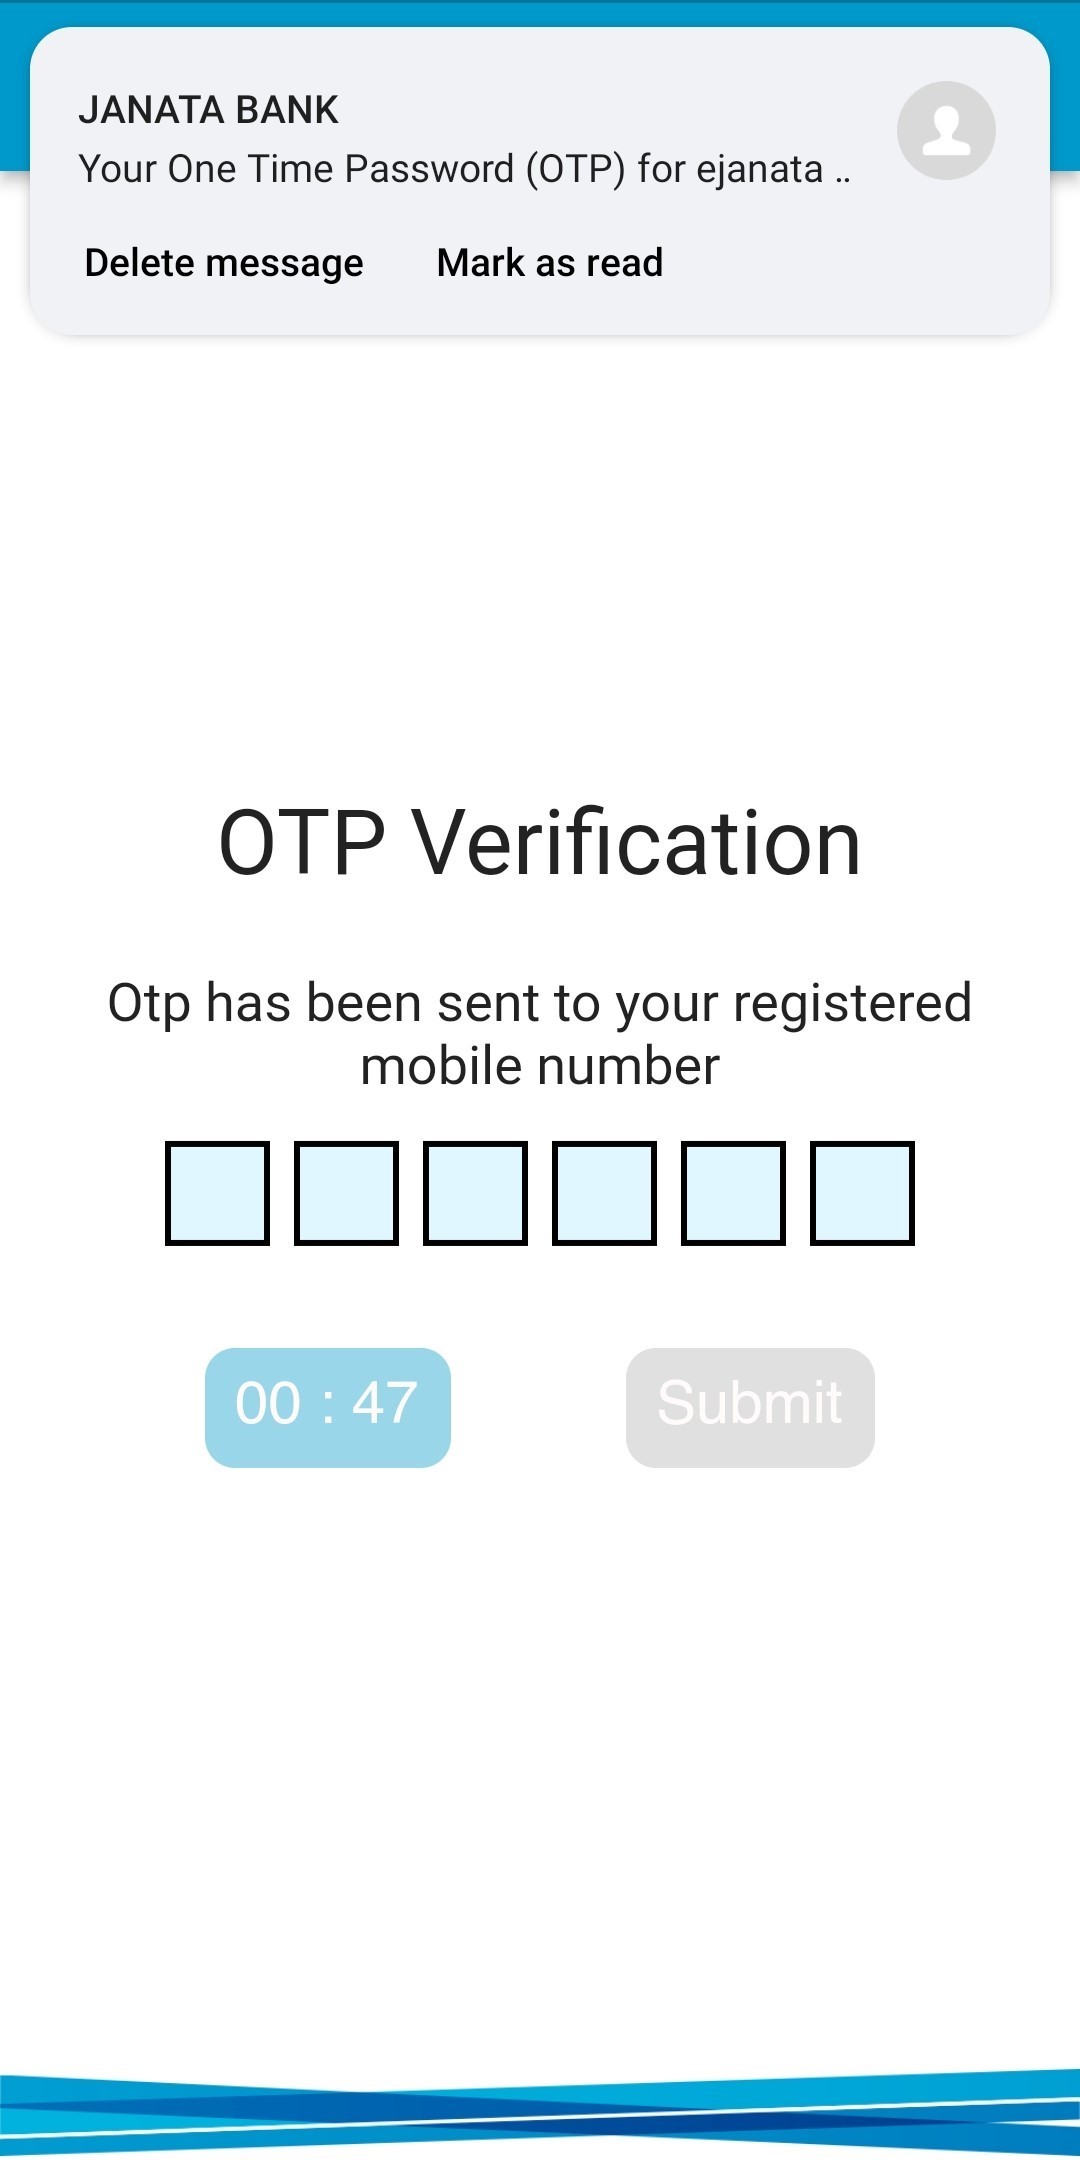
Step-3:
Description: User will get OTP through SMS. ব্যবহারকারী OTP সম্বলিত একটি SMS পাবেন।
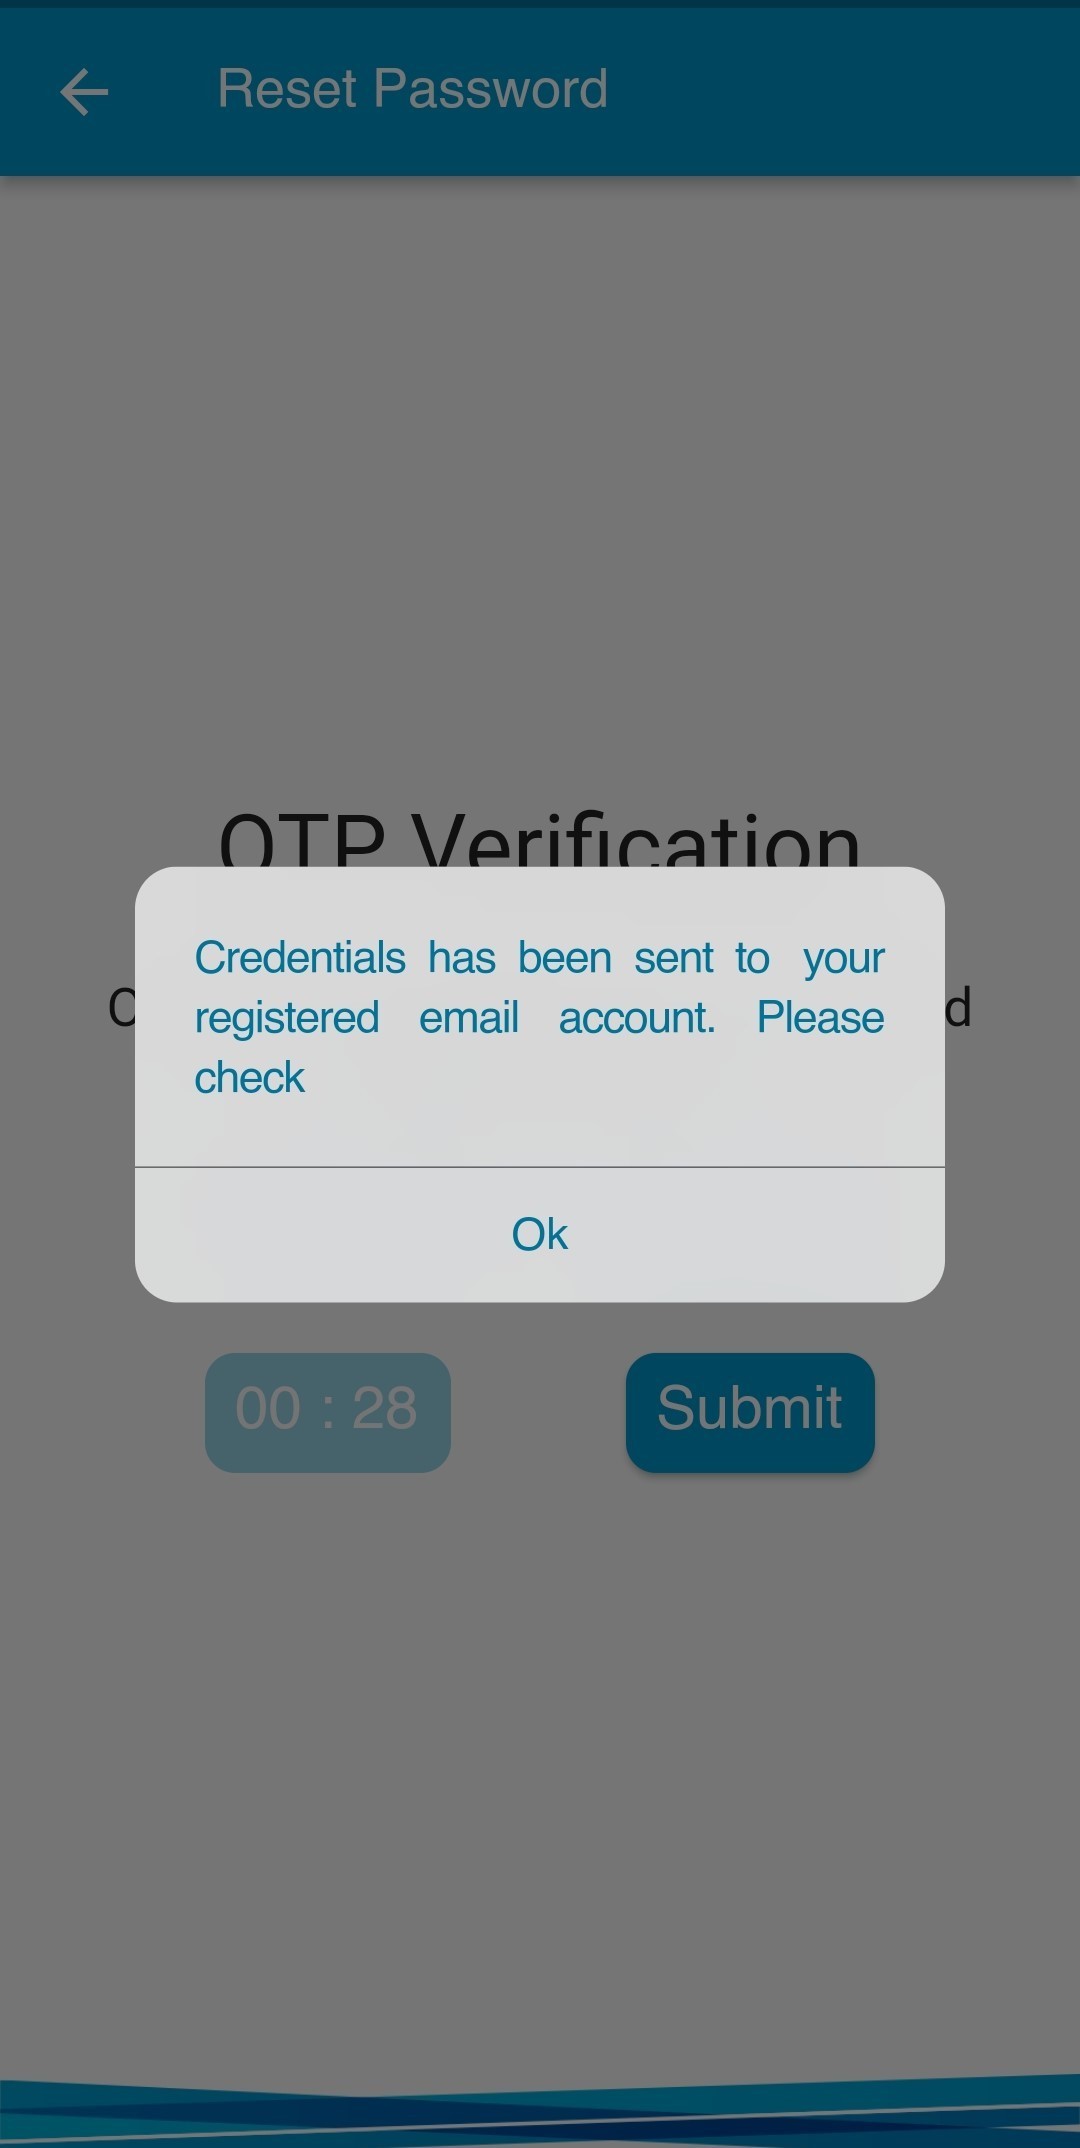
Step-4:
Description: After submitting valid OTP, credentials will send to user's registered email address. প্রবেশ করানো OTP সঠিক হলে, ব্যবহারকারীর নিবন্ধিত ইমেইলে UserID অথবা পাসওয়ার্ড বা উভয় (step-2 তে নির্বাচিত অপশন মোতাবেক) পাঠানো হবে।
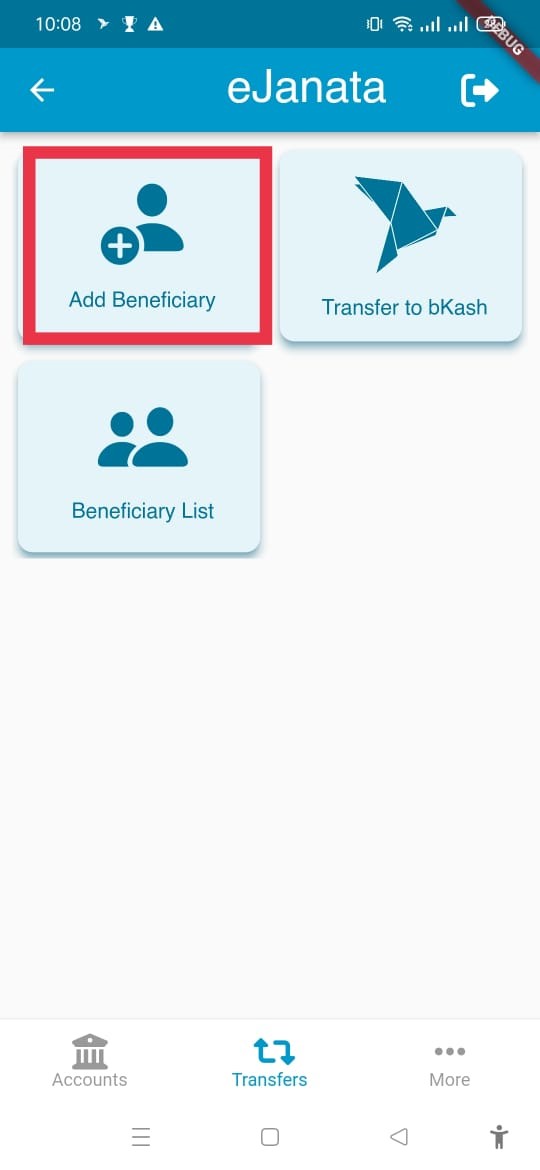
Add Beneficiary
Description: User can add own bank beneficiary and other bank beneficiary (by routing number or by selecting bank name). ব্যবহারকারী নিজ ব্যাংকের Beneficiary (প্রাপক) অথবা অন্য যেকোন ব্যাংকের Beneficiary (প্রাপক) যুক্ত করতে পারবেন (রাউটিং নম্বর ব্যবহার অথবা ব্যাংকের নাম নির্বাচন করে)। দ্রষ্টব্যঃ অন্য ব্যাংকের প্রাপক যুক্ত করার সময় কোন প্রকার ভুল ভ্রান্তি এড়ানোর জন্য অনুগ্রহ করে প্রাপকের একাউন্টের চেকবই এর তথ্য অনুসারে প্রাপকের একাউন্টের নাম, শাখার নাম অথবা রাউটিং নম্বর ইত্যাদি নির্বাচন করুন।

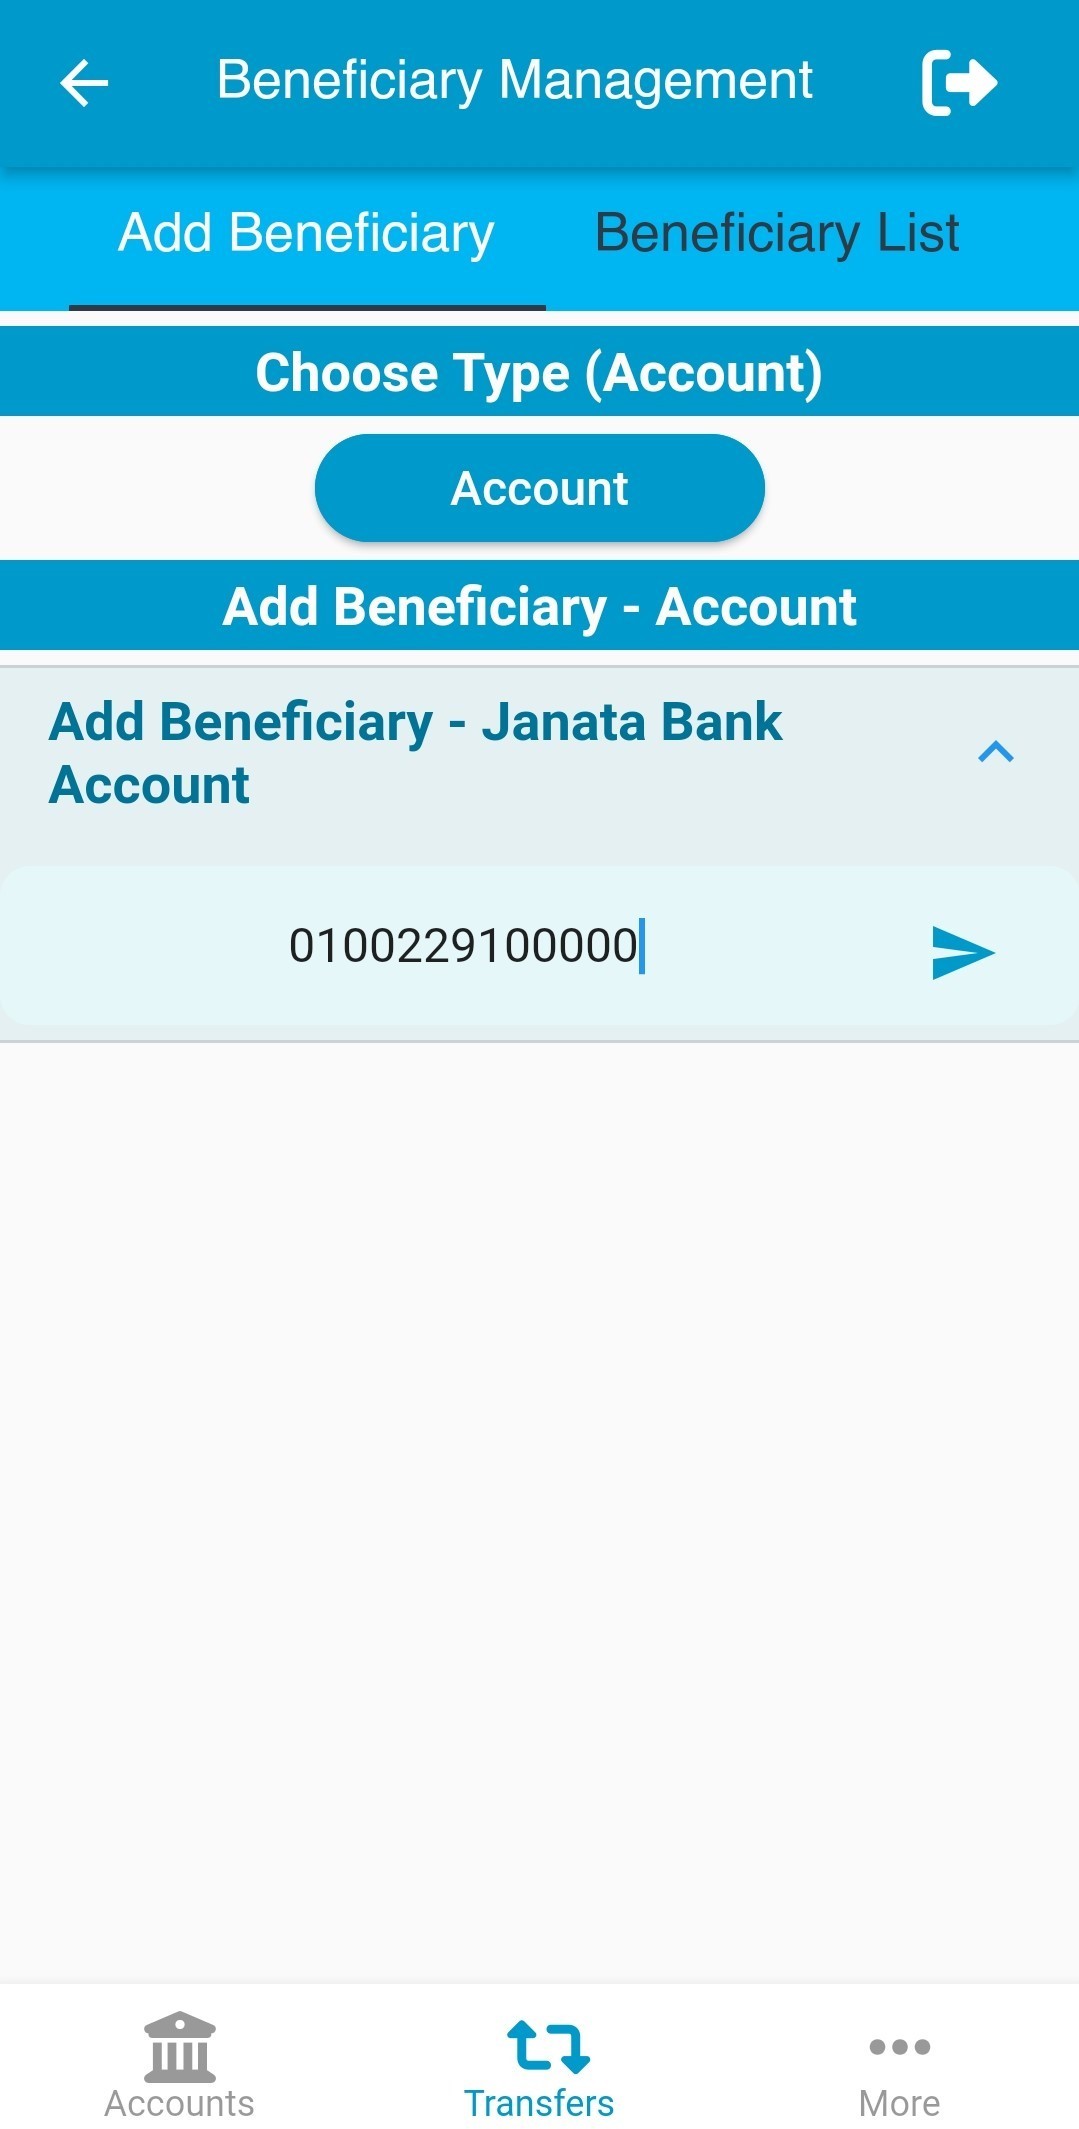
Step-1:
Description: Please insert the Janata bank beneficiary account number. Add Beneficiary – Janata Bank Account (প্রাপক যোগ করুন – জনতা ব্যাংক অ্যাকাউন্ট) মেন্যুটি চাপুন। দয়া করে আপনার জনতা ব্যাংকের প্রাপকের Online একাউন্ট নম্বরটি প্রবেশ করান।
Step-2:
Description: Account title will be filled up automatically if beneficiary account number is valid. আপনার জনতা ব্যাংকের প্রাপকের একাউন্ট নম্বরটি সঠিক হলে স্বয়ংক্রিয়ভাবে একাউন্টধারীর নাম দেখতে পাবেন।
Step-3:
Description: Please enter a nick name and tap on submit for adding the beneficiary. দয়া করে আপনার জনতা ব্যাংকের প্রাপক একাউন্টির জন্য একটি উপনাম দিন এবং Submit (সাবমিট) চাপুন।

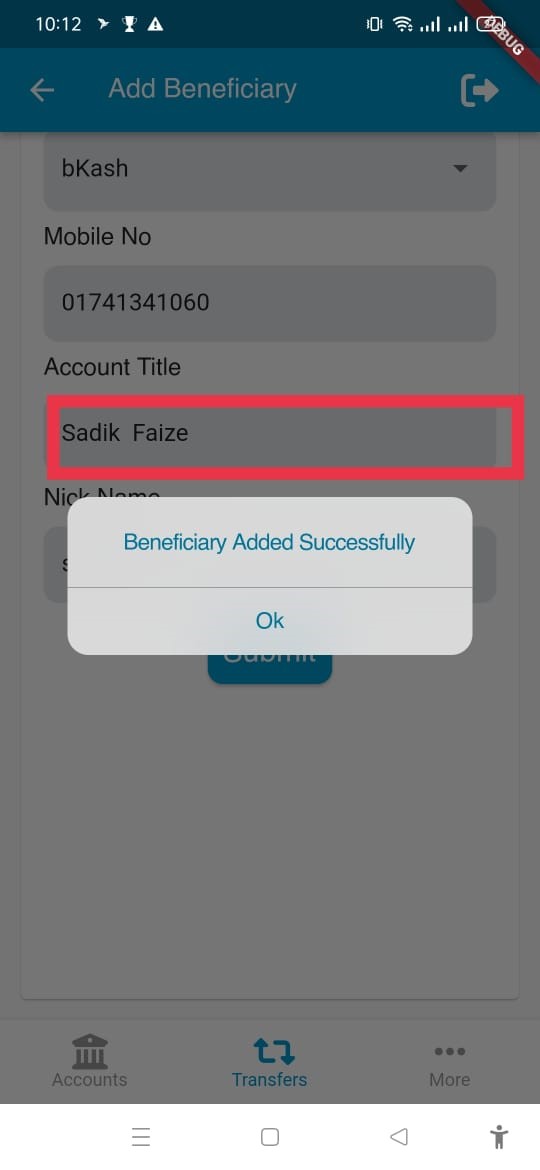
Step-4:
Description: If the beneficiary is added successfully, user will see a success message on screen. সফলভাবে প্রাপক যুক্ত হলে একটি সফলতা বার্তা দেখতে পাবেন।
Step-1:
Description: User can add other bank beneficiary by entering other bank branch routing number. রাউটিং নম্বর ব্যবহার করে ব্যবহারকারী অন্য যেকোন ব্যাংকের প্রাপক যুক্ত করতে চাইলেঃ ১। Add Beneficiary by Routing Number (রাউটিং নম্বর ব্যবহার করে প্রাপক যোগ করুন) মেন্যুটি চাপুন। ২। উক্ত প্রাপকের একাউন্টের শাখার রাউটিং নম্বরটি প্রবেশ করান।

Step-2:
Description: Branch details will appear on screen. User need to enter beneficiary account number, account title and nick name of beneficiary. Then tap on submit to save the beneficiary. রাউটিং নম্বর প্রবেশ করানোর পর শাখার তথ্য দেখা যাবে। তথ্য সঠিক হলেঃ Account Number (একাউন্ট নম্বর) ঘরে প্রাপকের একাউন্ট নম্বরটি লিখুন Account Title (একাউন্টের নাম) ঘরে প্রাপকের একাউন্টের নাম লিখুন Nick Name (উপনাম) ঘরে একাউন্টের জন্য একটি উপনাম দিয়ে Submit (সাবমিট) চাপুন।
Step-3:
Description: If the beneficiary is added successfully, user will see a success message on screen. সফলভাবে প্রাপক যুক্ত হলে একটি সফলতা বার্তা দেখতে পাবেন।
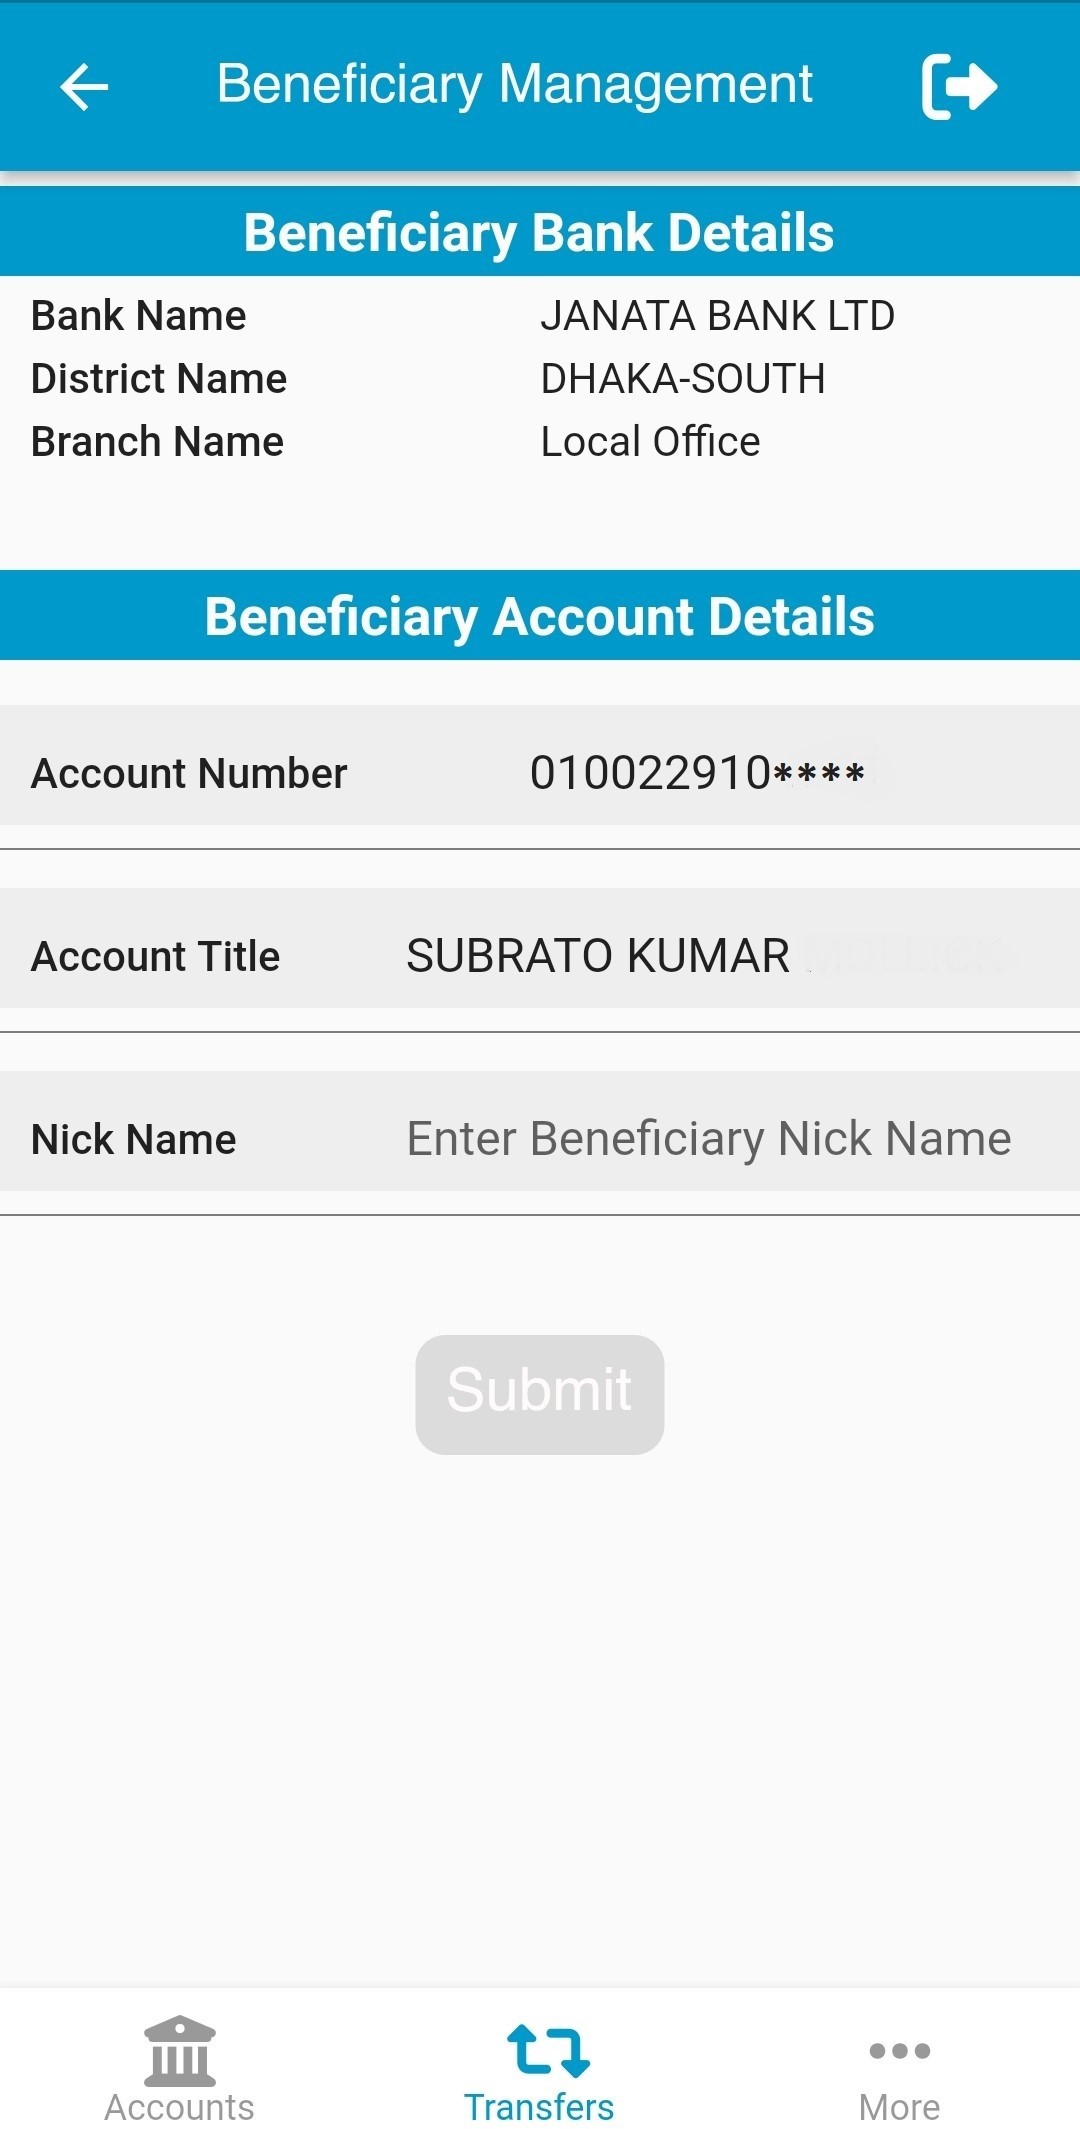
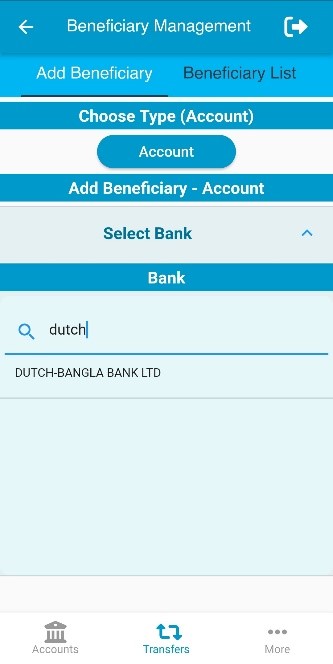
Step-1:
Description: Please select bank from bank list or by searching bank name. রাউটিং নম্বর জানা না থাকলেও ব্যাংকের তালিকা থেকে খুঁজে অন্য যেকোন ব্যাংকের প্রাপক যুক্ত করতে পারবেন। Select Bank (ব্যাংক নির্বাচন) মেন্যুটি চাপুন। প্রাপকের ব্যাংকের নাম তালিকা থেকে নির্বাচন করুন অথবা ব্যাংকের নাম লিখে সার্চ করুন।
Step-2:
Description: Please select district from district list or by searching district name. প্রাপকের ব্যাংকের শাখার জেলার নাম তালিকা থেকে নির্বাচন করুন অথবা জেলার নাম লিখে সার্চ করুন।

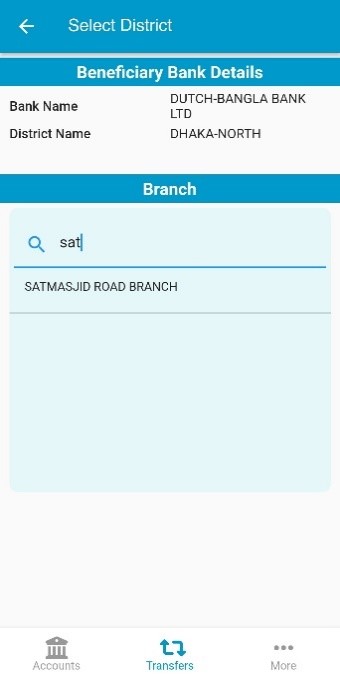
Step-3:
Description: Please select branch from branch list or by searching branch name. প্রাপকের ব্যাংকের শাখার নাম তালিকা থেকে নির্বাচন করুন অথবা শাখার নাম লিখে সার্চ করুন।
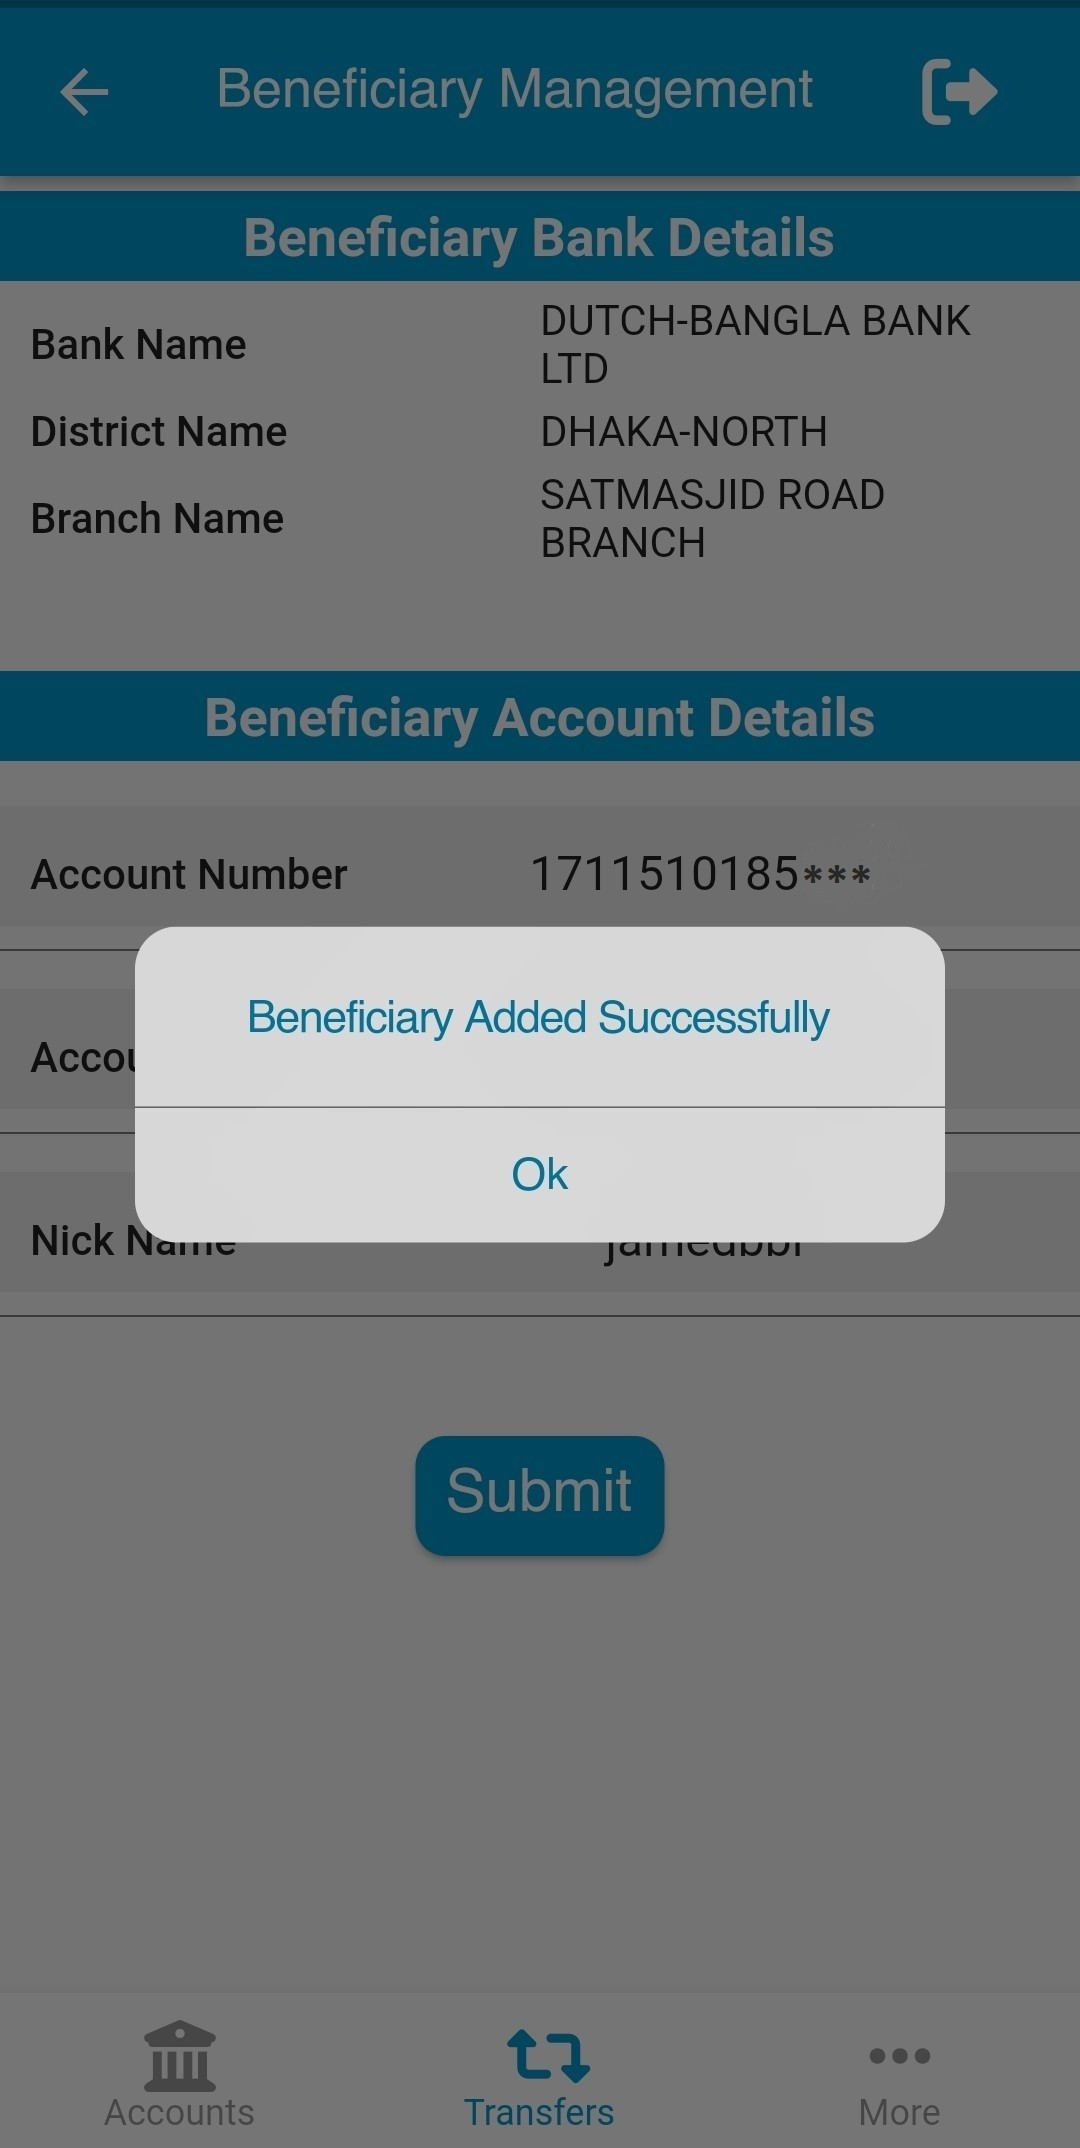
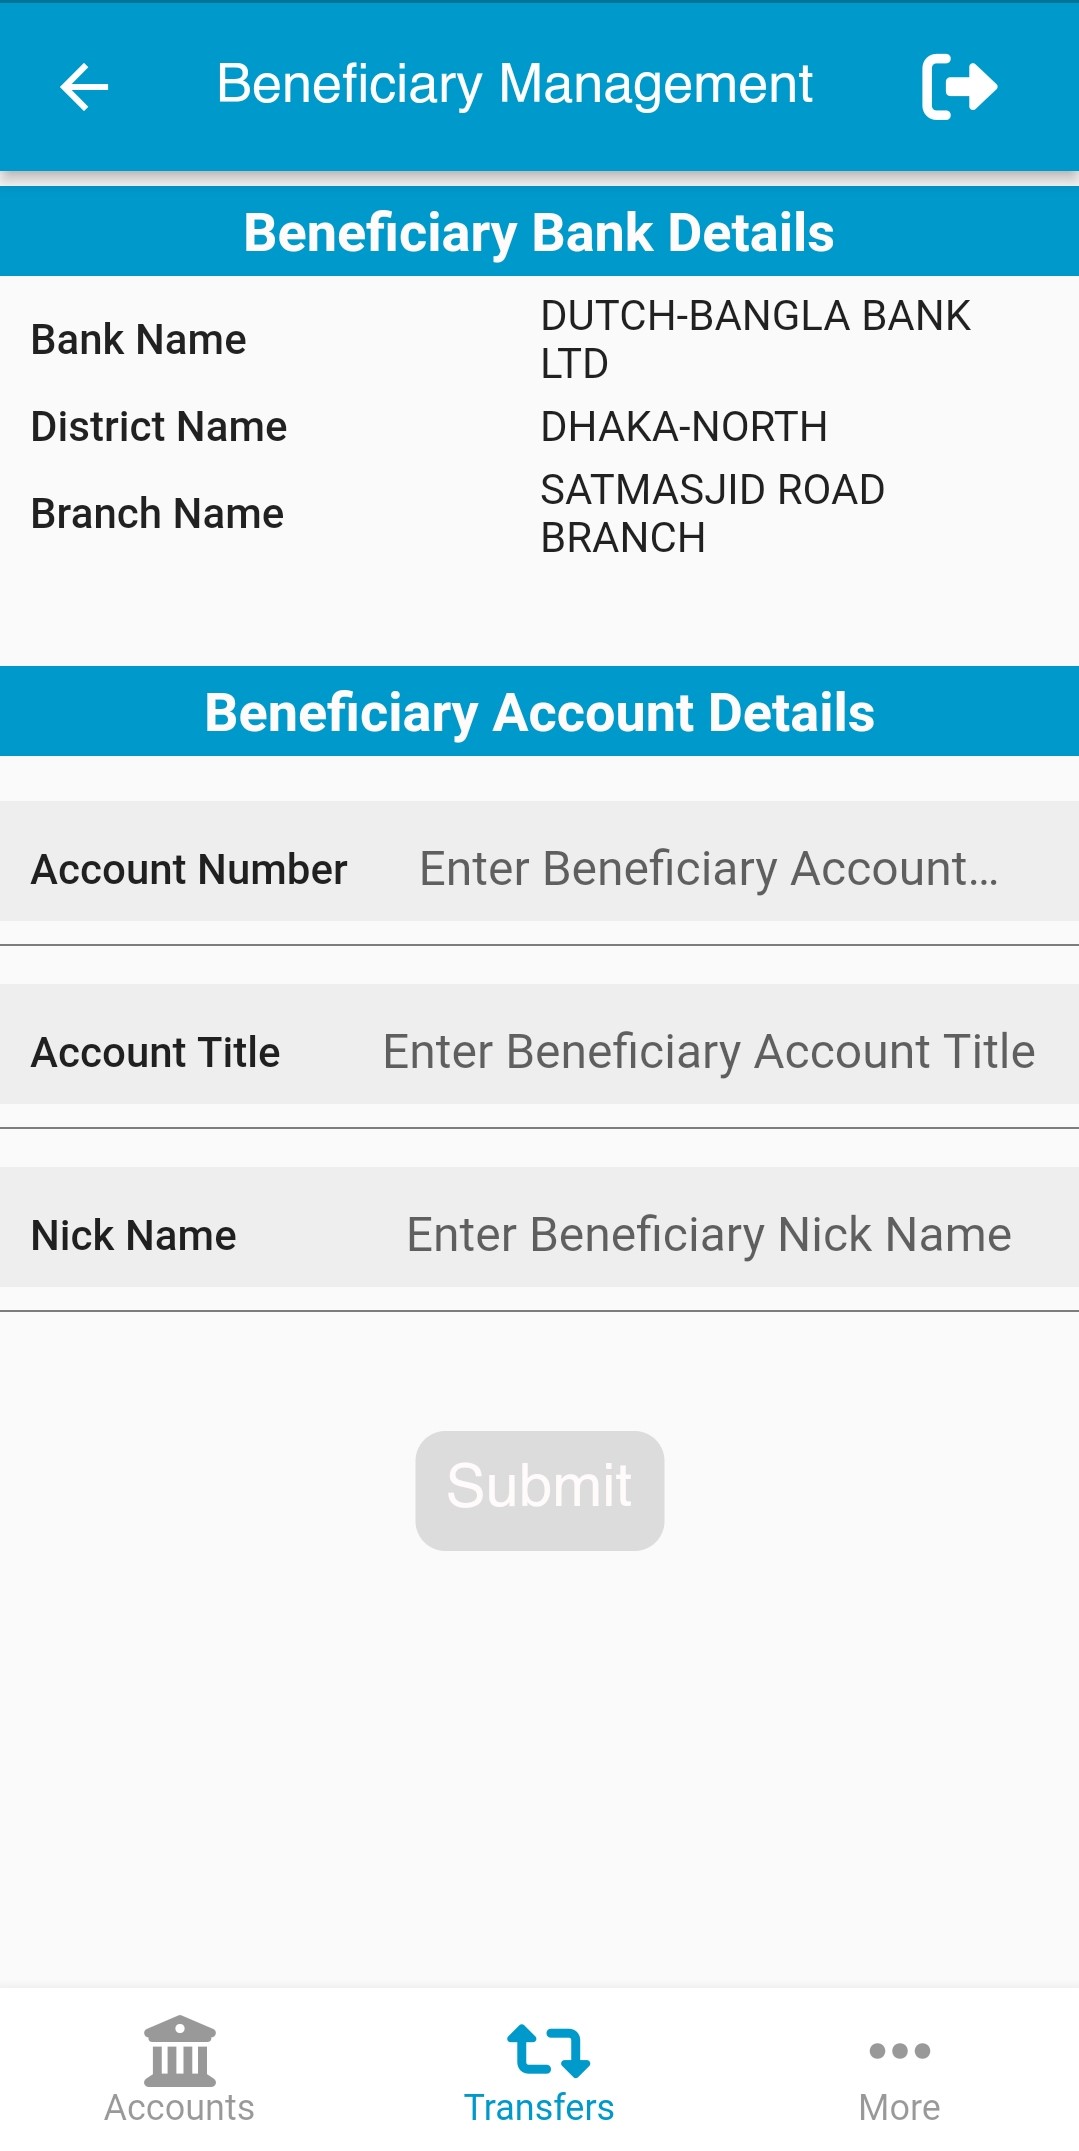
Step-4:
Description: Branch details will appear on screen. User need to enter beneficiary account number, account title and nick name of beneficiary. Then tap on submit to save the beneficiary. স্ক্রিনে শাখার তথ্য দেখা যাবে। শাখার তথ্য সঠিক হলেঃ Account Number (একাউন্ট নম্বর) ঘরে প্রাপকের একাউন্ট নম্বরটি লিখুন Account Title (একাউন্টের নাম) ঘরে প্রাপকের একাউন্টের নাম লিখুন Nick Name (উপনাম) ঘরে একাউন্টের জন্য একটি উপনাম দিয়ে Submit (সাবমিট) চাপুন।
Step-5:
Description: If the beneficiary is added successfully, user will see a success message on screen. সফলভাবে প্রাপক যুক্ত হলে একটি সফলতা বার্তা দেখতে পাবেন।

Description: User can find all the beneficiary list, including own bank and other bank, in the Beneficiary List tab. Beneficiary List (প্রাপক তালিকা) ট্যাব হতে আপনার সকল প্রাপকের (নিজ অথবা অন্য ব্যাংকের) তথ্য দেখতে পাবেন।
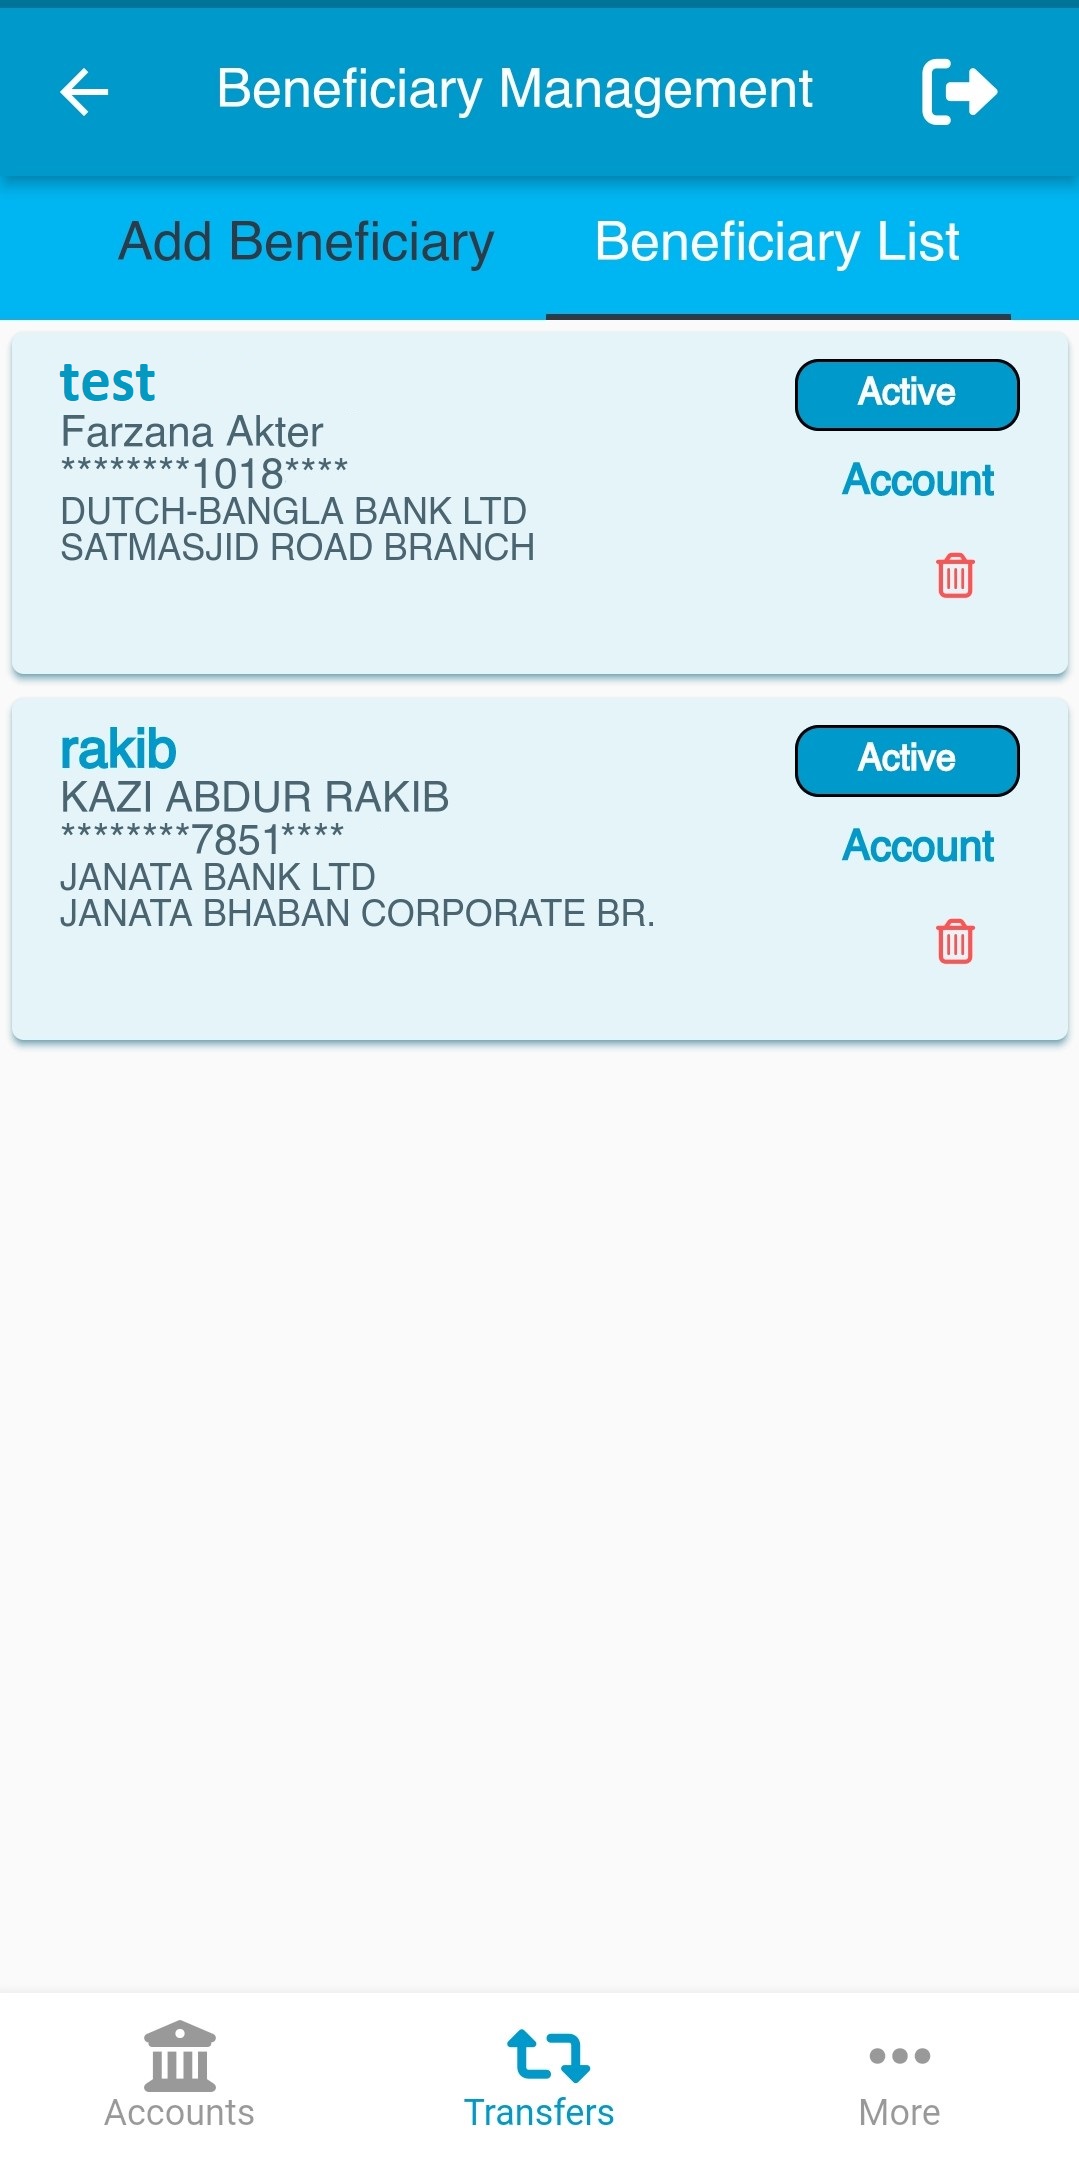
Description: User can only active or inactive any beneficiary (beneficiary cannot be deleted). ব্যবহারকারী Beneficiary List (প্রাপক তালিকা) ট্যাব হতে যেকোন প্রাপককে (নিজ অথবা অন্য ব্যাংকের) Active (সক্রিয়) অথবা Inactive (নিষ্ক্রিয়) করতে পারবনে (কোন প্রাপকের তথ্য মুছে ফেলা/ডিলিট করা যাবেনা)।
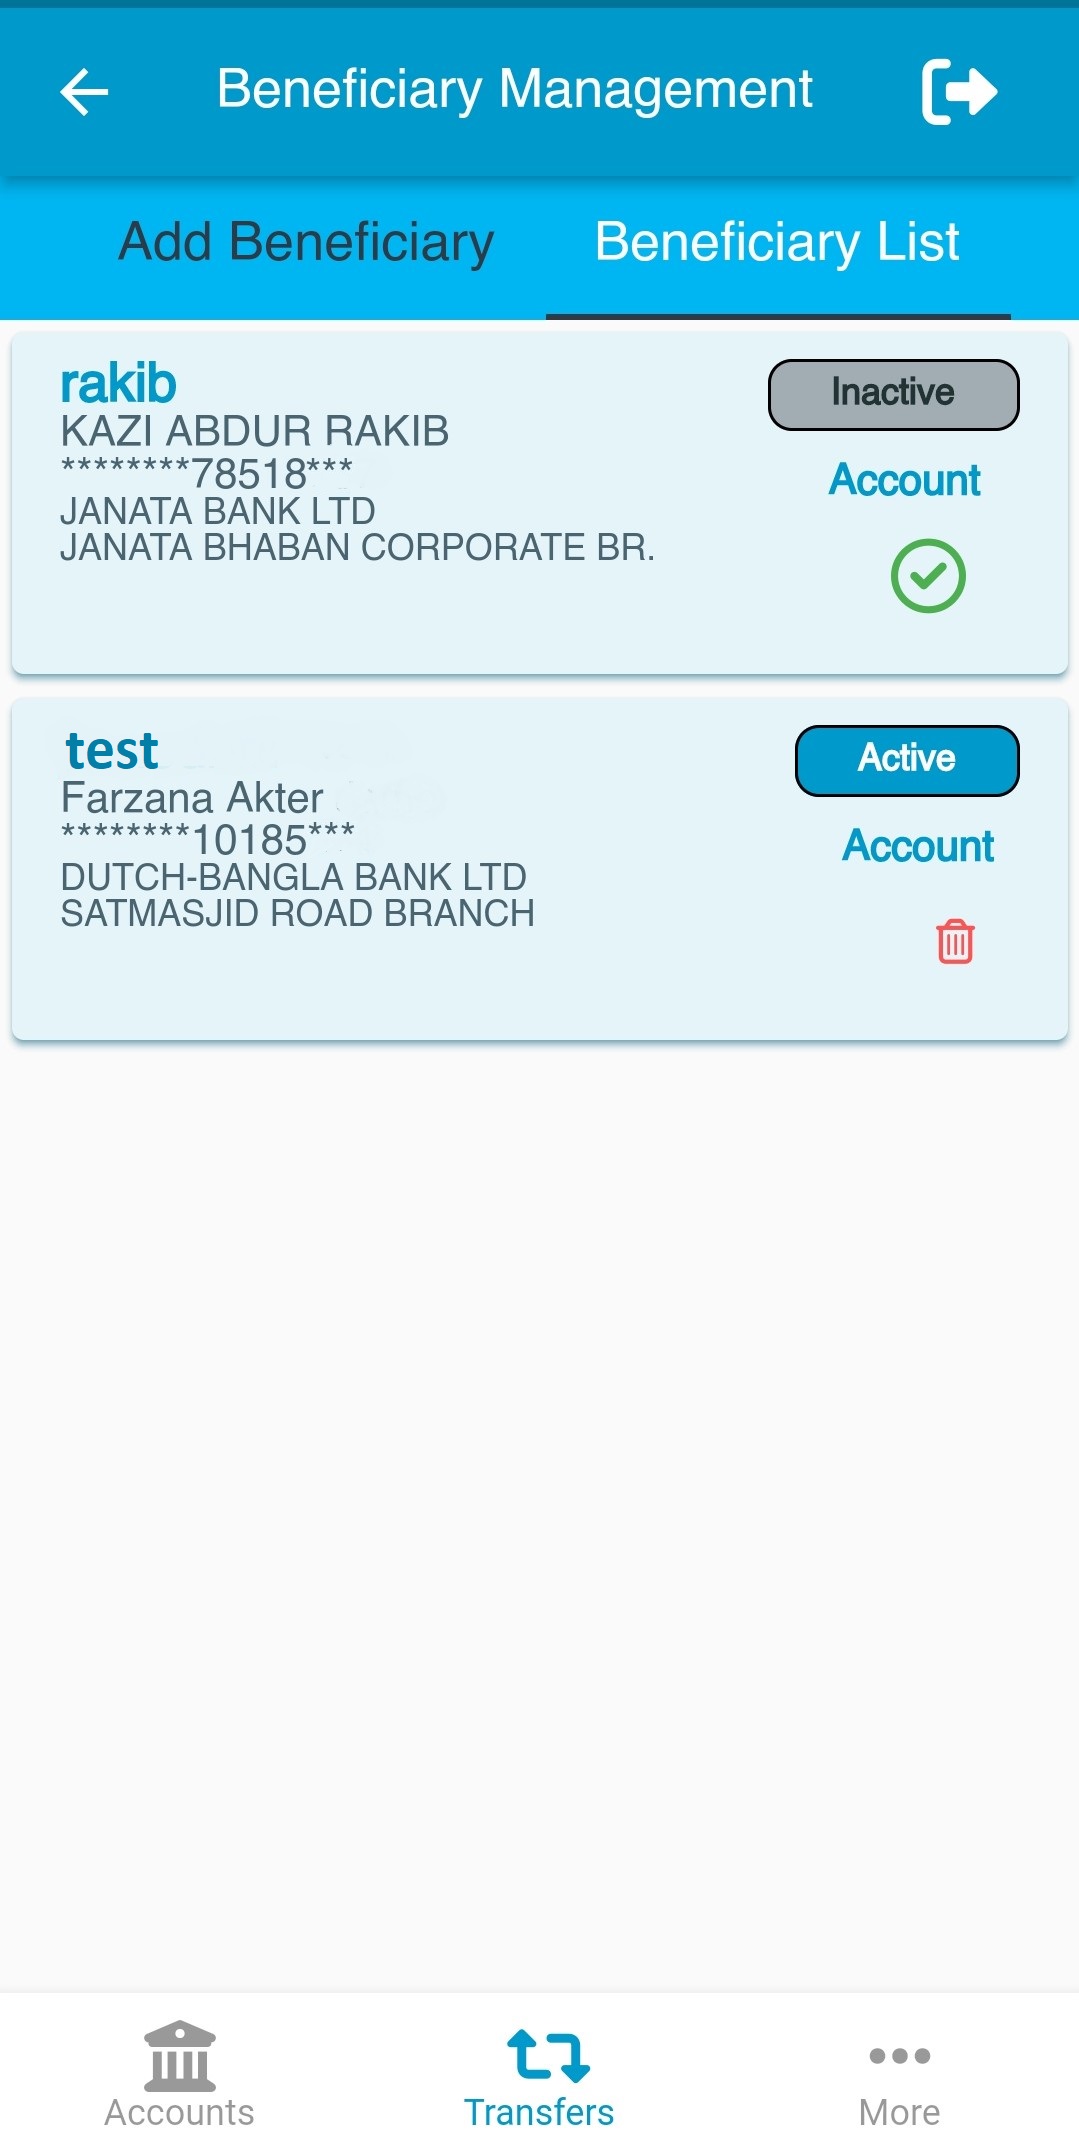
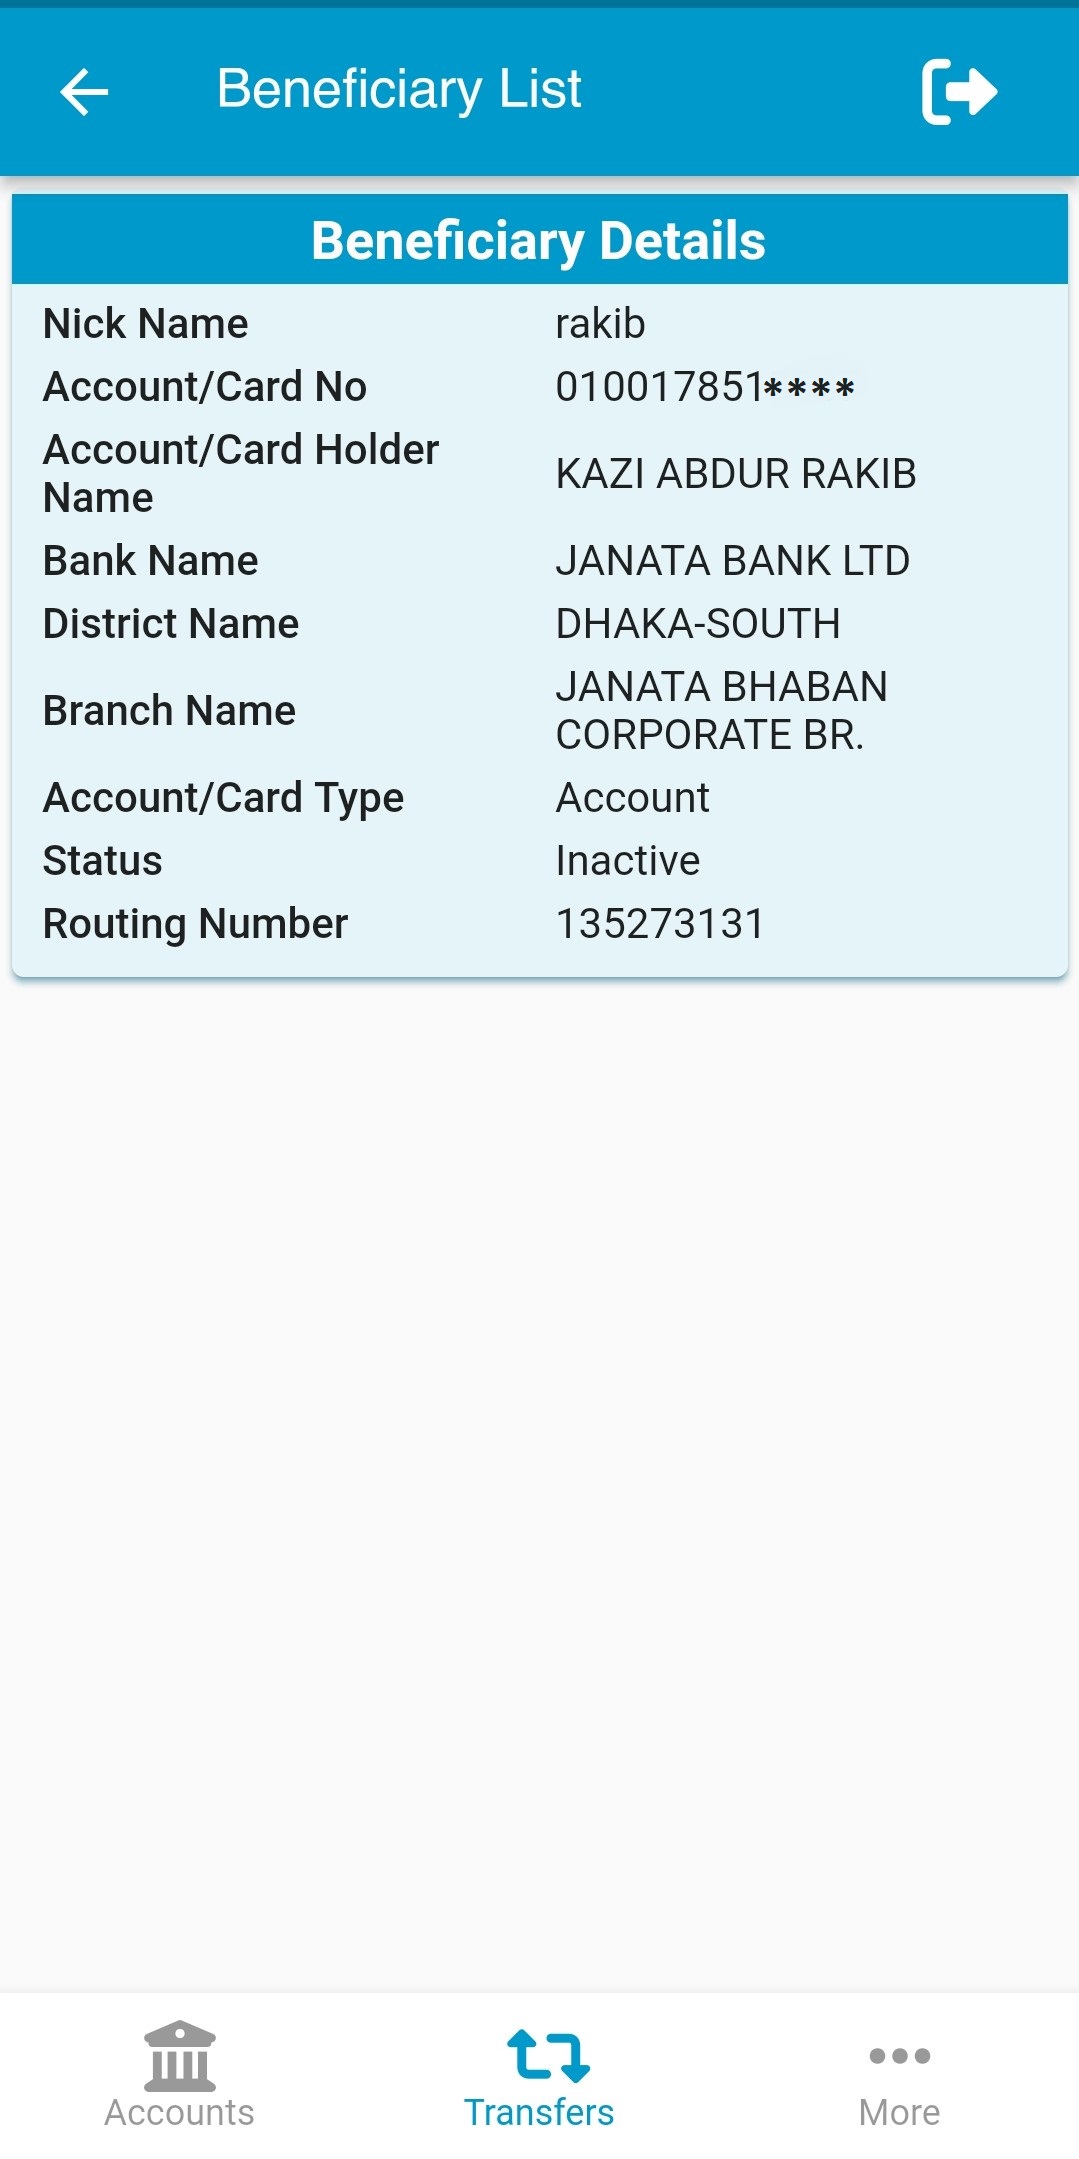
Description: User can see the details of any beneficiary by tapping on the beneficiary name. ব্যবহারকারী Beneficiary List (প্রাপক তালিকা) ট্যাব হতে যেকোন প্রাপকের নামের উপর স্পর্শ করলে সেই প্রাপকের বিস্তারিত দেখতে পারবেন।
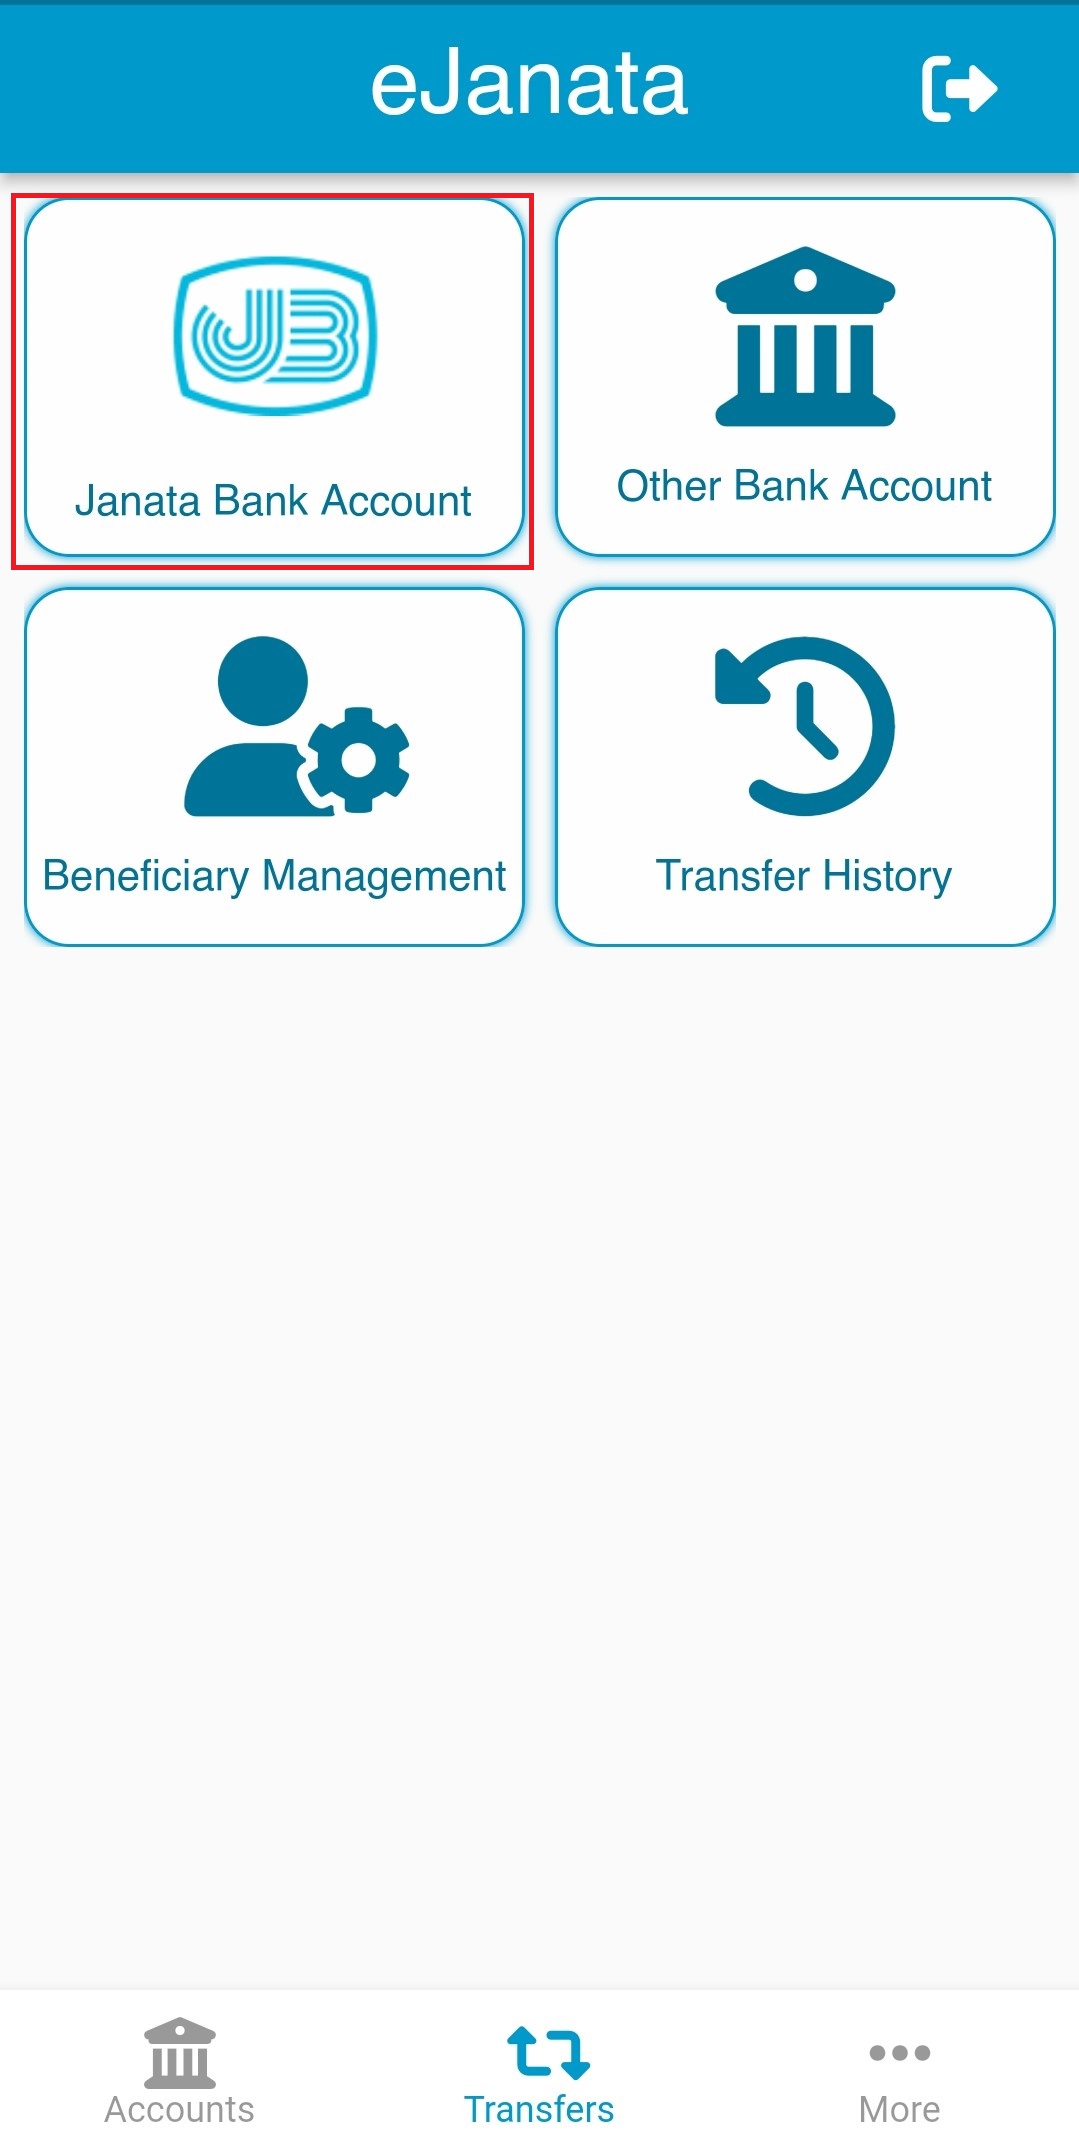
Step-1:
Description: Please tap on Janata Bank Account section for fund transfer to any Janata Bank Account. জনতা ব্যাংকের একাউন্টে টাকা পাঠানোর জন্য Janata Bank Account (জনতা ব্যাংক অ্যাকাউন্ট) অংশটি নির্বাচন করুন।
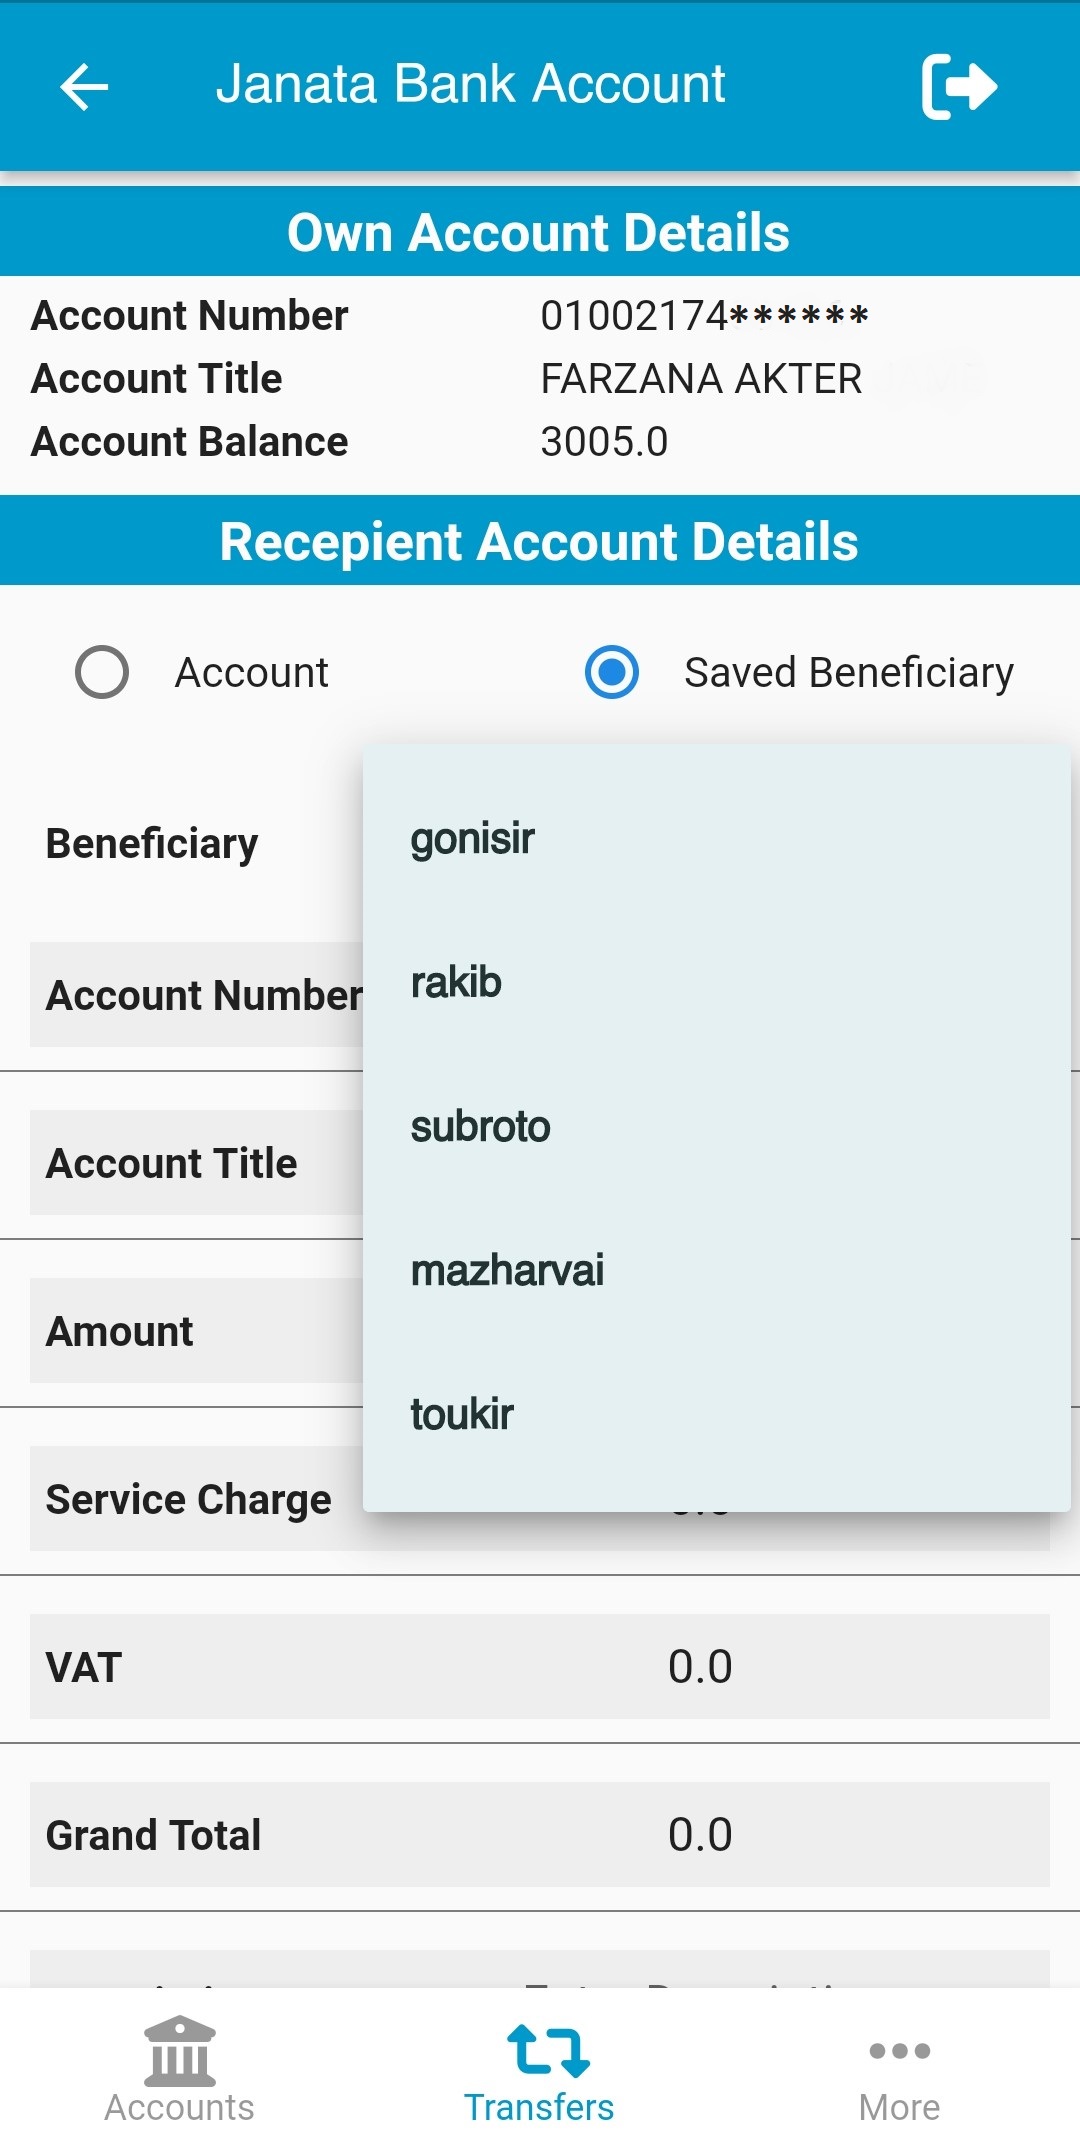
Step-2:
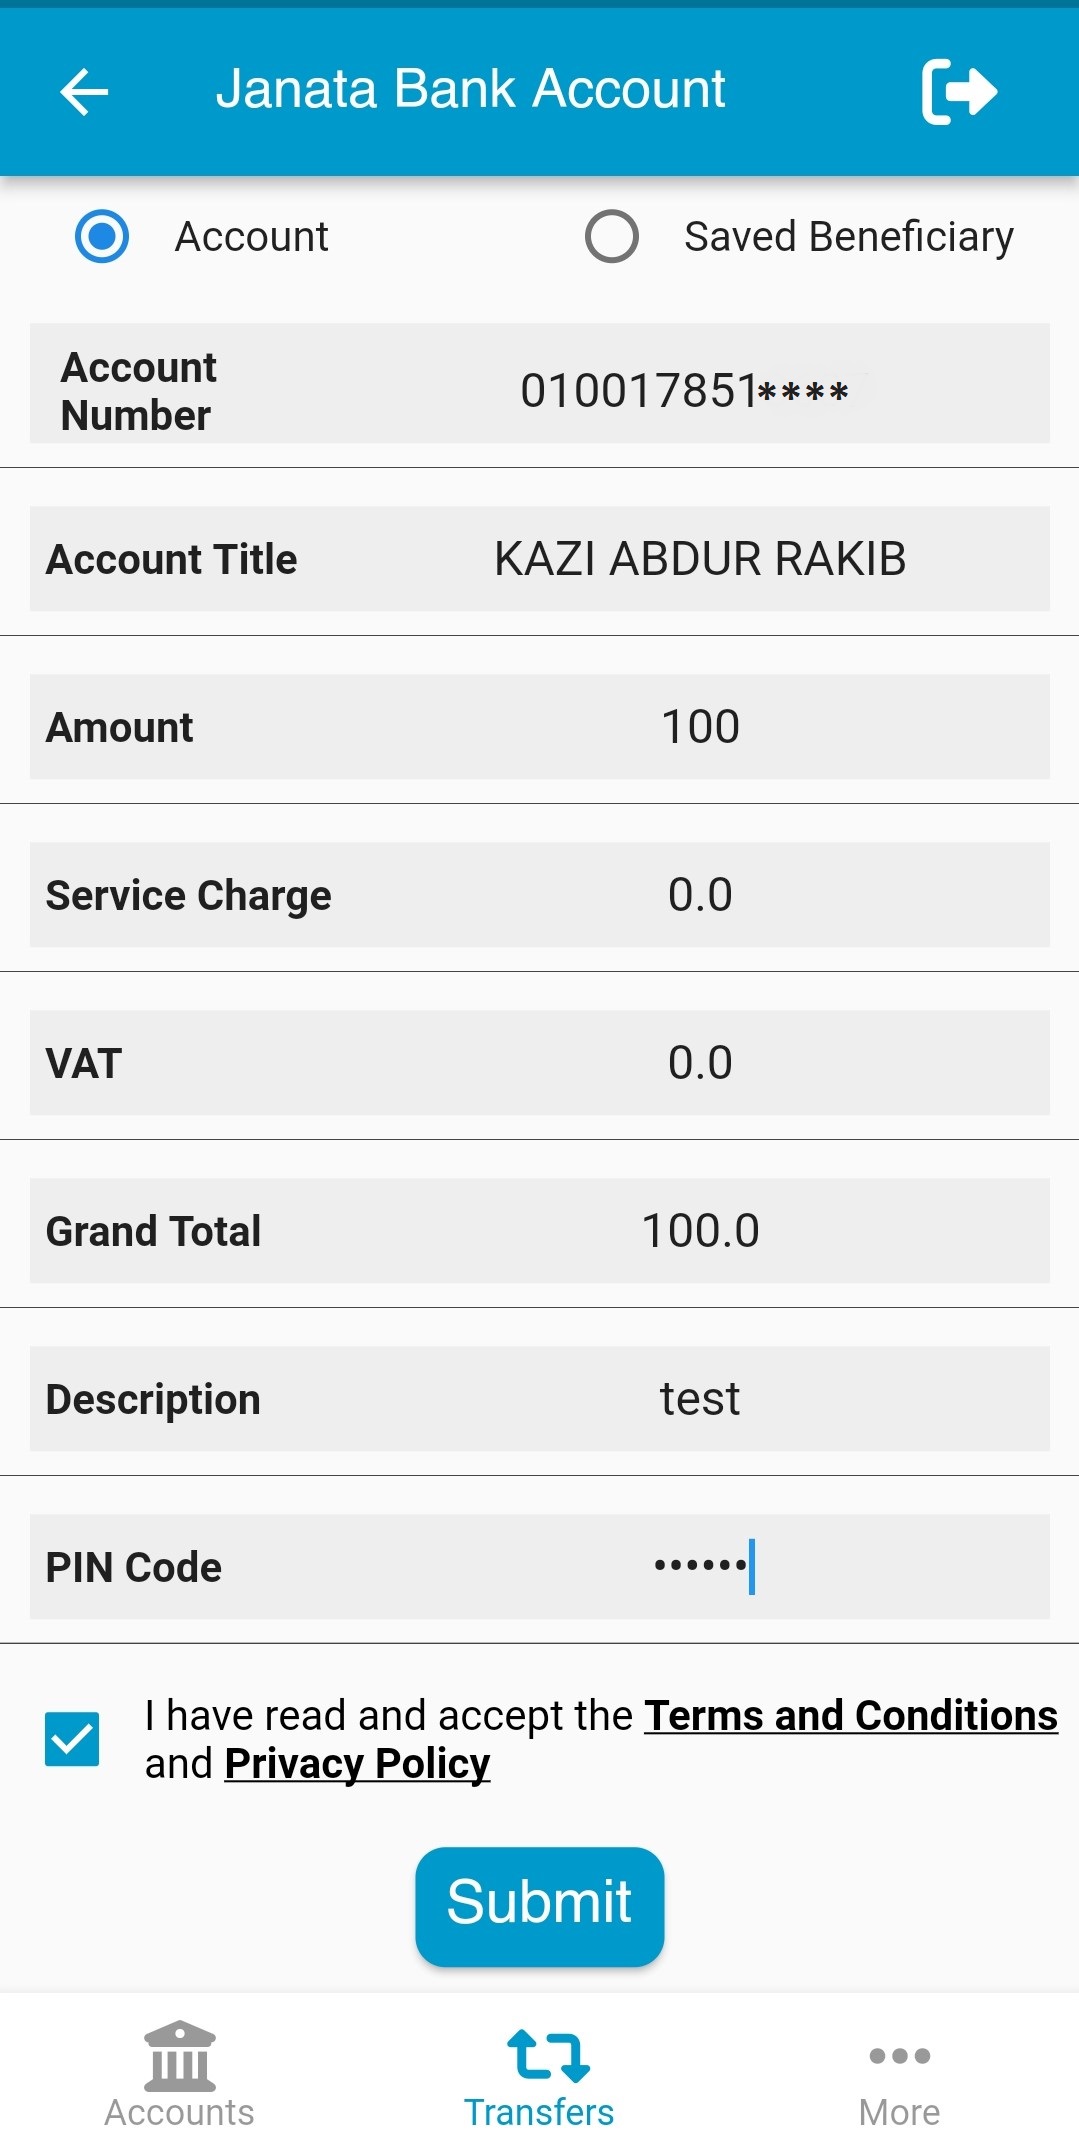
Description: Please choose Account or Saved Beneficiary option. Fund Transfer/টাকা পাঠানোর জন্য দয়া করে Account (অ্যাকাউন্ট) অথবা Saved Beneficiary (সংরক্ষিত গ্রাহক) যেকোন একটি নির্বাচন করুন।
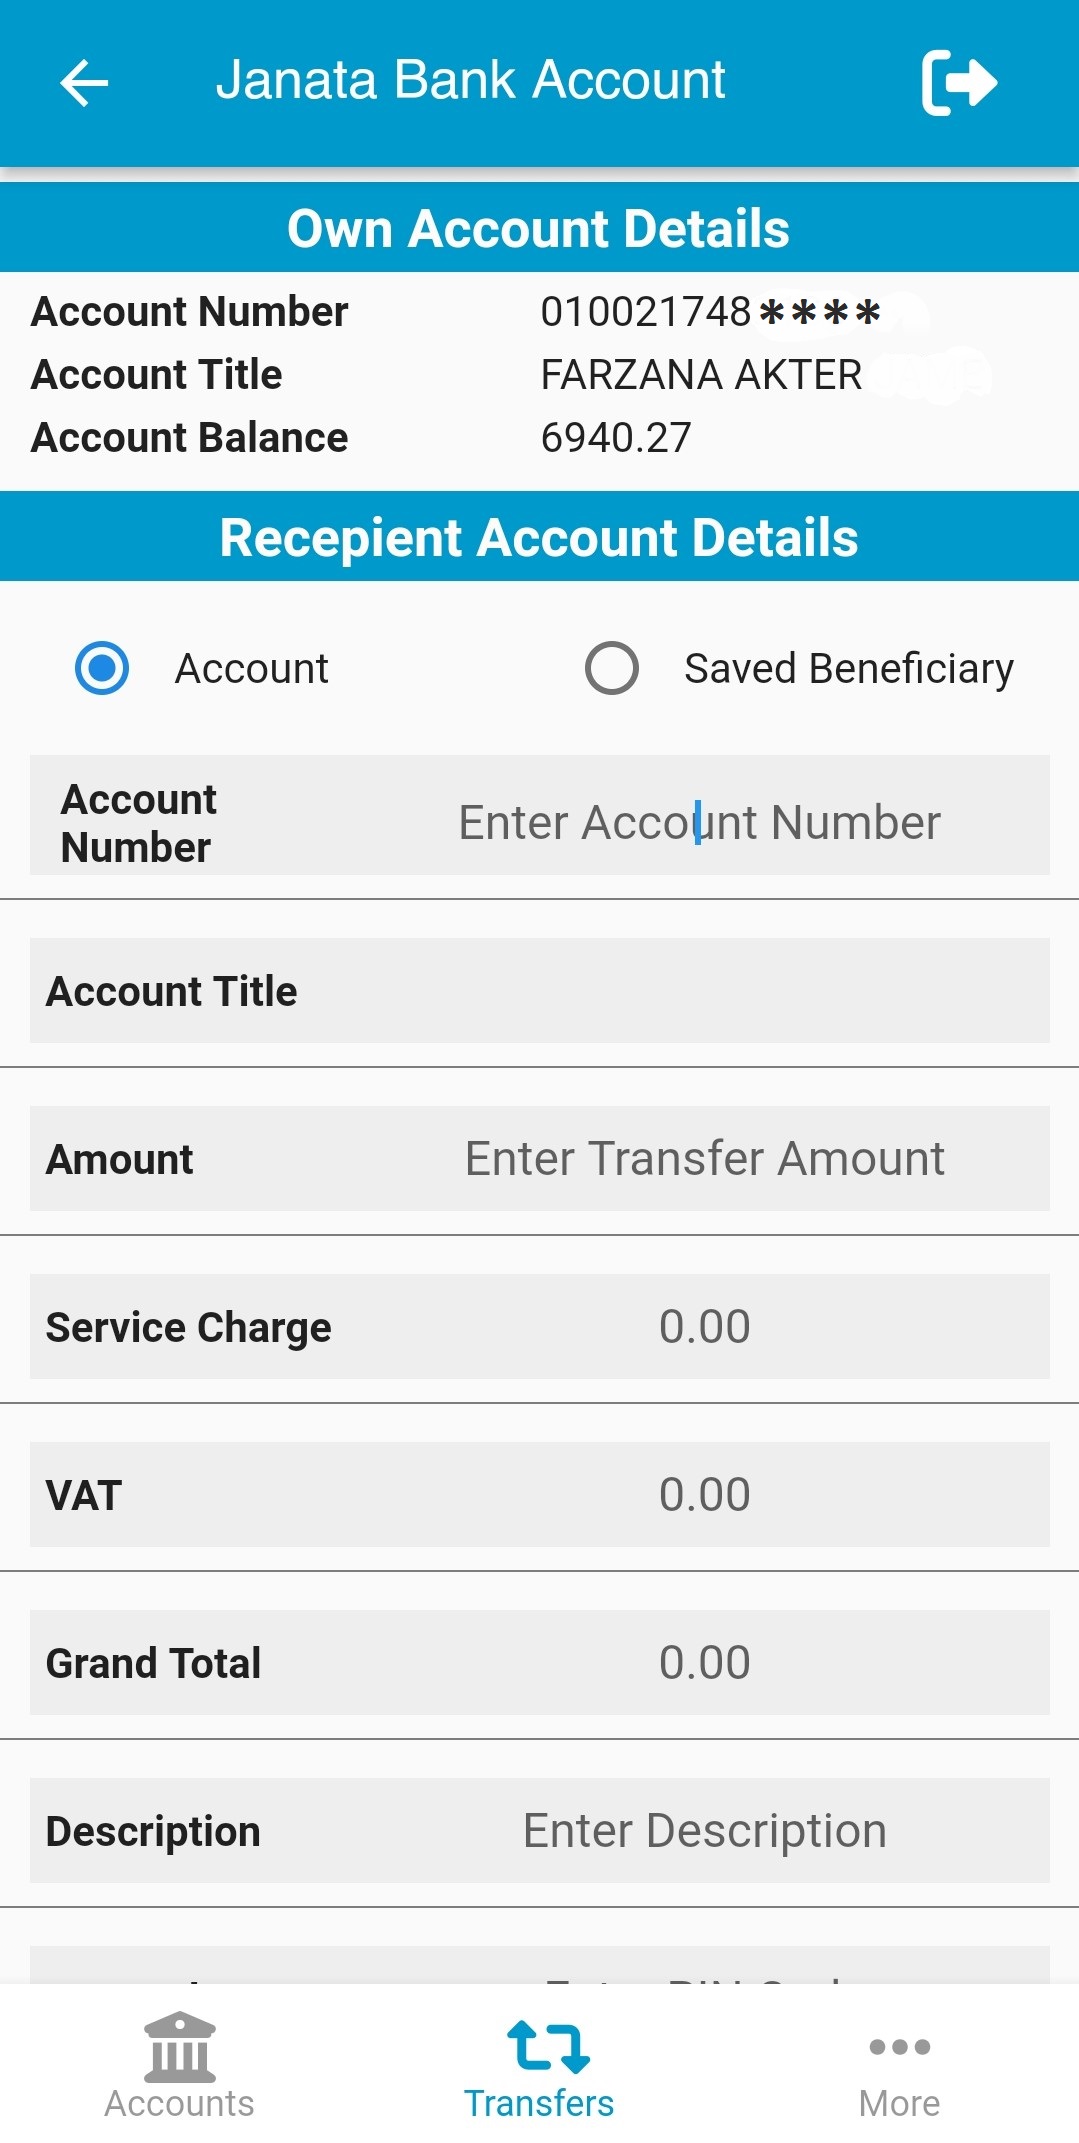
Step-3:
Description: For Account option: please provide account number. If the account number is valid, account title will be filled up automatically. Fund Transfer/টাকা পাঠানোর জন্য Account (অ্যাকাউন্ট) নির্বাচন করলে প্রাপকের একাউন্ট নম্বরটি প্রবেশ করান। আপনার জনতা ব্যাংকের প্রাপকের একাউন্ট নম্বরটি সঠিক হলে স্বয়ংক্রিয়ভাবে একাউন্টধারীর নাম দেখতে পাবেন।
Step-4:
Description: For Saved Beneficiary option, user can select the beneficiary from beneficiary list. Fund Transfer/টাকা পাঠানোর জন্য Saved Beneficiary (সংরক্ষিত গ্রাহক) নির্বাচন করলে Beneficiary (প্রাপক) এর তালিকা থেকে একাউন্ট নম্বরটি নির্বাচন করুন।
Step-5:
Description: Please input transfer amount, description of transaction and PIN. If user agrees with the privacy policy and terms and conditions, please select the checkbox and tap on the submit button. Amount (টাঃ পরিমান) ঘরে লেনদেনের টাকার পরিমান লিখুন। Description (বিবরণ) ঘরে লেনদেনের সংক্ষিপ্ত বর্ণনা দিন। PIN Code (পিন কোড) ঘরে PIN নম্বর প্রবেশ করান। Terms and conditions (শর্তাবলী) এর সাথে সম্মত হলে চেক বক্সটি সিলেক্ট করুন এবং Submit (সাবমিট) চাপুন।
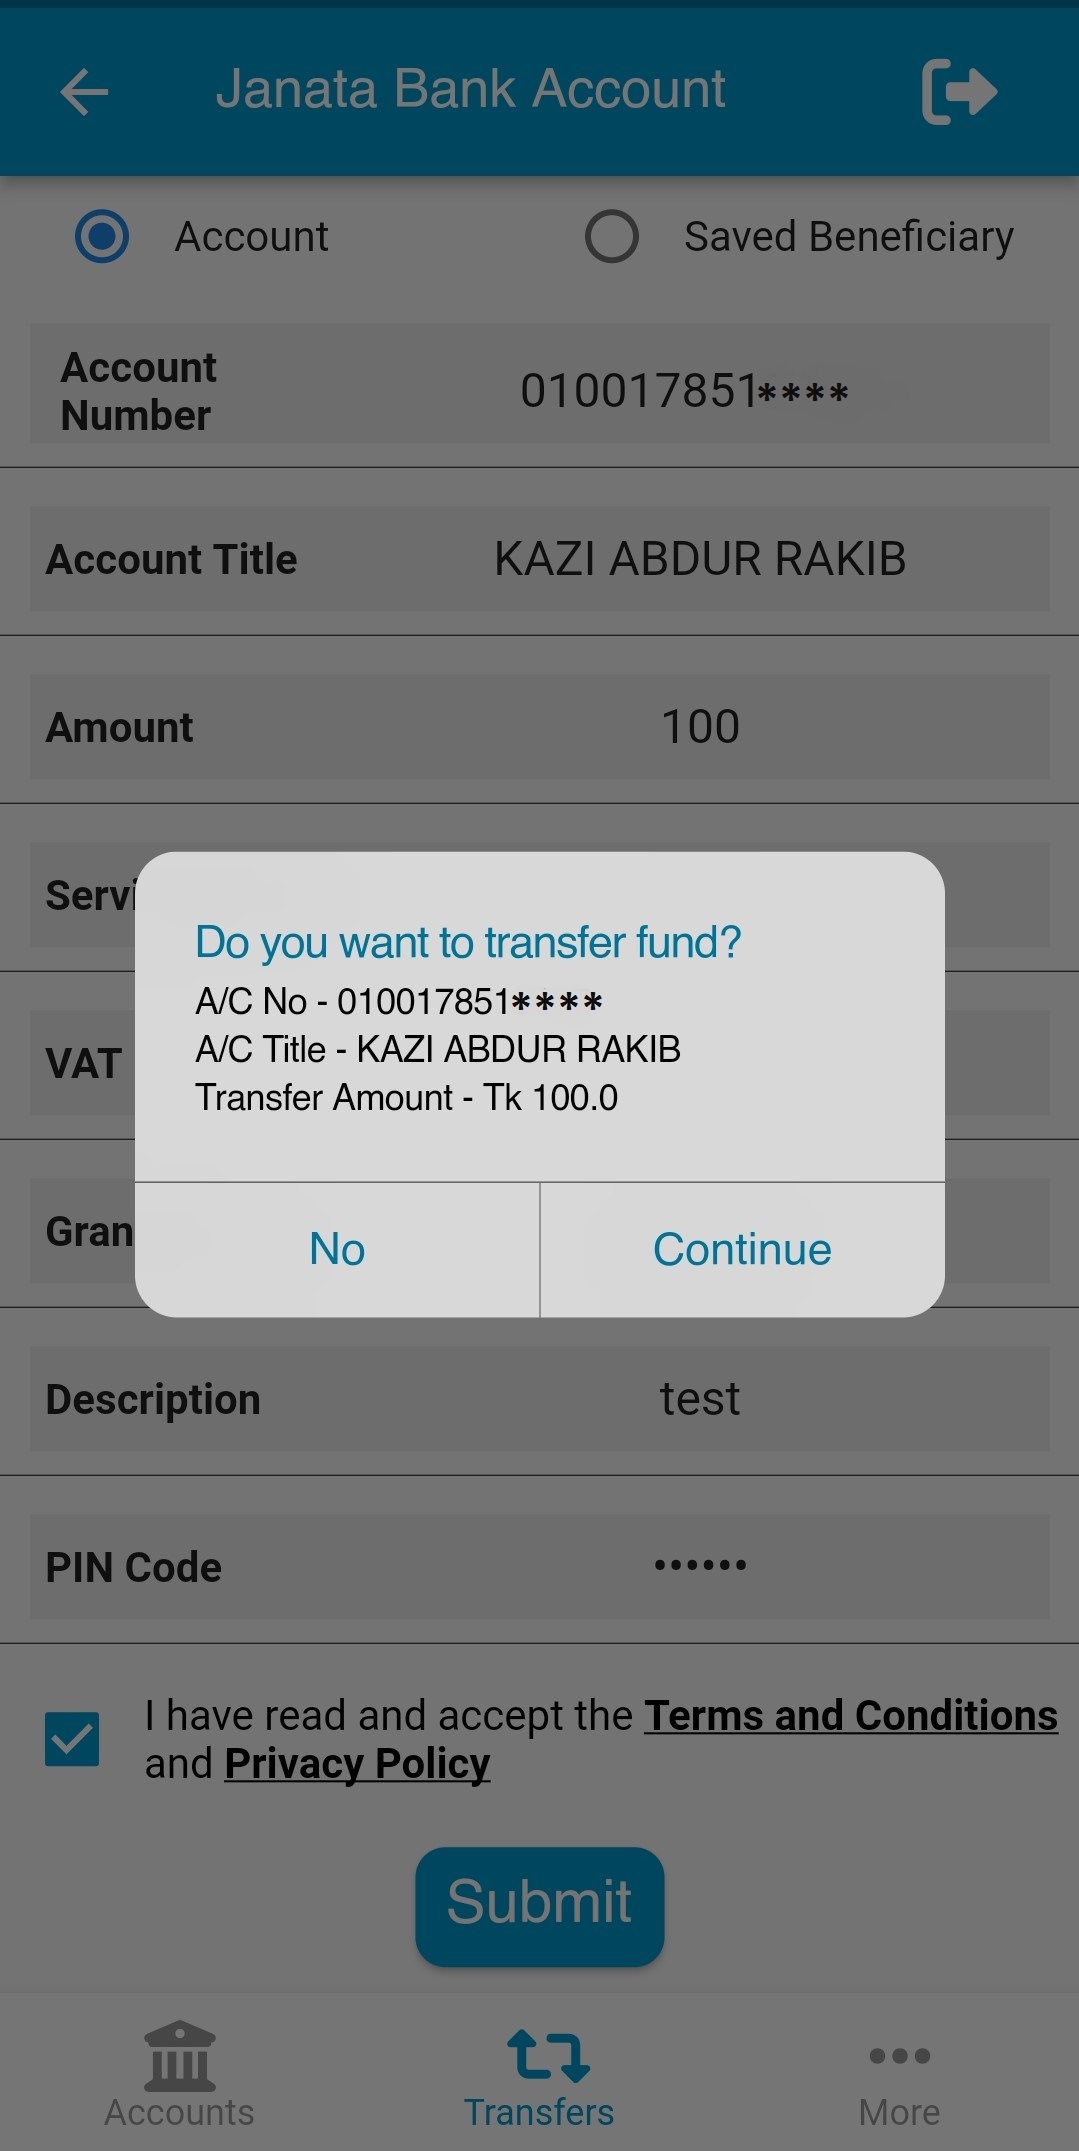
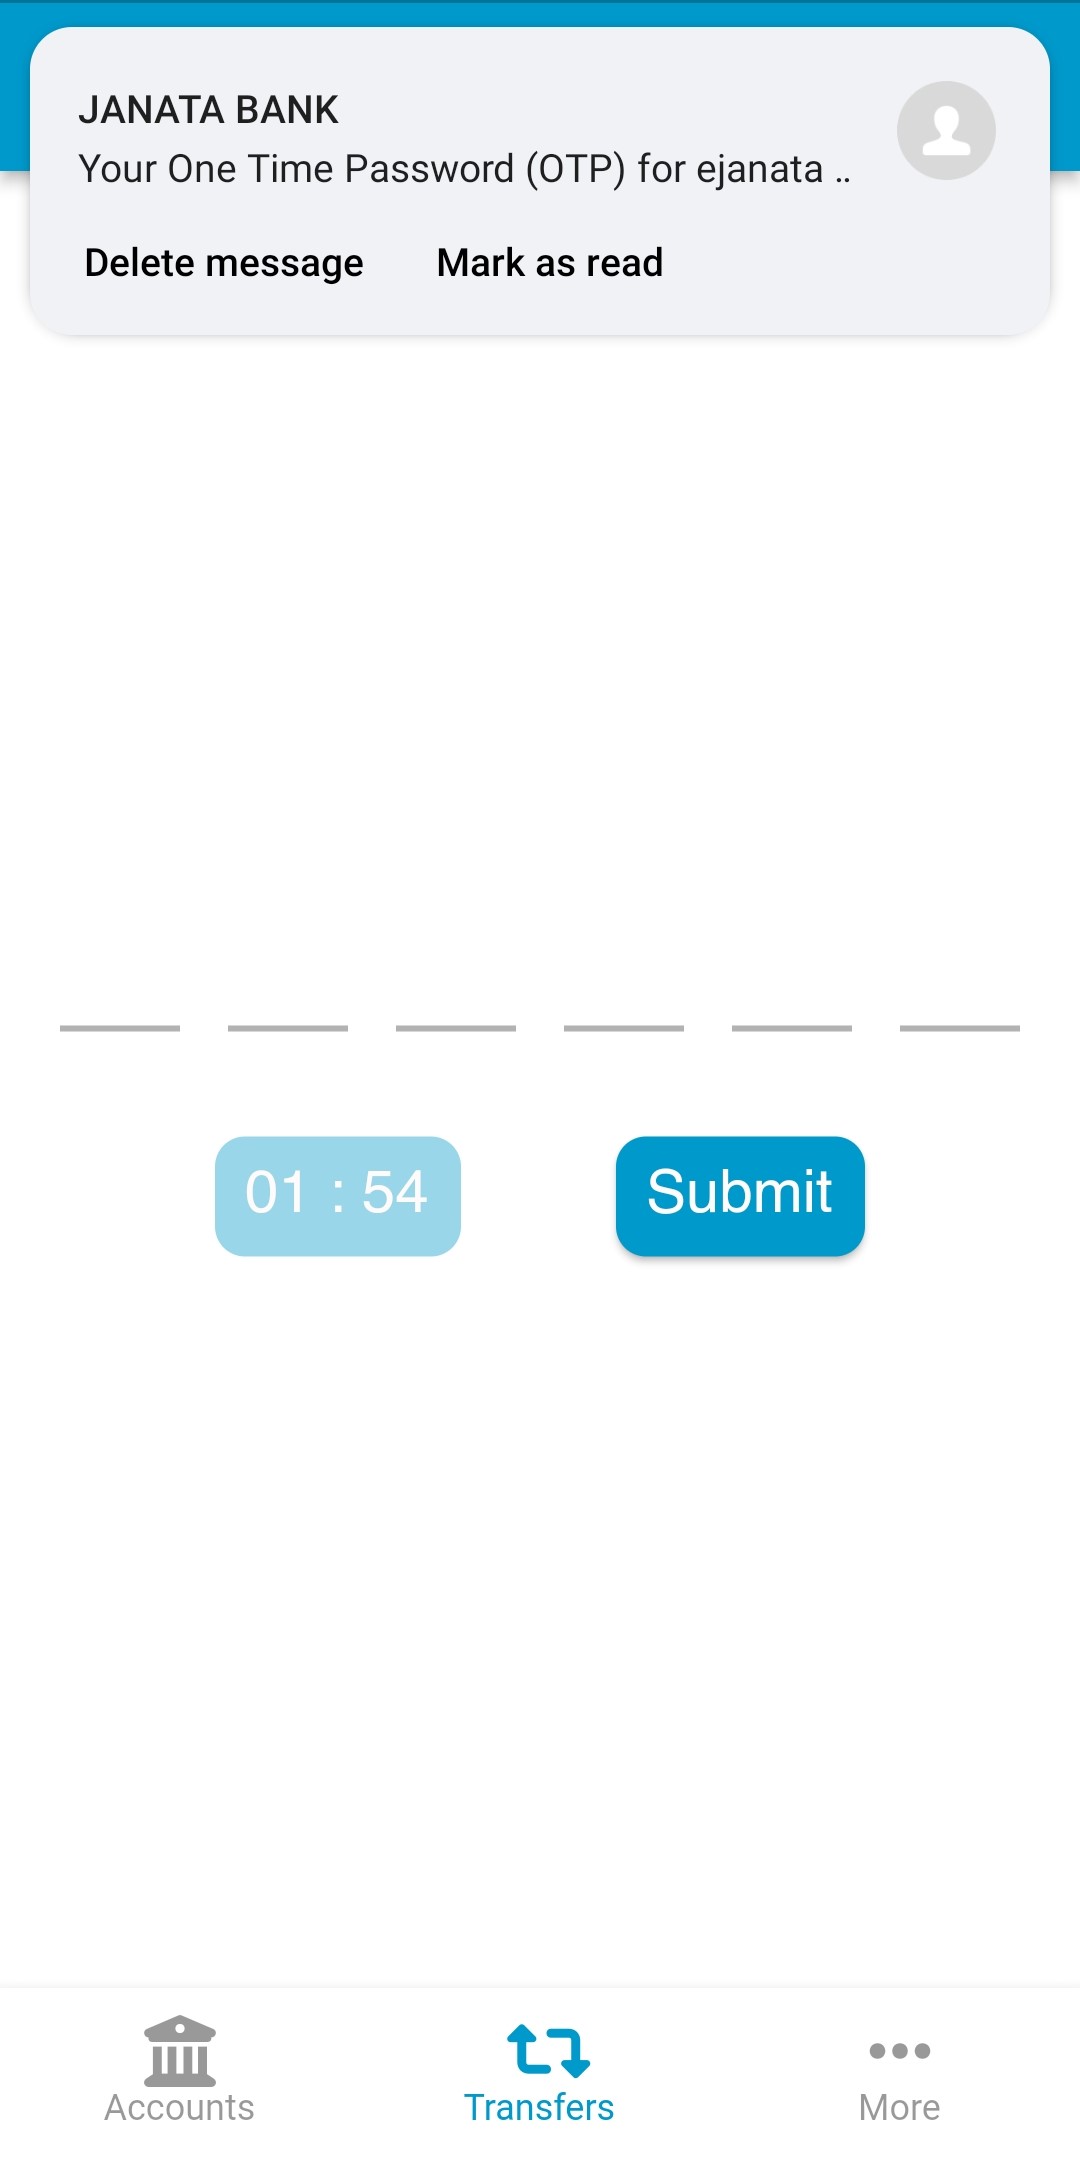
Step-6:
Description: User will get an OTP to his/ her registered mobile number for completing the transaction. Fund Transfer/ টাকা পাঠানোর প্রক্রিয়া সম্পন্ন করার জন্য ব্যবহারকারী তাঁর নিবন্ধিত মোবাইল নম্বরে OTP সম্বলিত একটি SMS পাবেন।
Step-7:
Description: If the transaction is completed, user can see a success message on screen. Fund Transfer/টাকা পাঠানোর প্রক্রিয়া সফল হলে একটি সফলতা বার্তা দেখতে পাবেন।

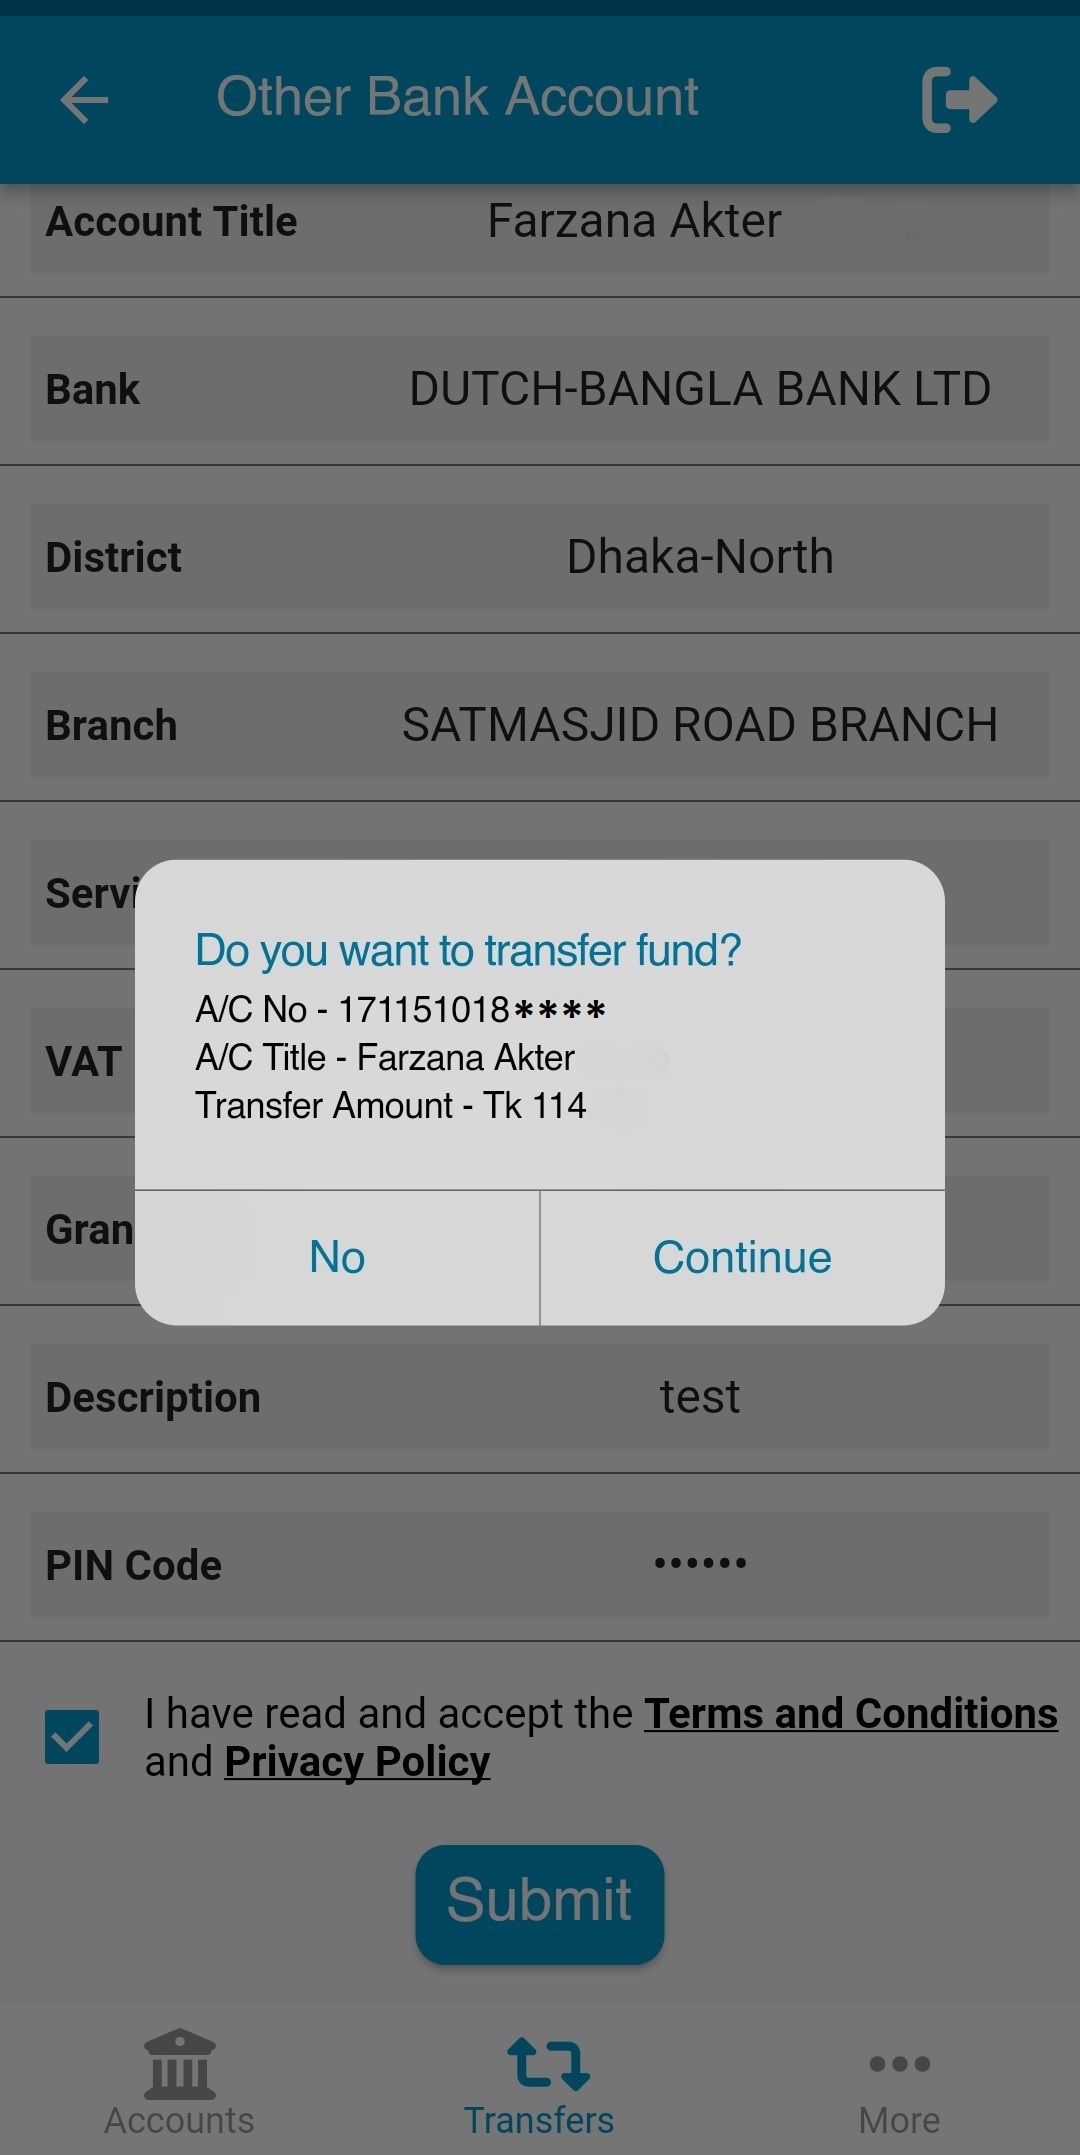
Step-1:
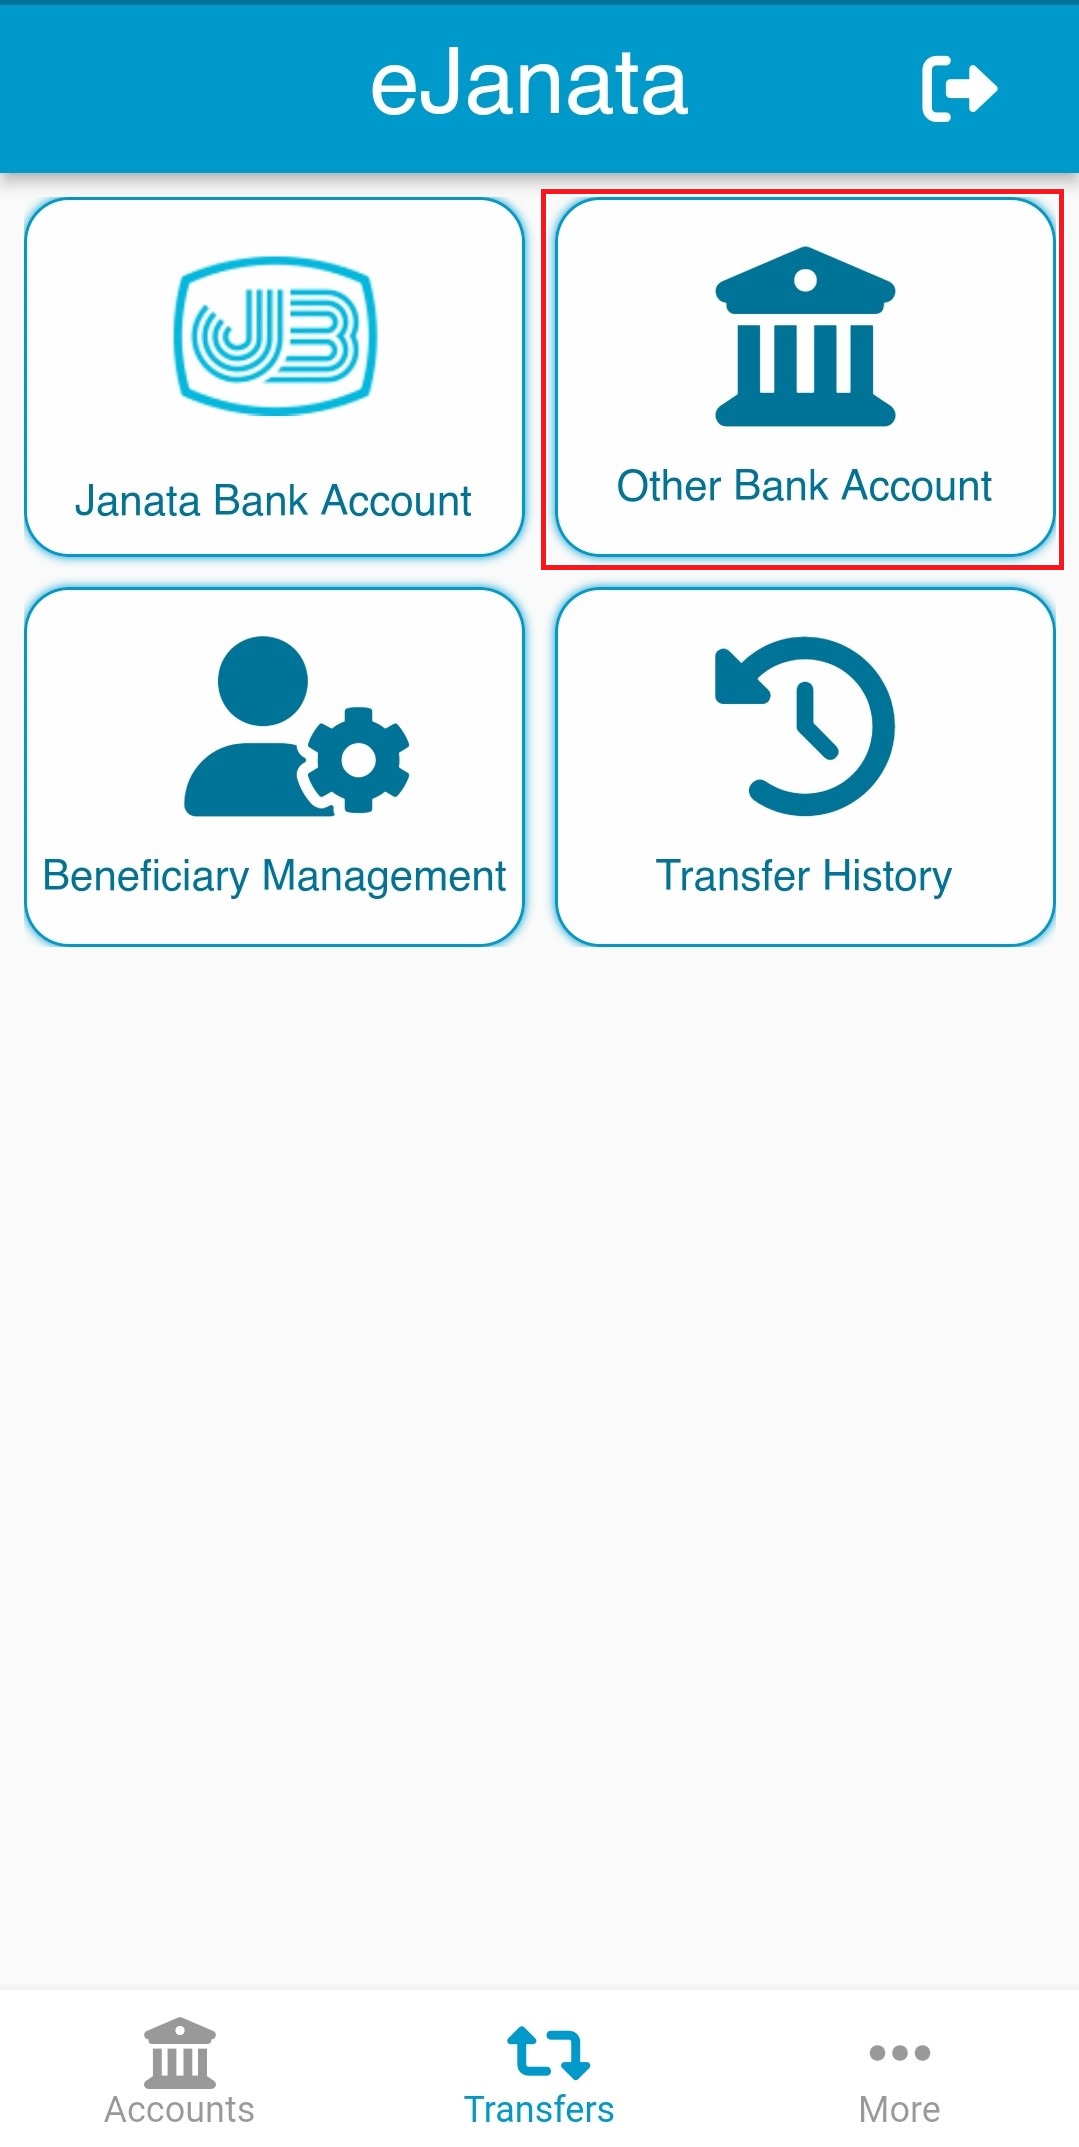
Description: Please tap on Other Bank Account section for fund transfer to any Other Bank Account. অন্যান্য ব্যাংকের একাউন্টে টাকা পাঠানোর জন্য Other Bank Account (অন্যান্য ব্যাংক অ্যাকাউন্ট) অংশটি নির্বাচন করুন।
Step-2:
Description: User select the beneficiary from beneficiary option. Fund Transfer/টাকা পাঠানোর জন্য Beneficiary (প্রাপক) এর তালিকা থেকে একাউন্ট নম্বরটি নির্বাচন করুন।
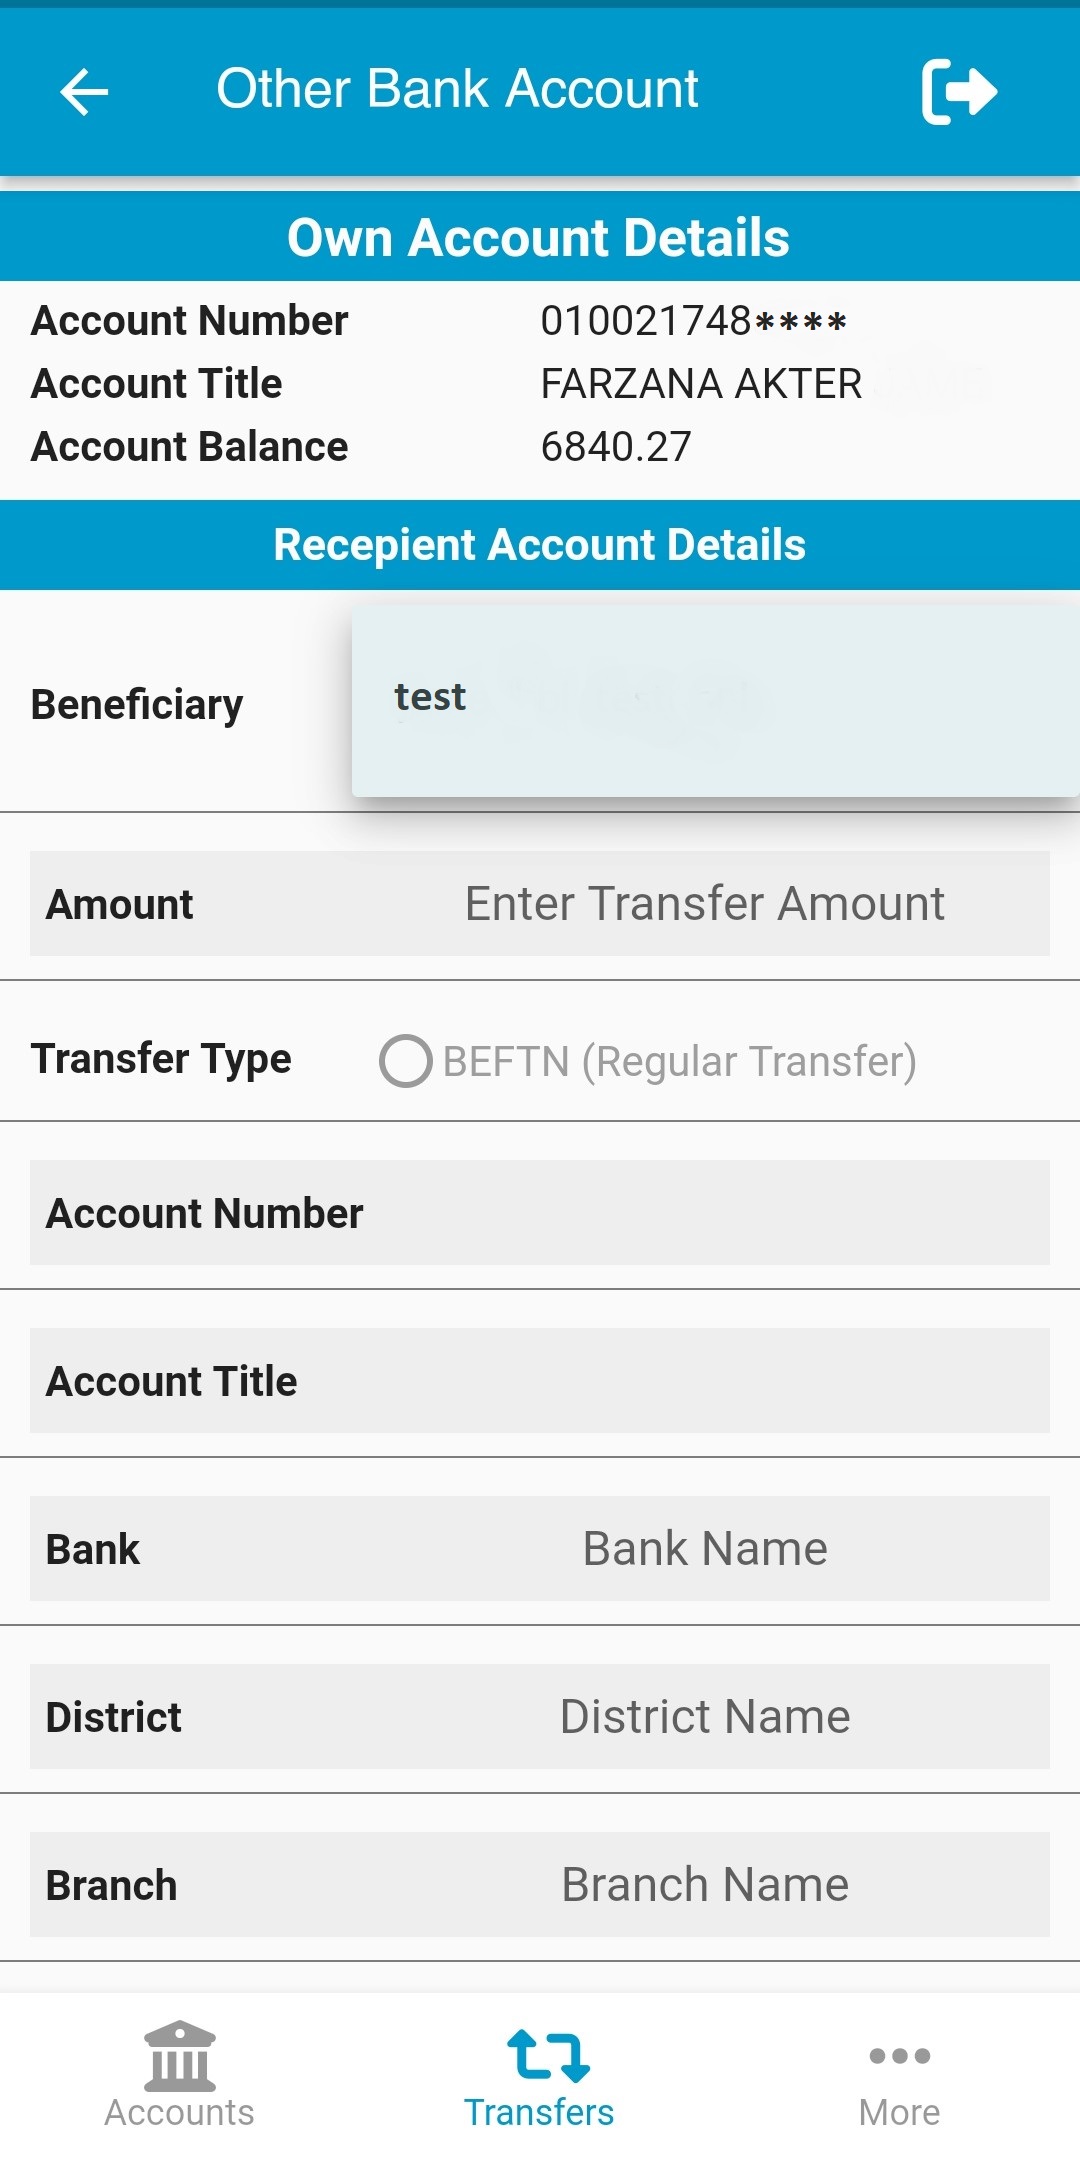
Step-3:
Description: Then user need to select transfer type, give input for transfer amount, description of transaction and PIN. After reading the privacy policy and terms and conditions user can submit the form. Amount (টাঃ পরিমান) ঘরে লেনদেনের টাকার পরিমান লিখুন। Transfer type (স্থানান্তর টাইপ) নির্বাচন করুন। Description (বিবরণ) ঘরে লেনদেনের সংক্ষিপ্ত বর্ণনা দিন। PIN Code (পিন কোড) ঘরে PIN নম্বর প্রবেশ করান। Terms and conditions (শর্তাবলী) এর সাথে সম্মত হলে চেক বক্সটি সিলেক্ট করুন এবং Submit (সাবমিট) চাপুন।
Step-4:
Description: User will get an OTP to his/ her registered mobile number for completing the transaction. Fund Transfer/ টাকা পাঠানোর প্রক্রিয়া সম্পন্ন করার জন্য ব্যবহারকারী তাঁর নিবন্ধিত মোবাইল নম্বরে OTP সম্বলিত একটি SMS পাবেন।
Step-5:
Description: If the transaction is completed, user can see a success message on screen. Fund Transfer/টাকা পাঠানোর প্রক্রিয়া সফল হলে একটি সফলতা বার্তা দেখতে পাবেন।
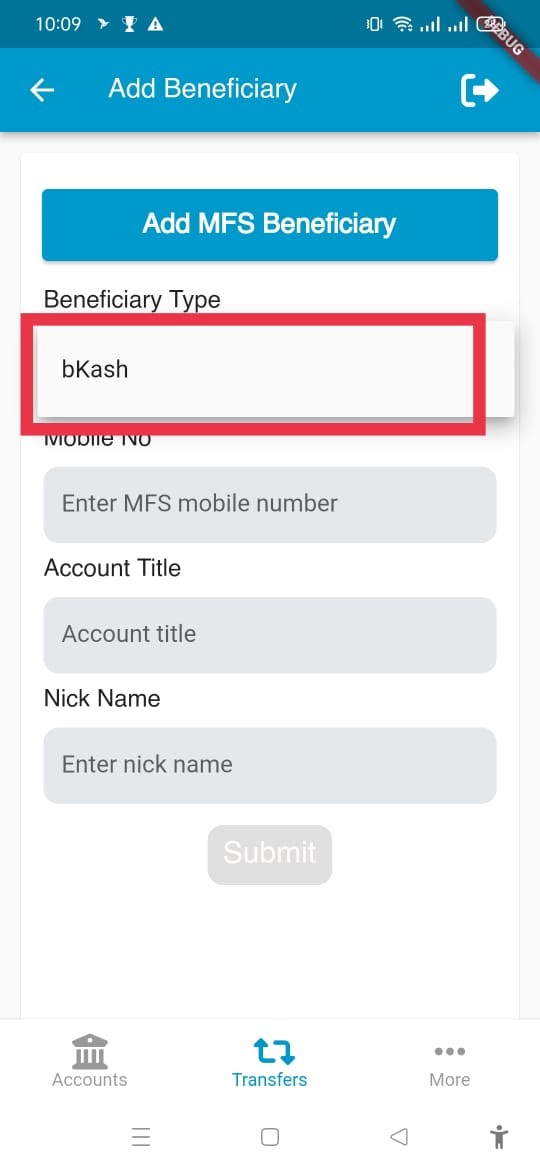
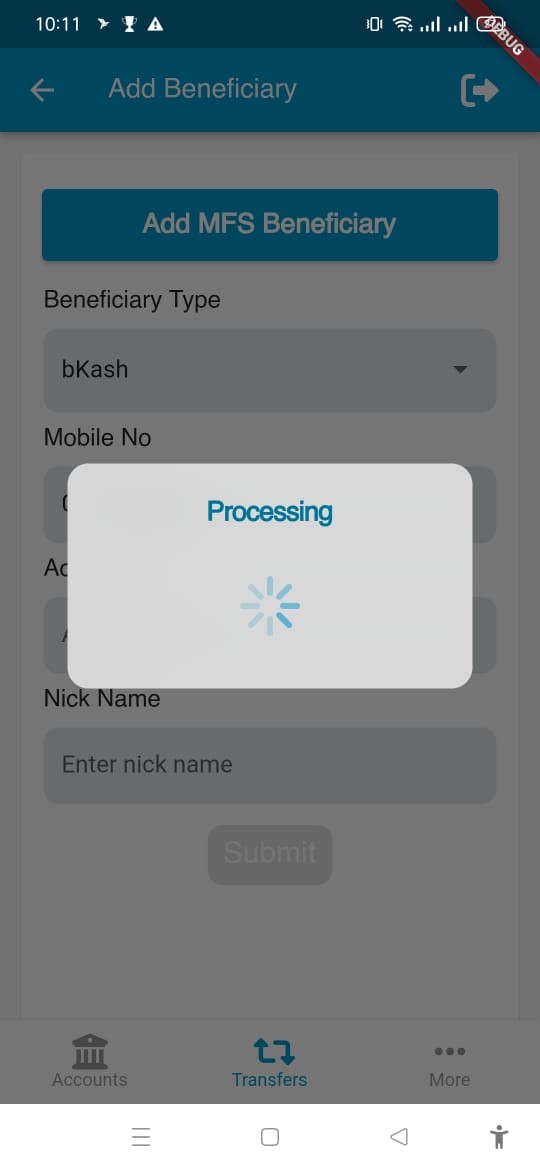
Step-1:
Description: Please select Add Beneficiary section to add your bKash beneficiary. বিকাশের প্রাপককে টাকা পাঠাতে হলে অবশ্যই পূর্বে প্রাপকের তথ্য যুক্ত করতে হবে। প্রাপকের তথ্য যুক্ত করতে Add Beneficiary (প্রাপক যোগ করুন) মেন্যুটি নির্বাচন করুন।
Step-2:
Description: Please select Beneficiary Type and insert the beneficiary mobile number. Write a nick name for the beneficiary. Beneficiary Type (প্রাপকের ধরণ) অংশে বিকাশ নির্বাচন করুন। Mobile No (মোবাইল নম্বর) ঘরে প্রাপকের মোবাইল নম্বরটি লিখুন। Nick Name (প্রাপকের উপনাম) ঘরে প্রাপকের জন্য একটি উপনাম দিয়ে Submit (সাবমিট) চাপুন।
Step-3:
Description: Account title will be filled up automatically if beneficiary mobile number is valid. আপনার বিকাশের প্রাপকের মোবাইল নম্বরটি সঠিক হলে স্বয়ংক্রিয়ভাবে প্রাপকের নাম দেখতে পাবেন।
Step-4:
Description: If the beneficiary is added successfully, user will see a success message on screen. সফলভাবে প্রাপক যুক্ত হলে একটি সফলতা বার্তা দেখতে পাবেন।
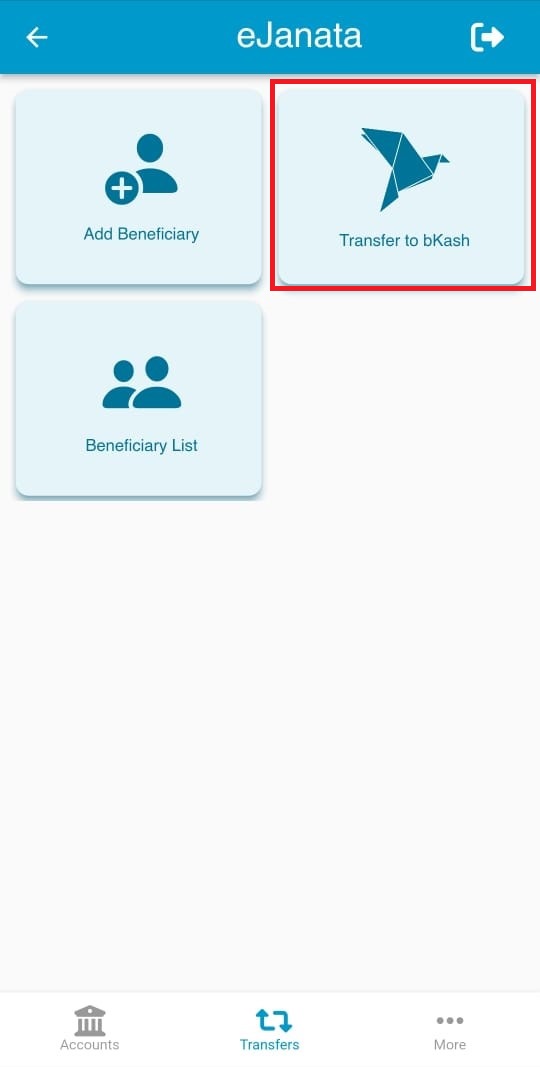
Step-1:
Description: Please select Transfer to bKash section for fund transfer to your bKash beneficiary. বিকাশের গ্রাহককে টাকা পাঠাতে Transfer to bKash (বিকাশে ব্যালেন্স ট্রান্সফার) মেন্যুটি নির্বাচন করুন।
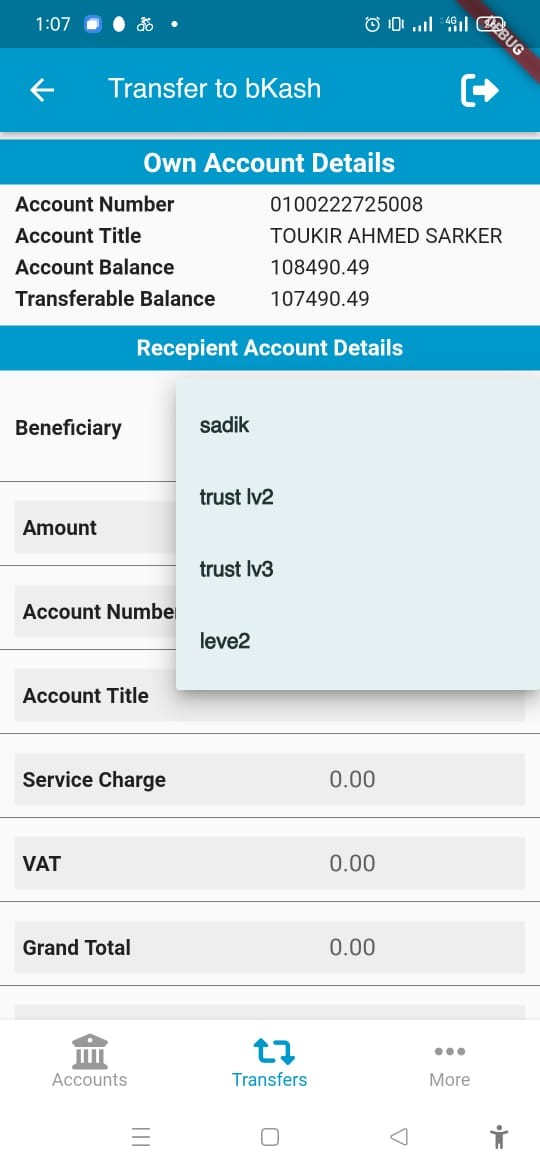
Step-2:
Description: Select the beneficiary name from beneficiary option. Fund Transfer/টাকা পাঠানোর জন্য Beneficiary (প্রাপক) এর তালিকা থেকে প্রাপক নির্বাচন করুন।
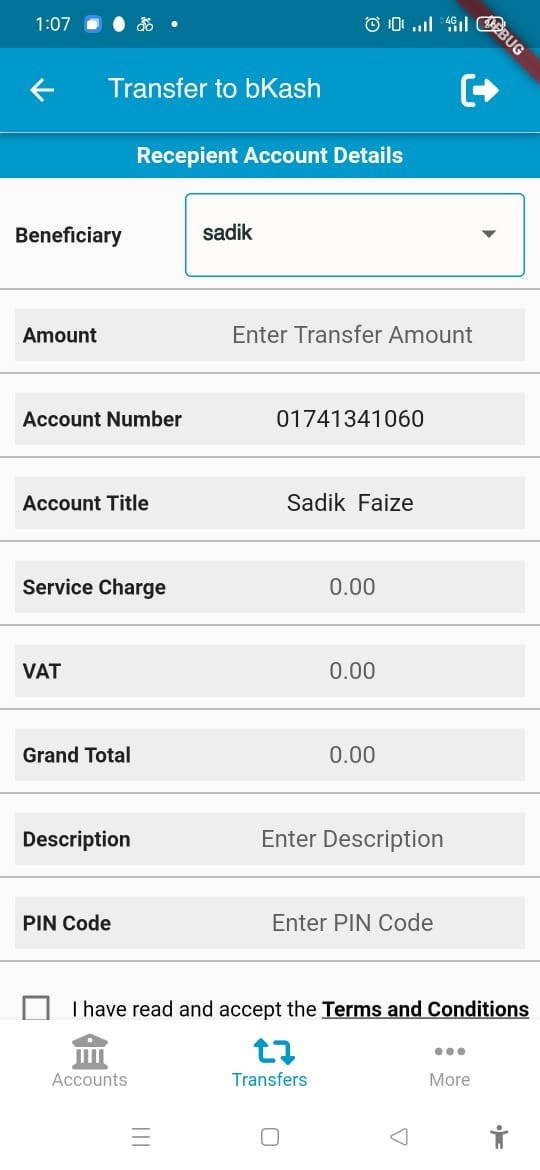
Step-3:
Description: Then user need to input the transfer amount, description of transaction and PIN. After reading the terms and conditions user can submit the form. Amount (টাঃ পরিমান) ঘরে লেনদেনের টাকার পরিমান লিখুন। Description (বিবরণ) ঘরে লেনদেনের সংক্ষিপ্ত বর্ণনা দিন। PIN Code (পিন কোড) ঘরে PIN নম্বর প্রবেশ করান। Terms and conditions (শর্তাবলী) এর সাথে সম্মত হলে চেক বক্সটি সিলেক্ট করুন এবং Submit (সাবমিট) চাপুন।
Step-4:
Description: If the transaction is completed, user can see a success message on screen with the transaction information. User can download the transaction information in nedded. Fund Transfer/টাকা পাঠানোর প্রক্রিয়া সফল হলে একটি সফলতা বার্তা দেখতে পাবেন এবং একই সাথে লেনদেনের বিস্তারিত পাবেন যা প্রয়োজনে ডাউনলোড করে সংরক্ষণ করা যাবে।
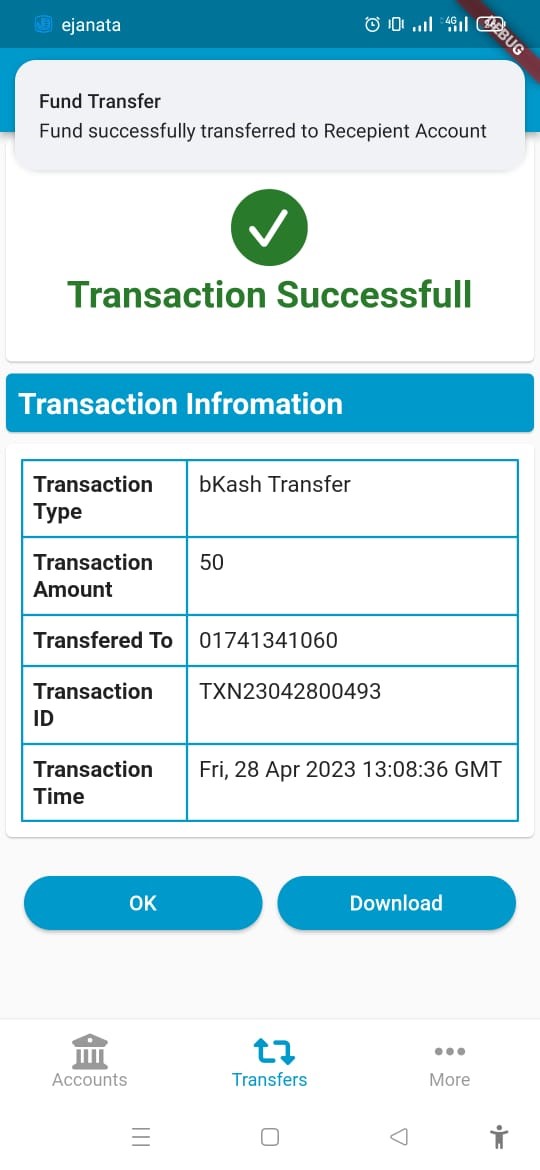
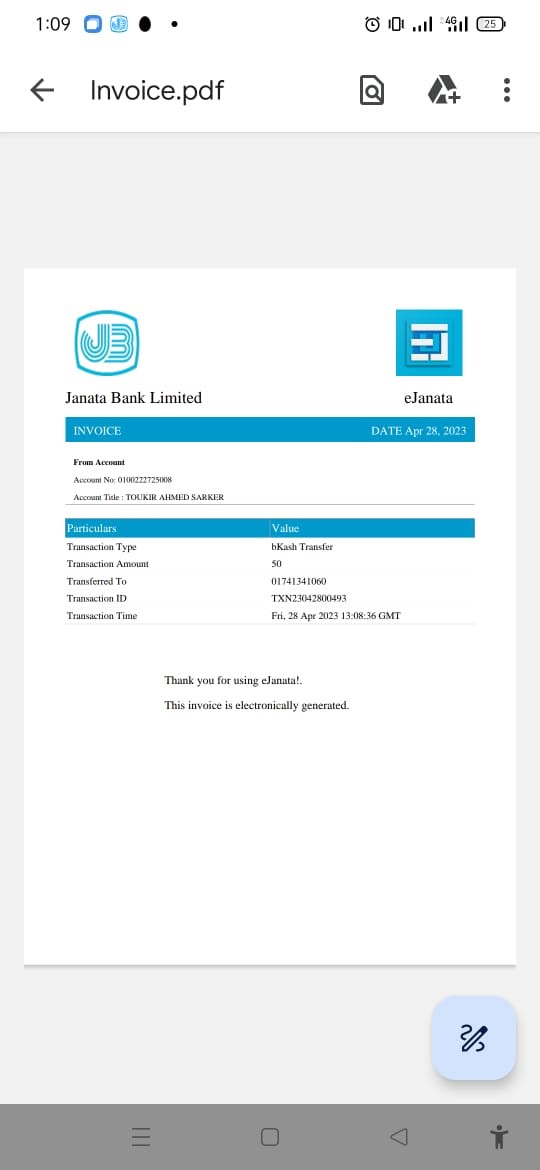
Step-5:
Description: If user choose to download the transaction information then a PDF invoice file will be downloaded. লেনদেনের বিস্তারিত ডাউনলোড করলে ফাইলটি PDF আকারে মোবাইলে ডাউনলোড হবে।
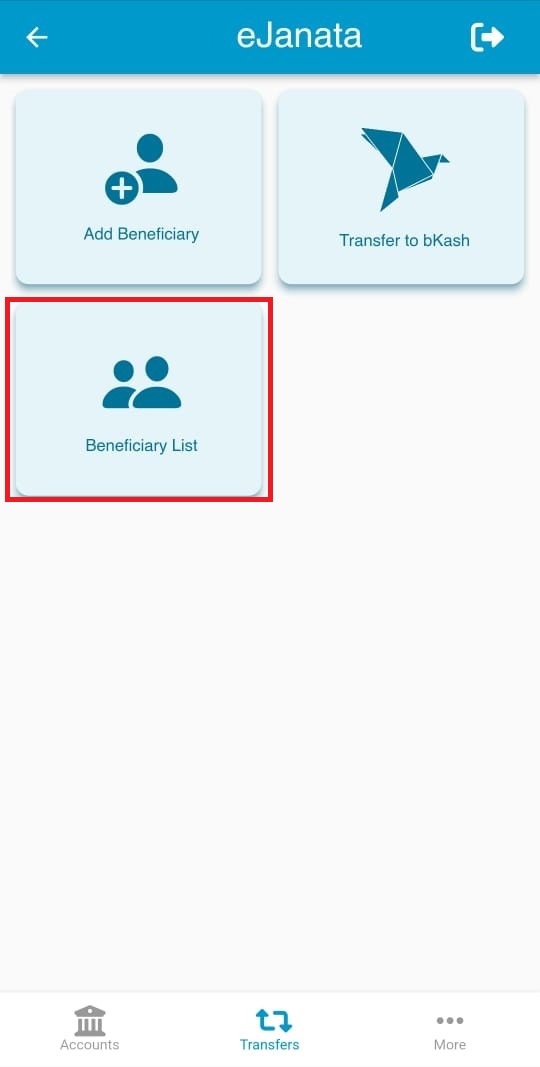
Step-1:
Description: Please select Beneficiary List section to see your bKash beneficiary list. সংরক্ষিত বিকাশের গ্রাহকদের তালিকা দেখতে Beneficiary List (প্রাপক তালিকা) মেন্যুটি নির্বাচন করুন।
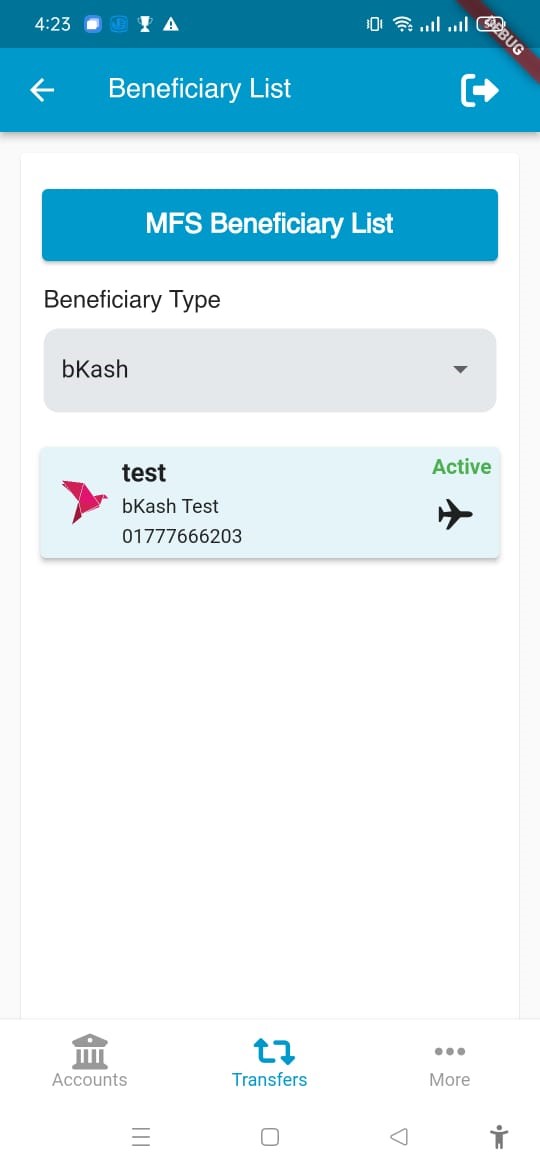
Step-2:
Description: Please select Beneficiary Type as bKash and user can find all the beneficiary list for bKash in the Beneficiary List Tab. User can active or inactive any beneficiary if needed (beneficiary cannot be deleted) Beneficiary List (প্রাপক তালিকা) ট্যাব এর Beneficiary Type হতে bKash (বিকাশ) নির্বাচন করলে আপনার সকল বিকাশ প্রাপকের তথ্য দেখতে পাবেন। ব্যবহারকারী Beneficiary List (প্রাপক তালিকা) ট্যাব হতে যেকোন প্রাপককে Active (সক্রিয়) অথবা Inactive (নিষ্ক্রিয়) করতে পারবনে (কোন প্রাপকের তথ্য মুছে ফেলা/ডিলিট করা যাবেনা)।
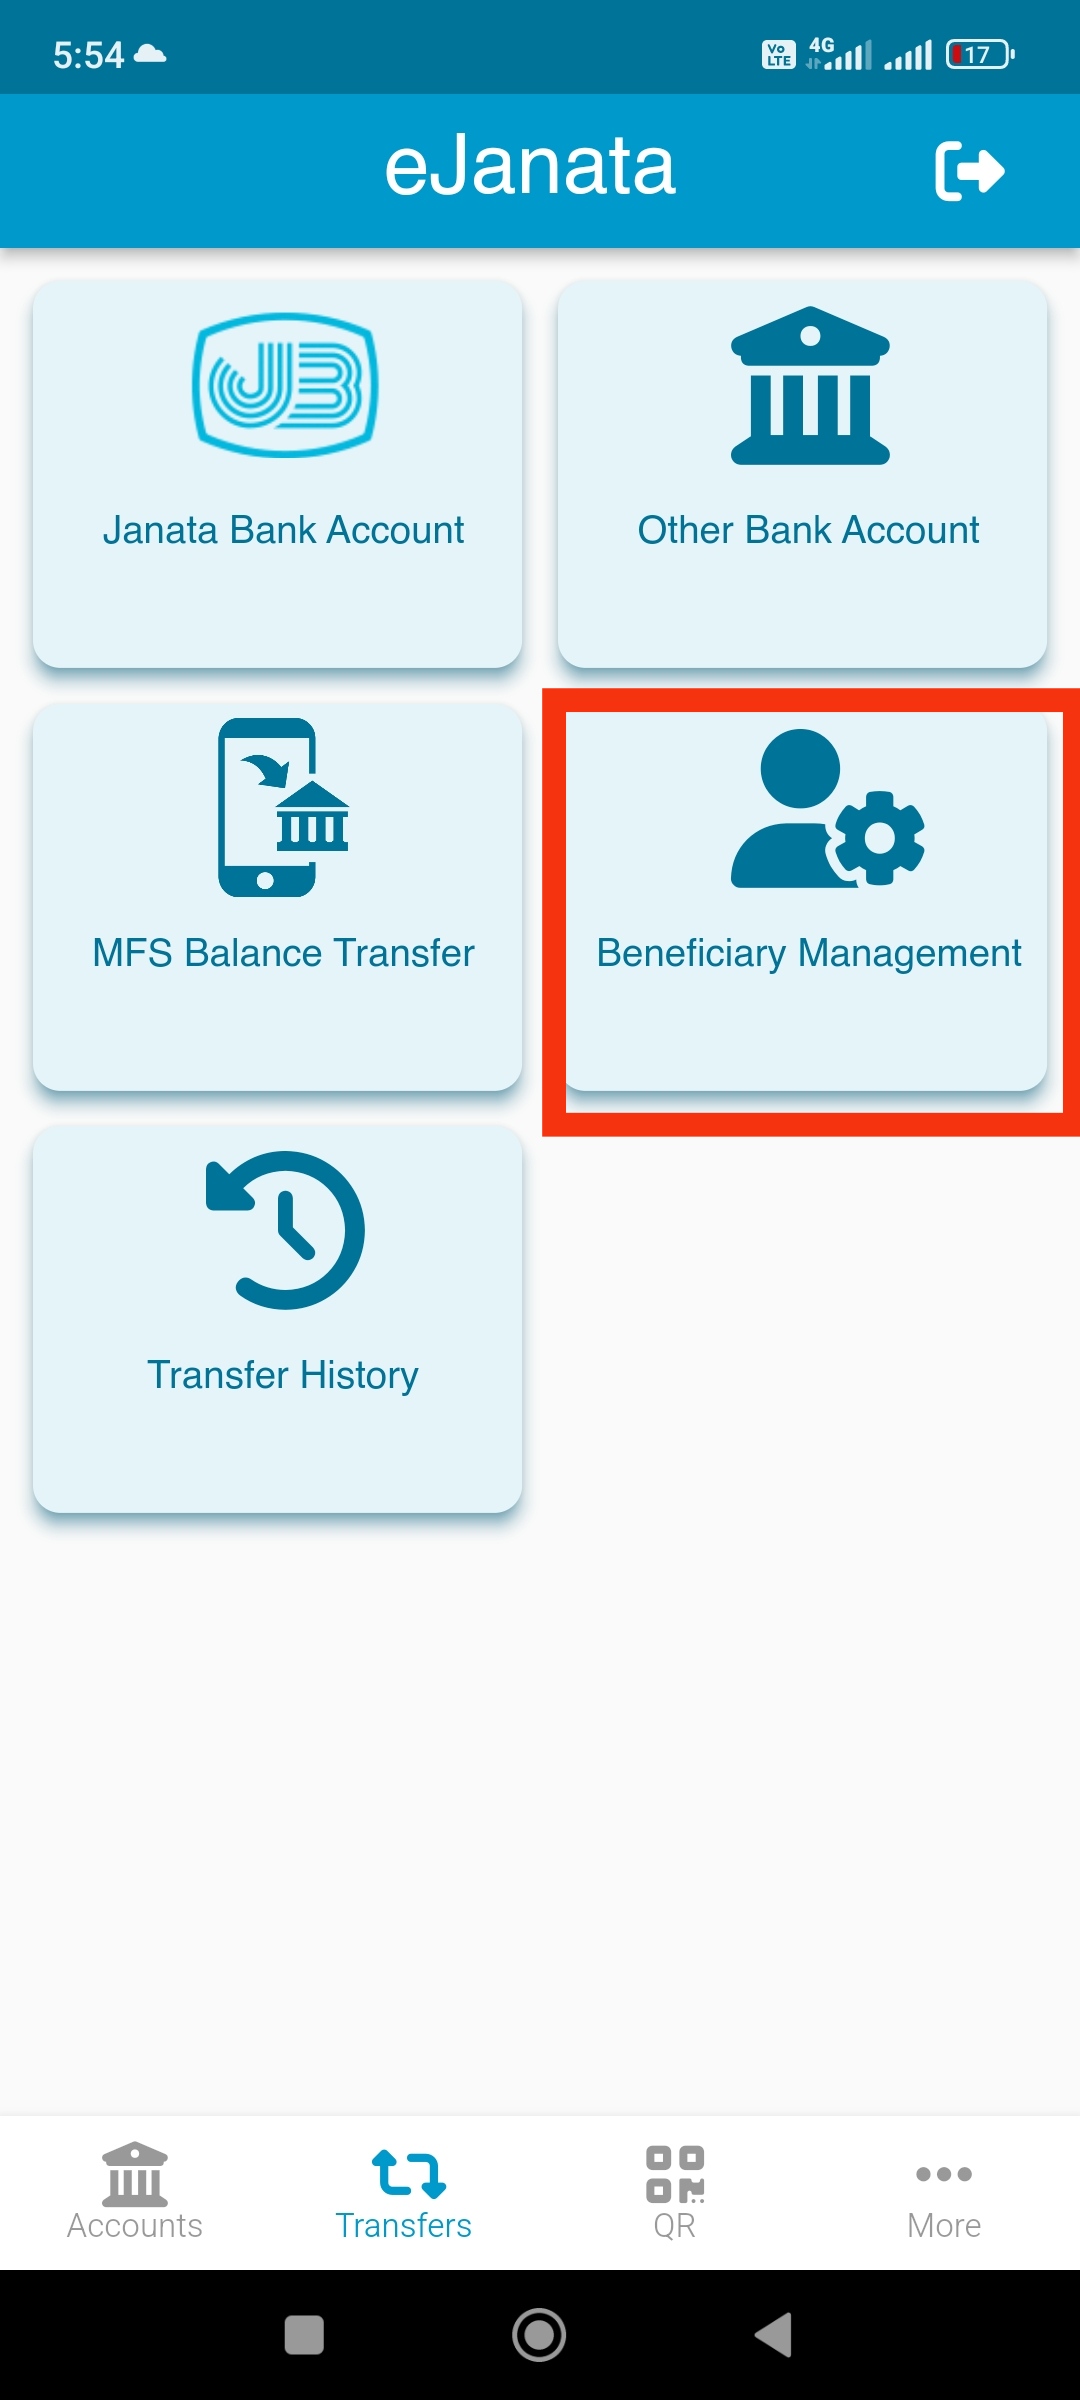
Step-1:
Description: Select Beneficiary Management section to add your Nagad beneficiary.
বর্ণনা: প্রাপকের তথ্য যুক্ত করতে (প্রাপক ব্যবস্থাপনা) মেন্যুটি নির্বাচন করুন।
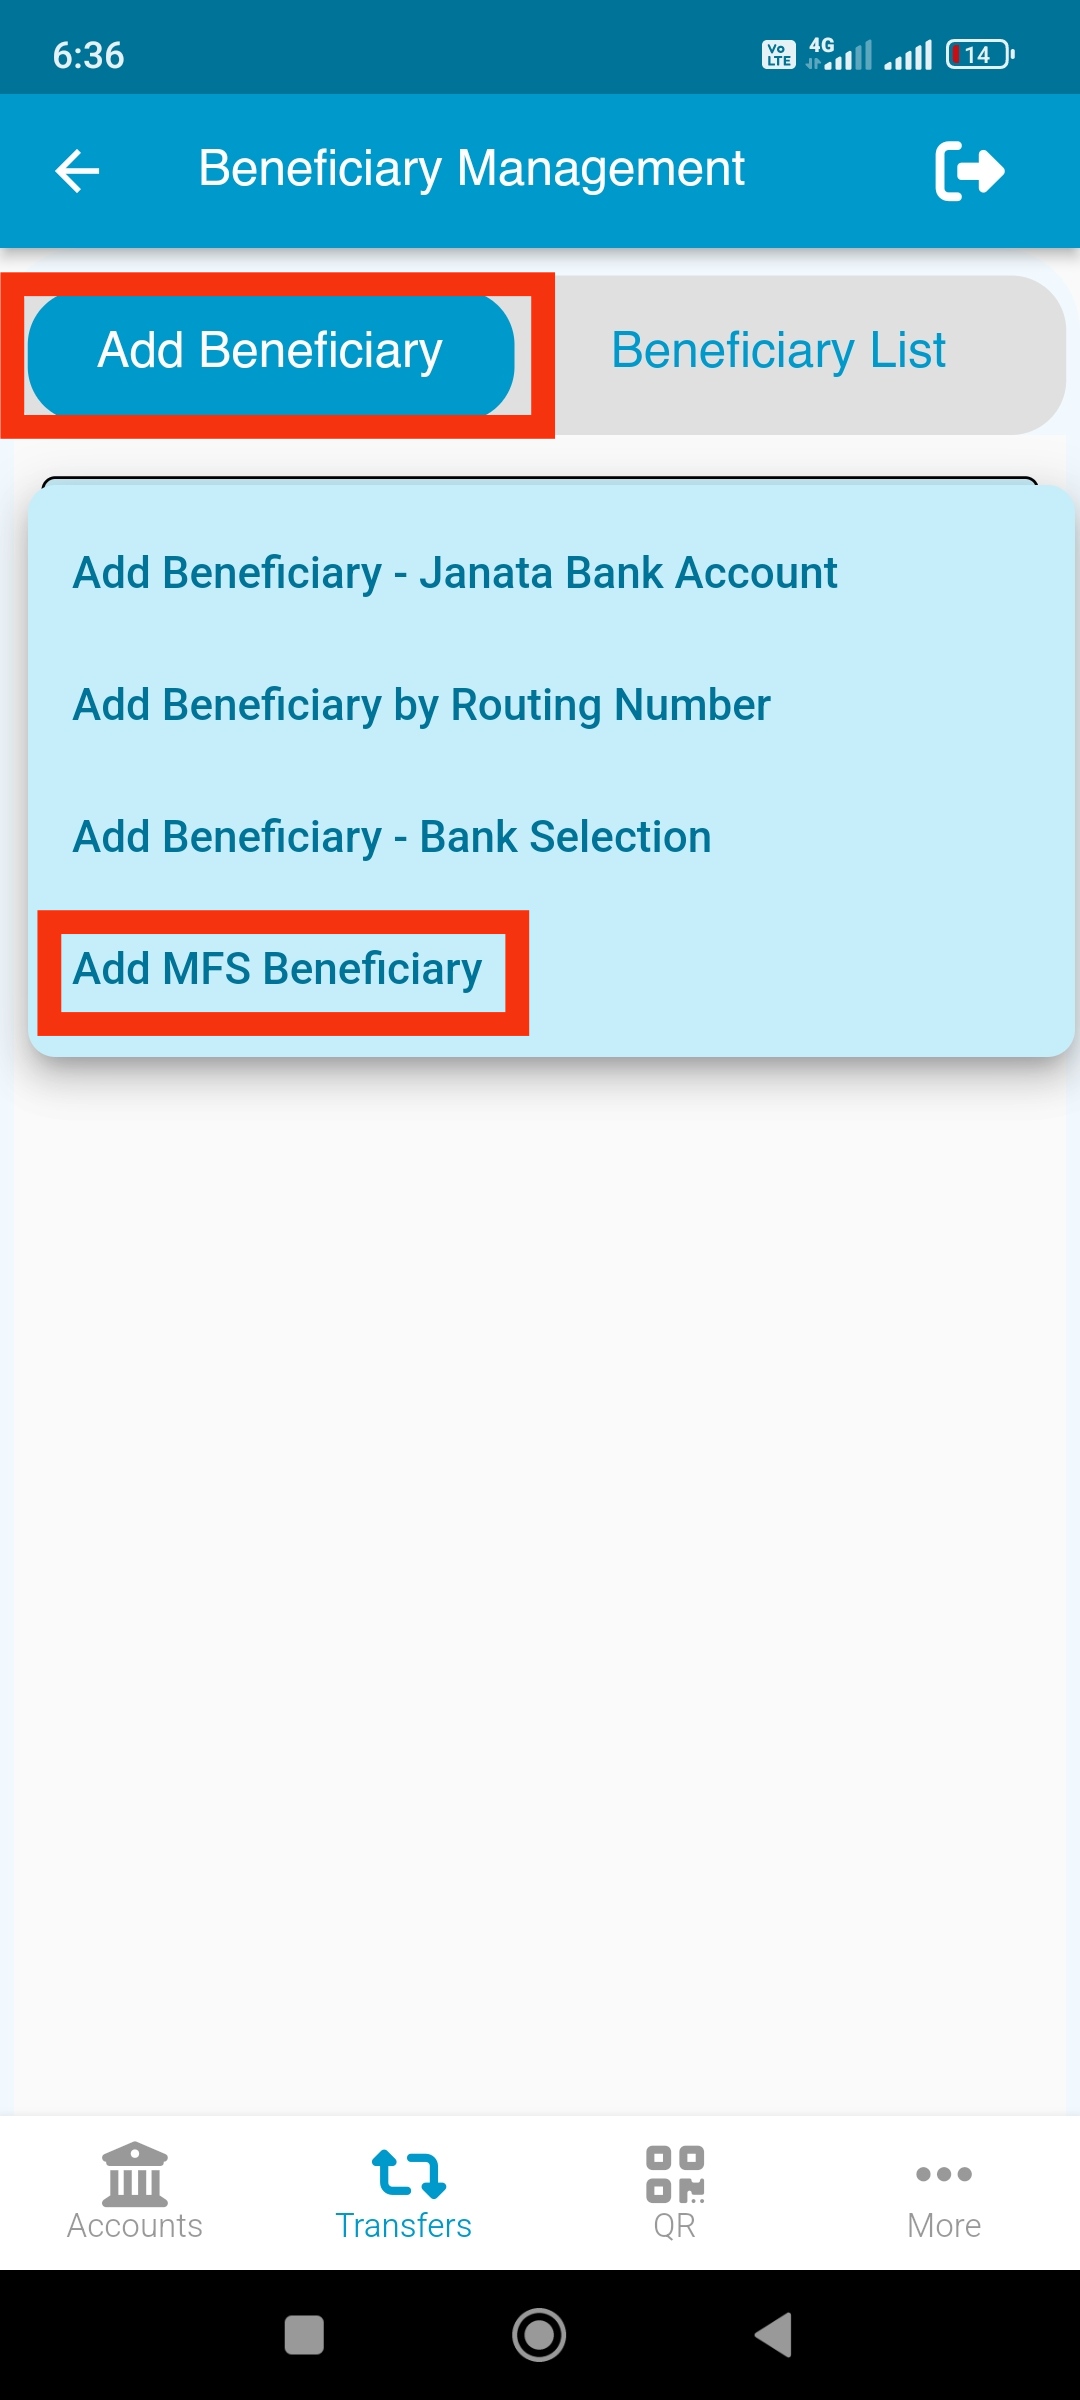
Step-2:
Description: Select Add Beneficiary option from the menu. Select Add MFS Beneficiary option from the dropdown menu.
বর্ণনা: মেনু থেকে (প্রপক যোগ করুন) অপশন টি নির্বাচন করুন। ড্রপডাউন মেনু থেকে (এমএফএস প্রপক যোগ করুন) অপশন টি নির্বাচন করুন।
Step-3:
Description: Select Beneficiary Type and insert the beneficiary mobile number. Write a nick name for the beneficiary.
বর্ণনা: (প্রাপকের ধরন) নির্বাচন করুন। প্রাপকের মোবাইল নম্বর টাইপ করুন। প্রাপকের জন্য একটি ডাক নাম লিখুন।

Step-4:
Description: Account title will be filled up automatically if beneficiary mobile number is valid.
বর্ণনা: প্রাপকের মোবাইল নম্বরটি সঠিক হলে স্বয়ংক্রিয়ভাবে প্রাপকের নাম দেখতে পাবেন।
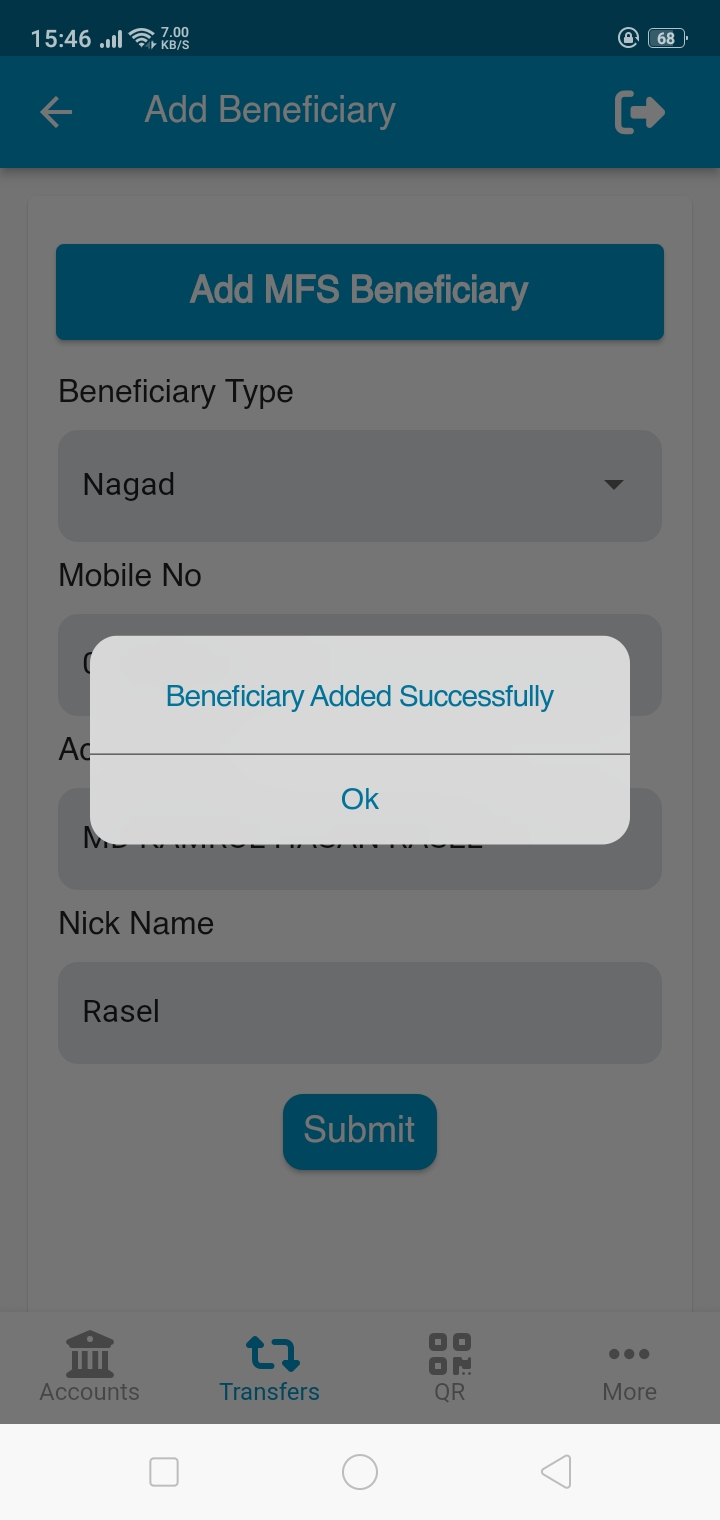
Step-5:
Description: If the beneficiary is added successfully, a success message will be displayed on screen.
বর্ণনা: সফলভাবে প্রাপক যুক্ত হলে একটি সফলতা বার্তা দেখতে পাবেন।
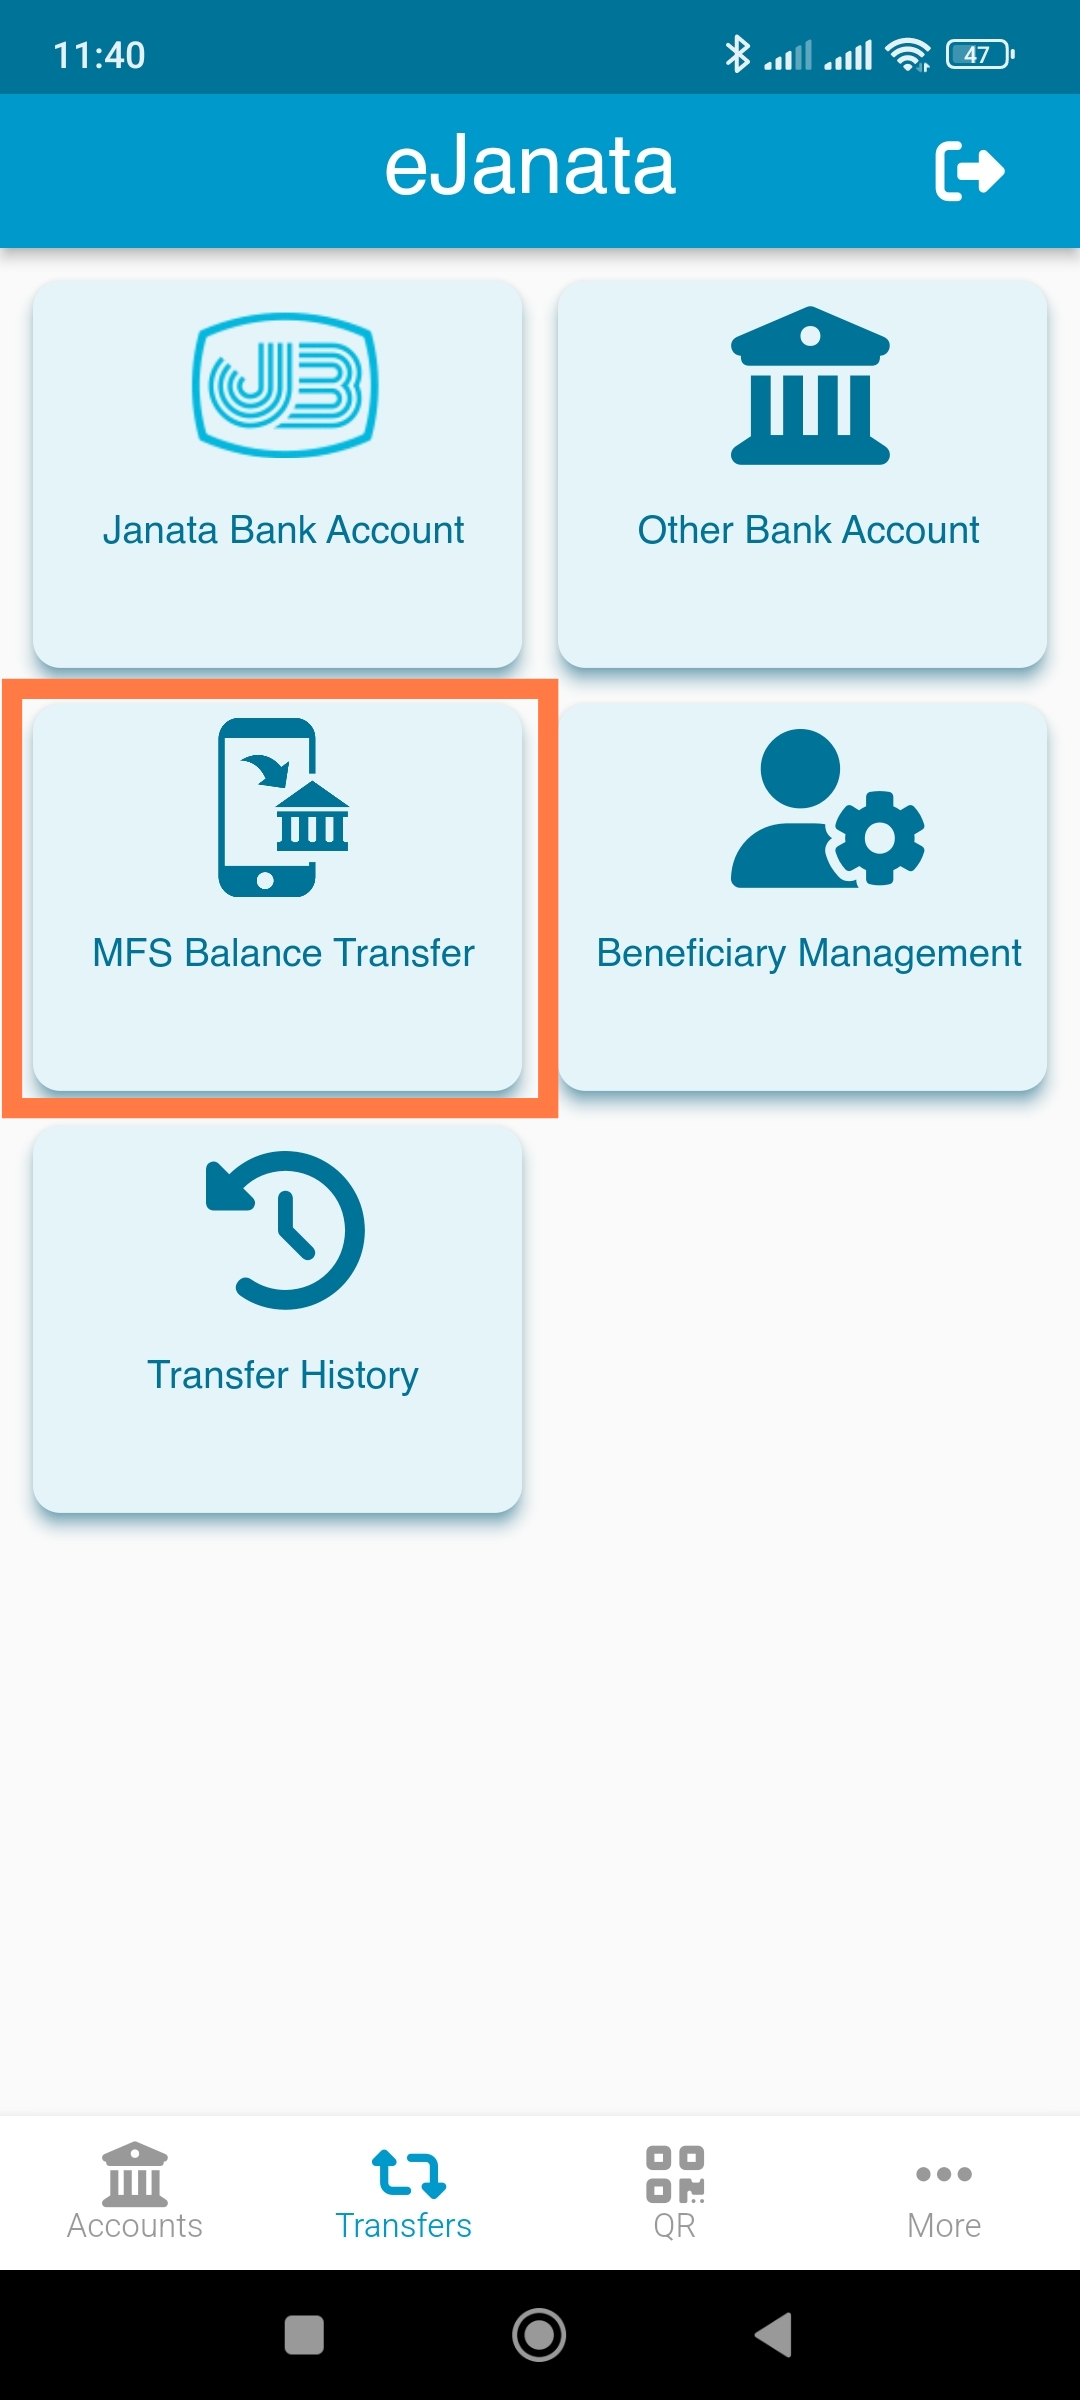
Step-1:
Description: Select MFS Balance Transfer section to transfer funds to Nagad beneficiary.
বর্ণনা: নগদ সুবিধাভোগীকে তহবিল স্থানান্তর করতে (এমএফএস ব্যালেন্স ট্রান্সফার) বিভাগ নির্বাচন করুন।
Step-2:
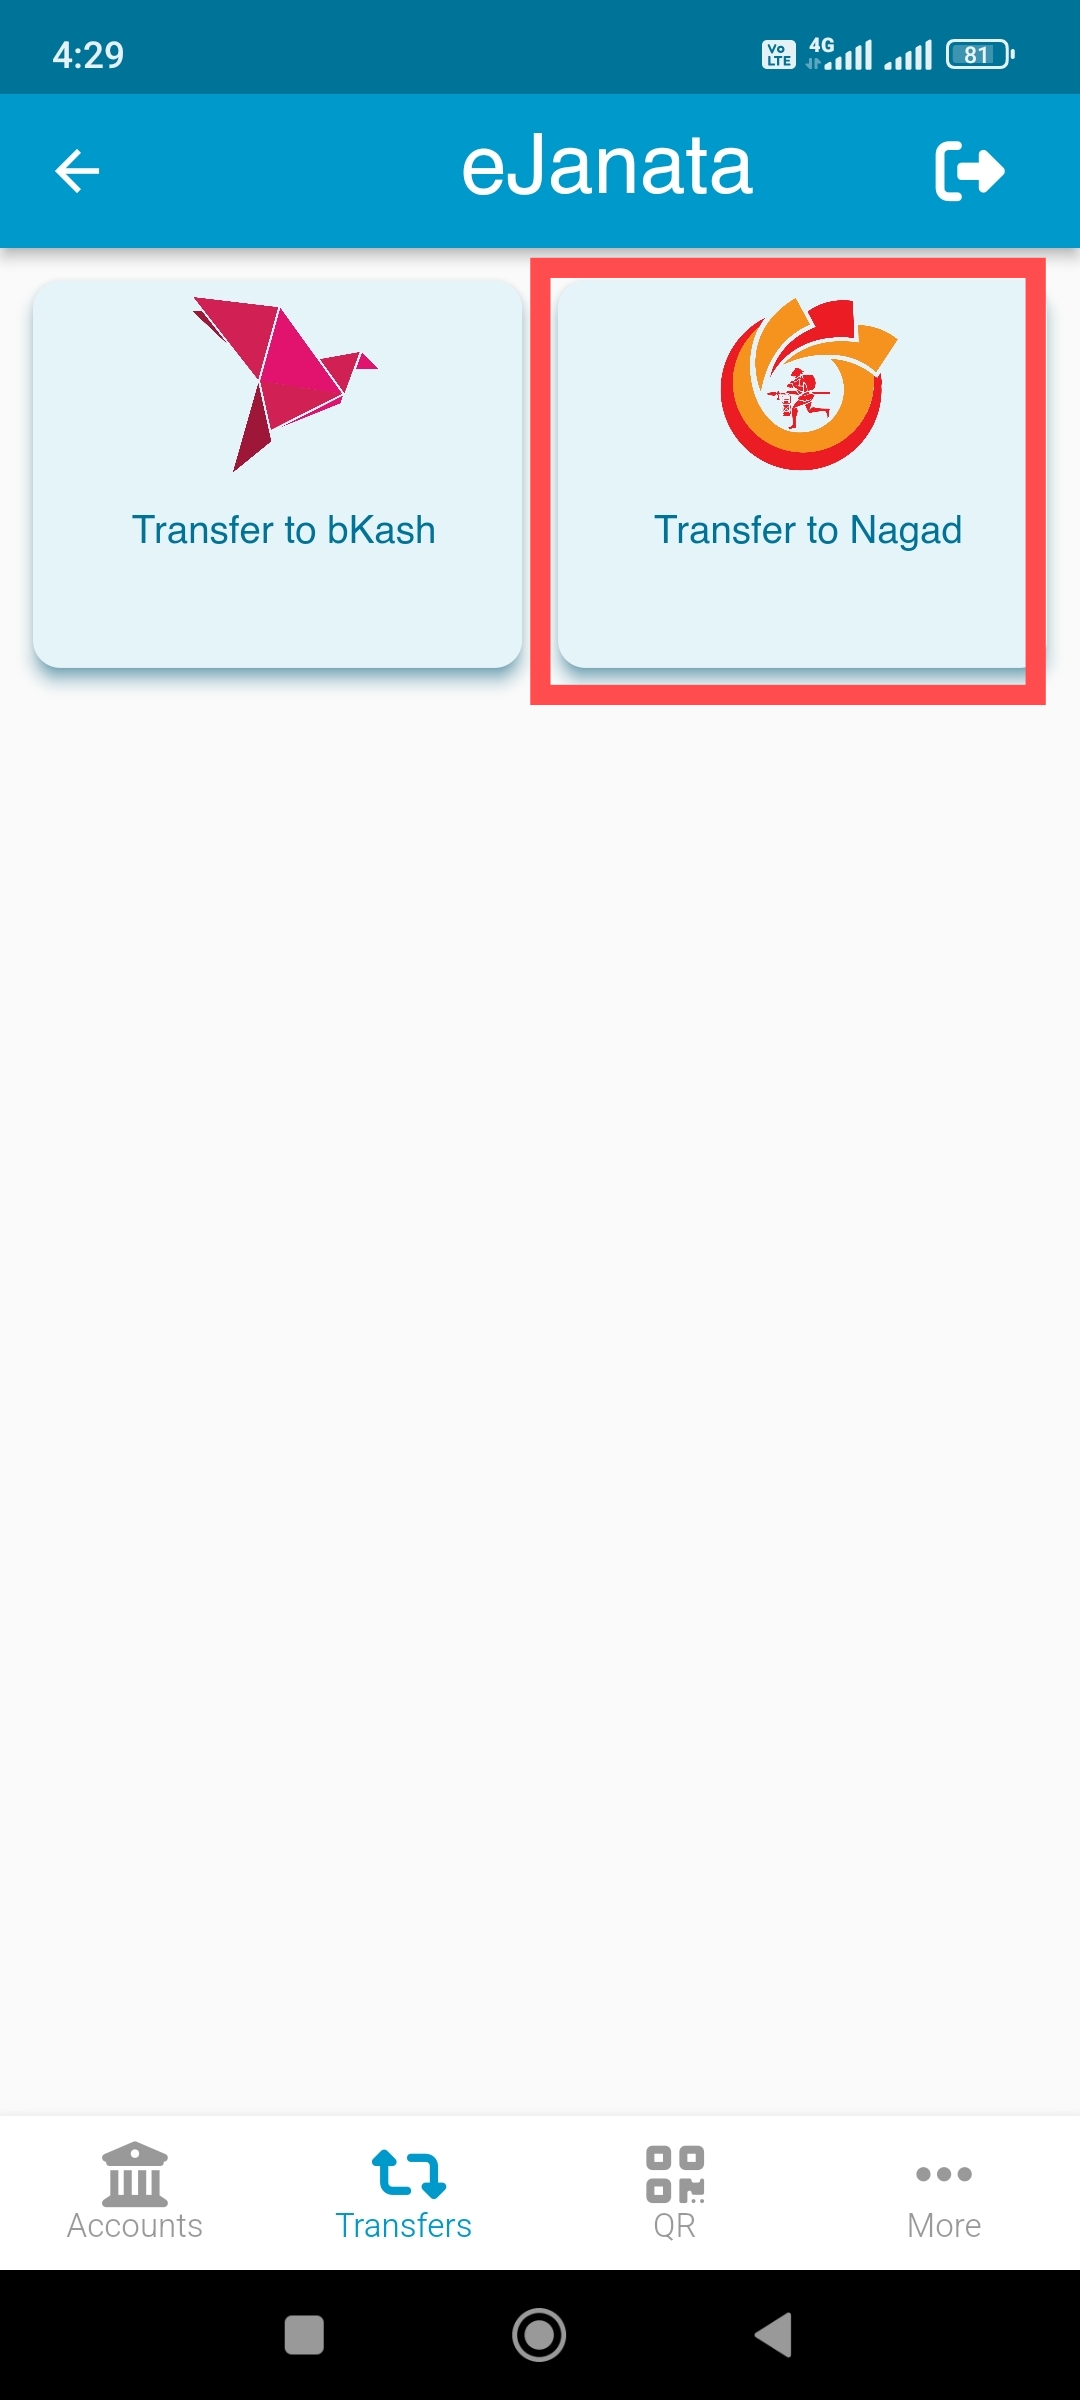
Description: Select Transfer to Nagad section for fund transfer to your Nagad beneficiary.
বর্ণনা: নগদের গ্রাহককে টাকা পাঠাতে (নগদে ব্যালেন্স ট্রান্সফার) মেন্যুটি নির্বাচন করুন।
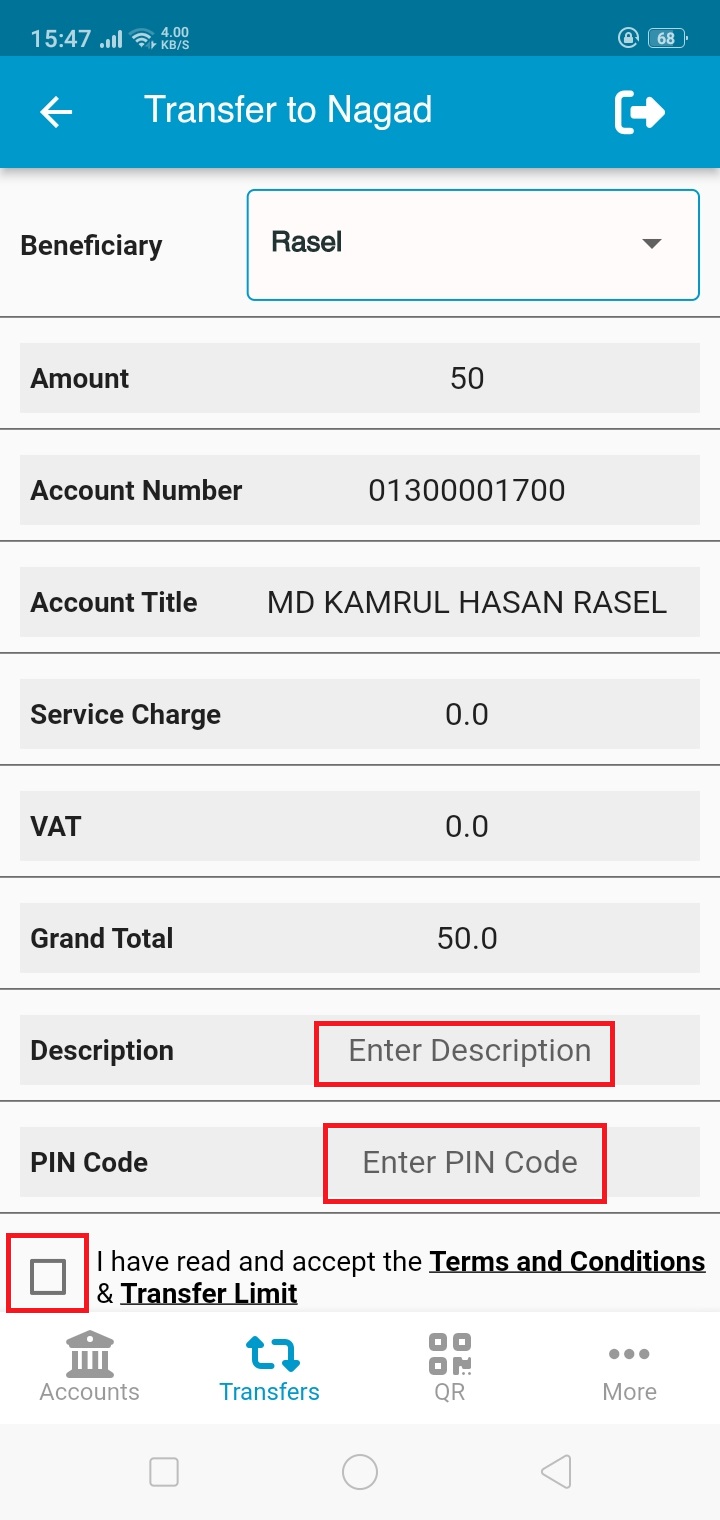
Step-3:
Description: Select the beneficiary name from Saved beneficiary option. Enter the transfer amount, description of transaction and PIN. After reading the terms and conditions submit the form.
বর্ণনা: (সংরক্ষিত গ্রাহক) এর তালিকা থেকে প্রাপক নির্বাচন করুন। অনুগ্রহ করে স্থানান্তরের পরিমাণ, লেনদেনের বিবরণ এবং পিন লিখুন। শর্তাবলী পড়ার পর ফর্মটি জমা দিন।
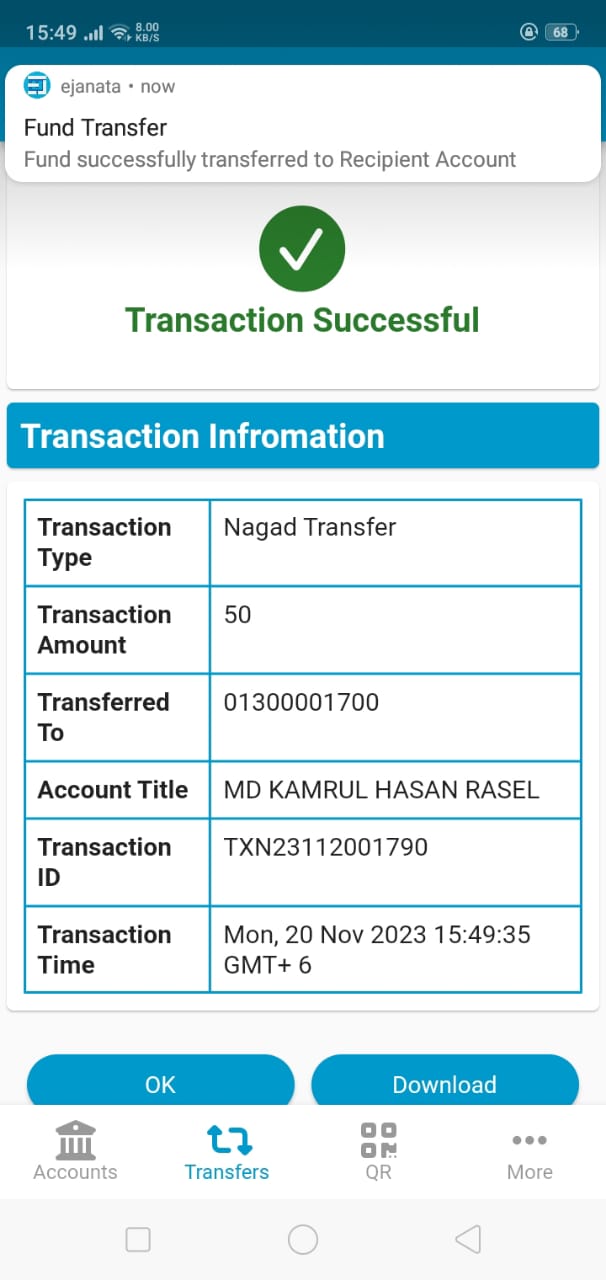
Step-4:
Description: If the transaction is completed, user will get a success message on screen with the transaction information. User can download the transaction information if needed.
বর্ণনা: লেনদেন সম্পন্ন হলে, ব্যবহারকারী লেনদেনের তথ্য সহ স্ক্রিনে একটি সফল বার্তা পাবেন । প্রয়োজনে ব্যবহারকারী লেনদেনের তথ্য ডাউনলোড করতে পারেন ।
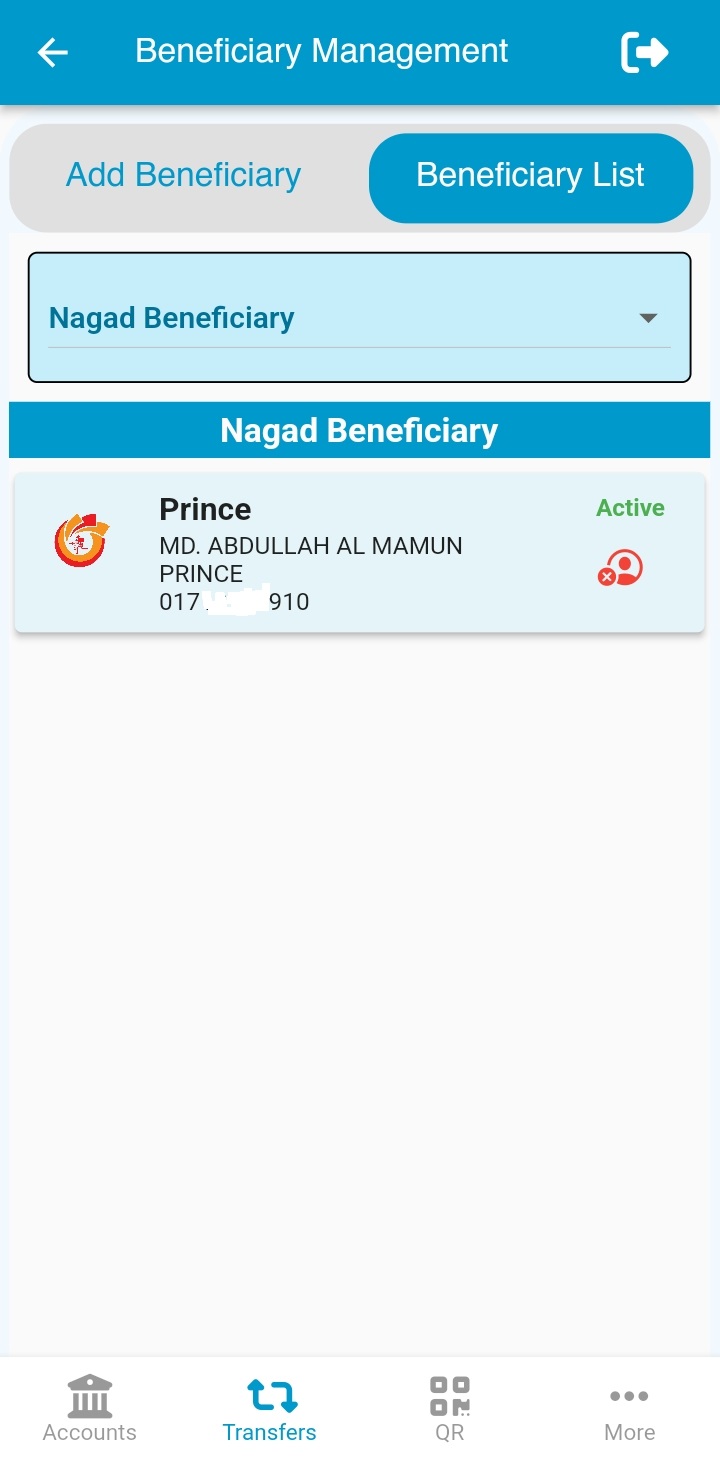
Step-1:
Description: Please select Beneficiary Management section to see your Nagad beneficiary.
বর্ণনা: নগদ সুবিধাভগীর তালিকা দেখতে (প্রাপক ব্যবস্থাপনা) মেন্যুটি নির্বাচন করুন।

Step-2:
Description: Select Beneficiary List option from the menu. Select Nagad Beneficiary option from the dropdown menu.
বর্ণনা: মেনু থেকে (প্রাপক তালিকা) নির্বাচন করুন। ড্রপডাউন মেনু থেকে (নগদ প্রাপক) অপশনটি নির্বাচন করুন।
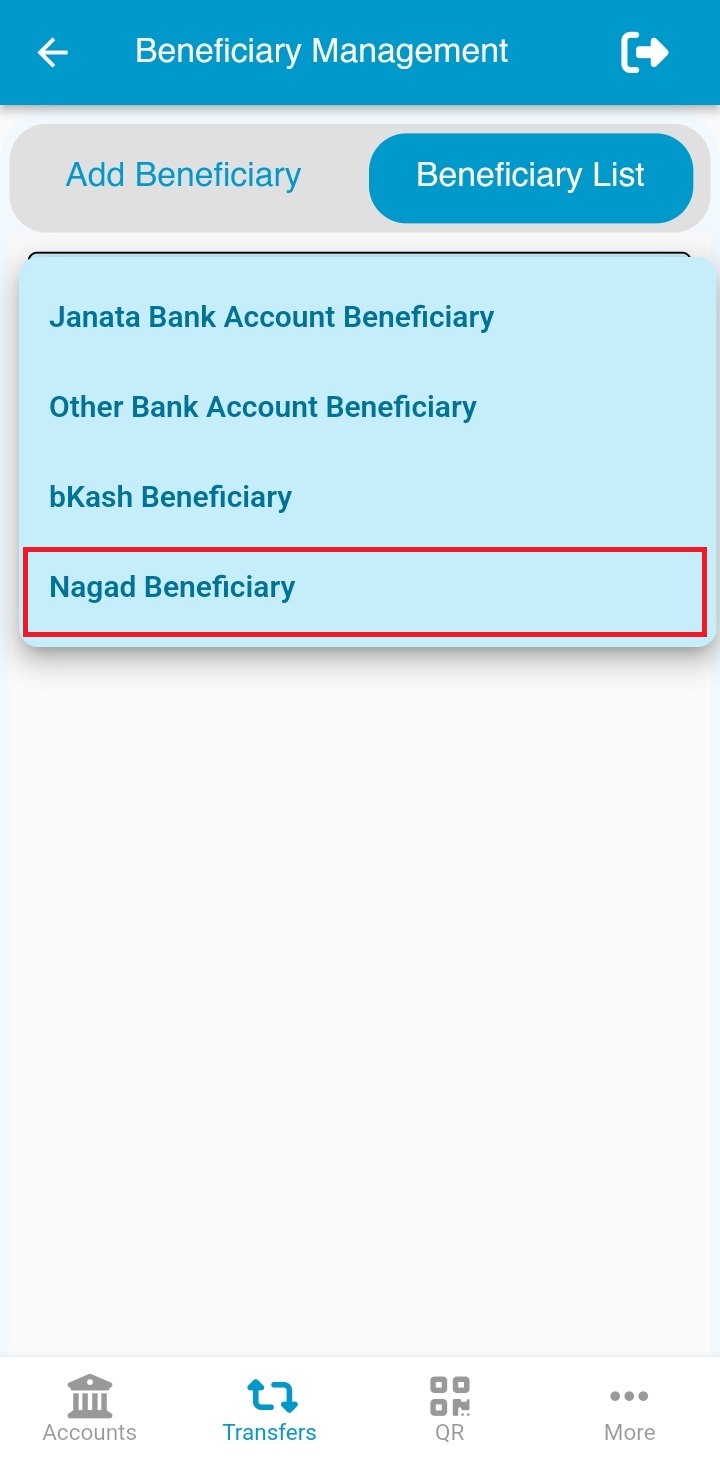
Description: Beneficiary list of Nagad will be displayed.
বর্ণনা: নগদ সুবিধাভোগী এর তালিকা প্রদর্শিত হবে ।
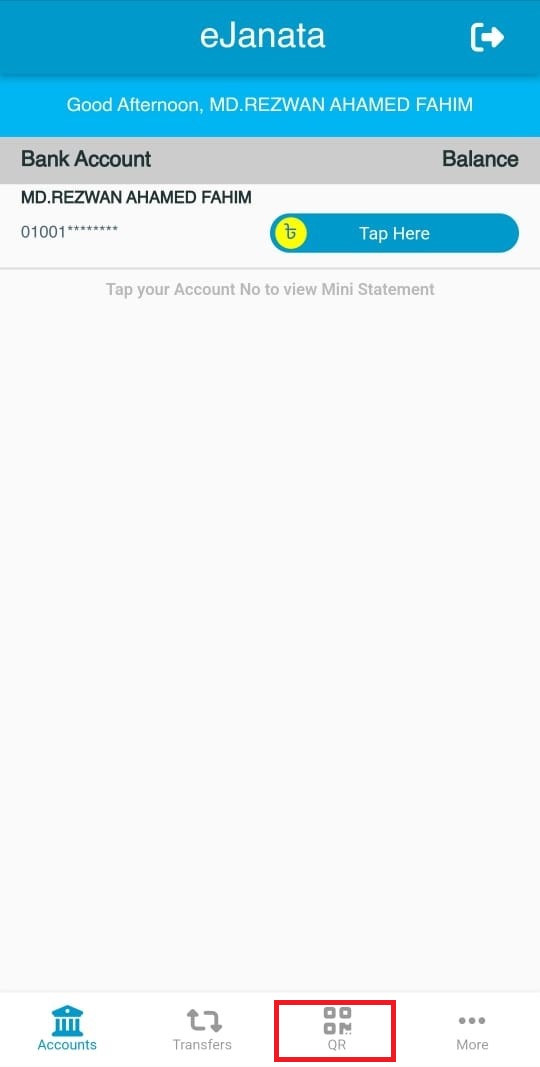
Step-1:
Description: Please tap on QR from footer to see QR Code menu. QR Code ব্যবহার করে টাকা উত্তোলনের জন্য নিচের মেনু থেকে QR এ চাপুন।
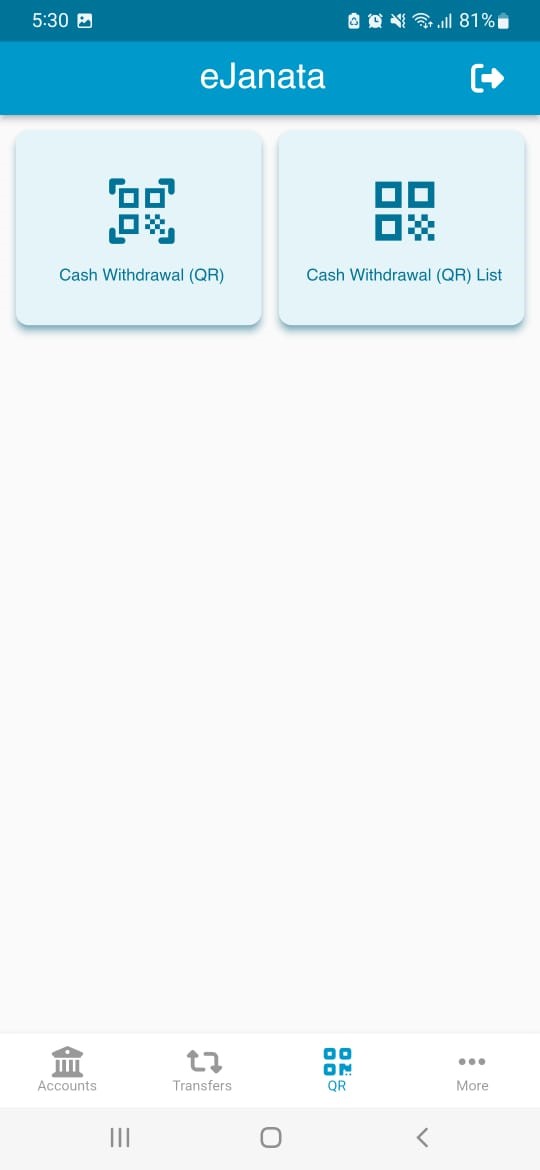
Step-2:
Description: Please tap on Cash Withdrawal (QR) section. Cash Withdrawal (QR) অংশটি নির্বাচন করুন।
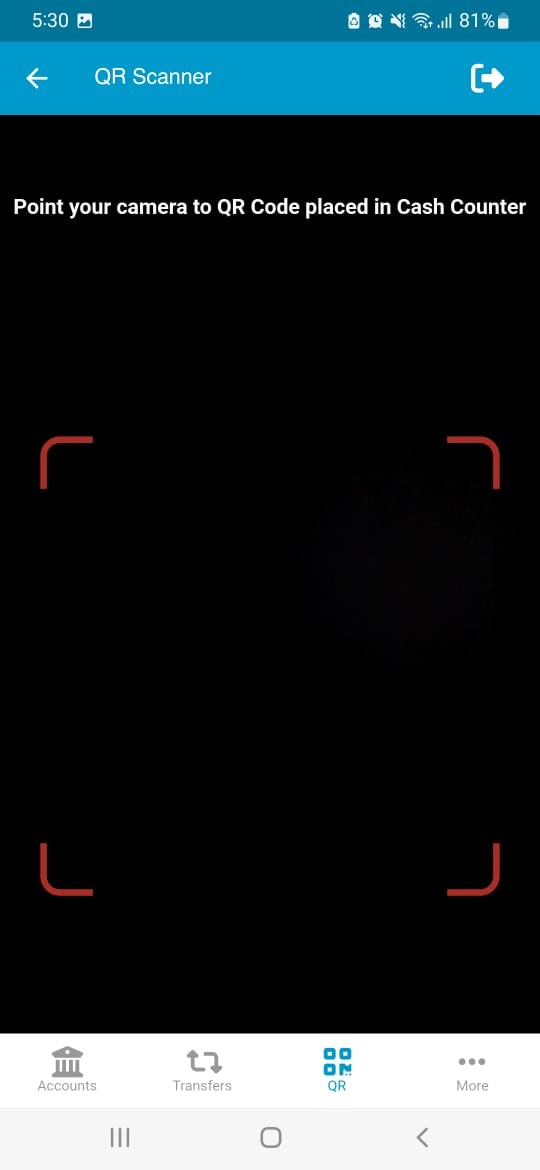
Step-3:
Description: Please scan the QR code. QR code টি স্ক্যান করুন।
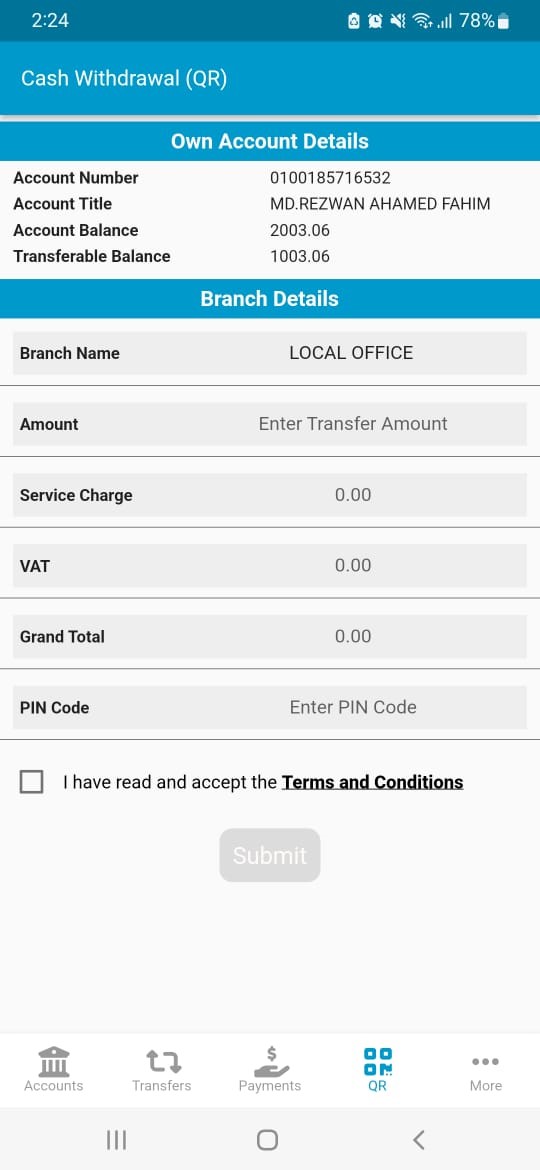
Step-4:
Description: Please input transfer amount and PIN code. If user agrees with the privacy policy and terms and conditions, please select the checkbox and tap on the submit button. Amount (টাঃ পরিমান) ঘরে লেনদেনের টাকার পরিমান লিখুন। PIN Code (পিন কোড) ঘরে PIN নম্বর প্রবেশ করান। Terms and conditions (শর্তাবলী) এর সাথে সম্মত হলে চেক বক্সটি সিলেক্ট করুন এবং Submit (সাবমিট) চাপুন।
Step-5:
Description: Please select Continue if everything is ok. তথ্য সঠিক হলে Continue (হ্যাঁ) চাপুন। অন্যথায় (no) না চাপুন।

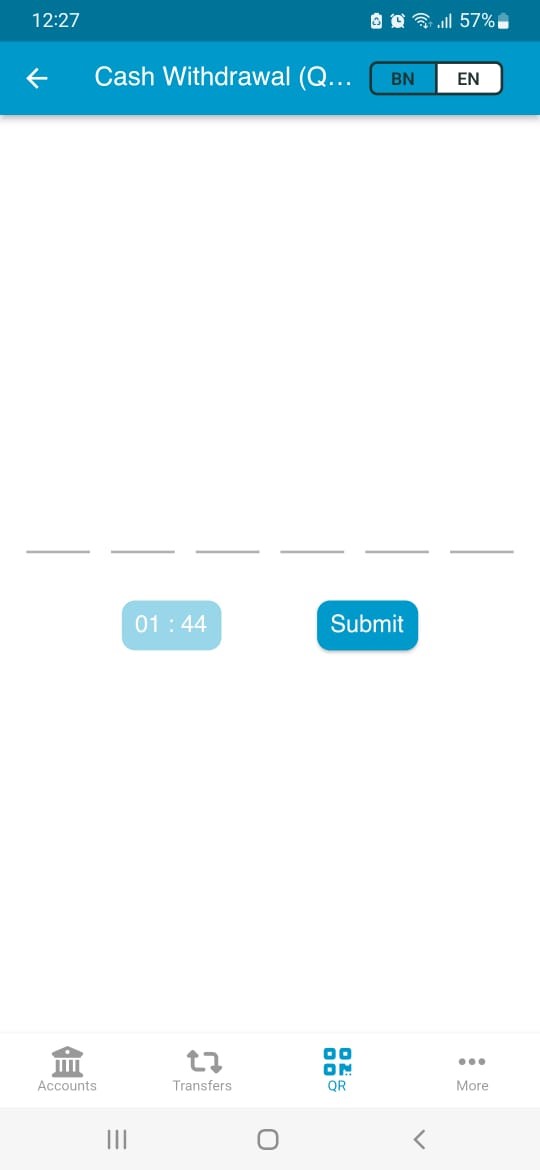
Step-6:
Description: User will get an OTP to his/her registered mobile number for completing the transaction. ব্যবহারকারী তাঁর নিবন্ধিত মোবাইল নম্বরে OTP সম্বলিত একটি SMS পাবেন। OTP এর নম্বরটি প্রবেশ করুন এবং Submit (সাবমিট) চাপুন।
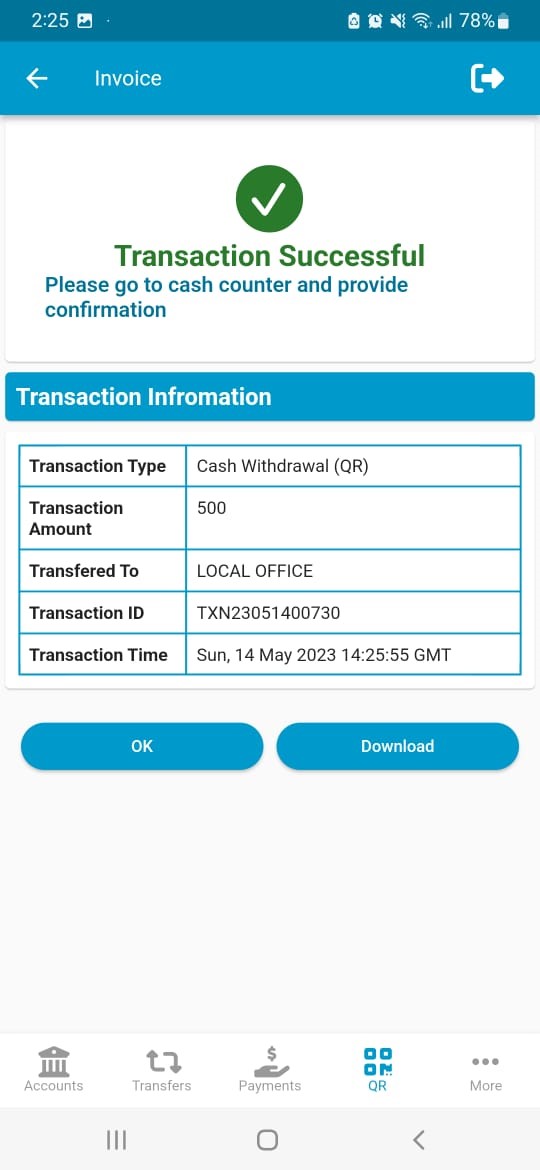
Step-7:
Description: If the transaction is completed, user can see a success message with invoice on screen. To download the invoice, select Download, otherwise select OK. টাকা পাঠানোর প্রক্রিয়া সফল হলে সংক্ষিপ্ত রশিদ সহ একটি সফলতা বার্তা দেখতে পাবেন। সংক্ষিপ্ত রশিদটি সংরক্ষণের জন্য (Download) ডাউনলোড নির্বাচন করুন।
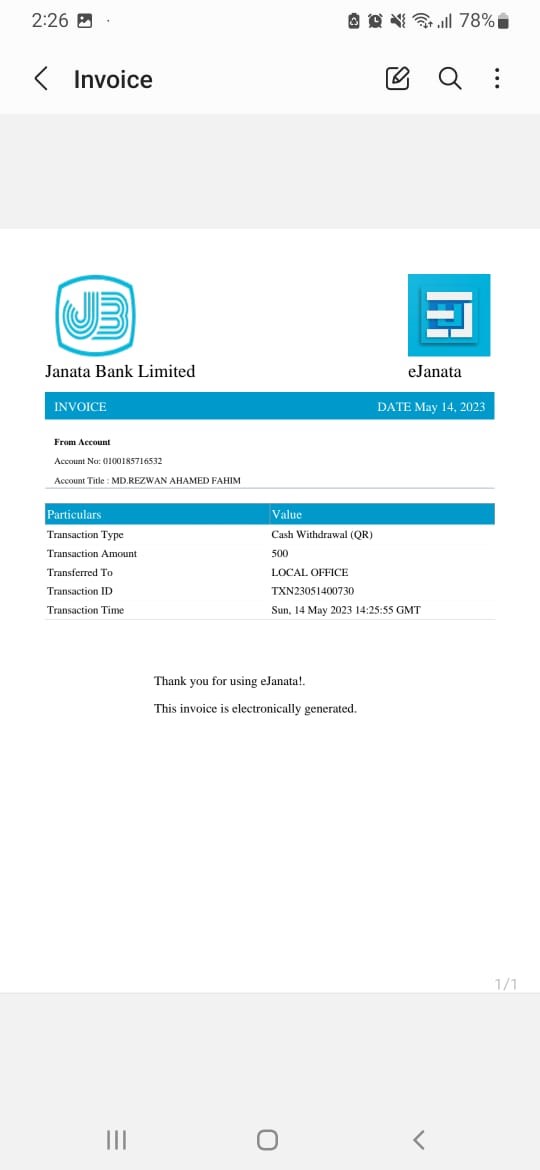
Step-8:
Description: If you choose to download you will get a PDF file of the invoice. সংক্ষিপ্ত রশিদটি ডাউনলোড করলে তা PDF আকারে আপনার ডিভাইসে সংরক্ষিত হবে।
Step-1:
Description: Please tap on Cash Withdrawal (QR) List section. Cash Withdrawal (QR) List অংশটি নির্বাচন করুন।
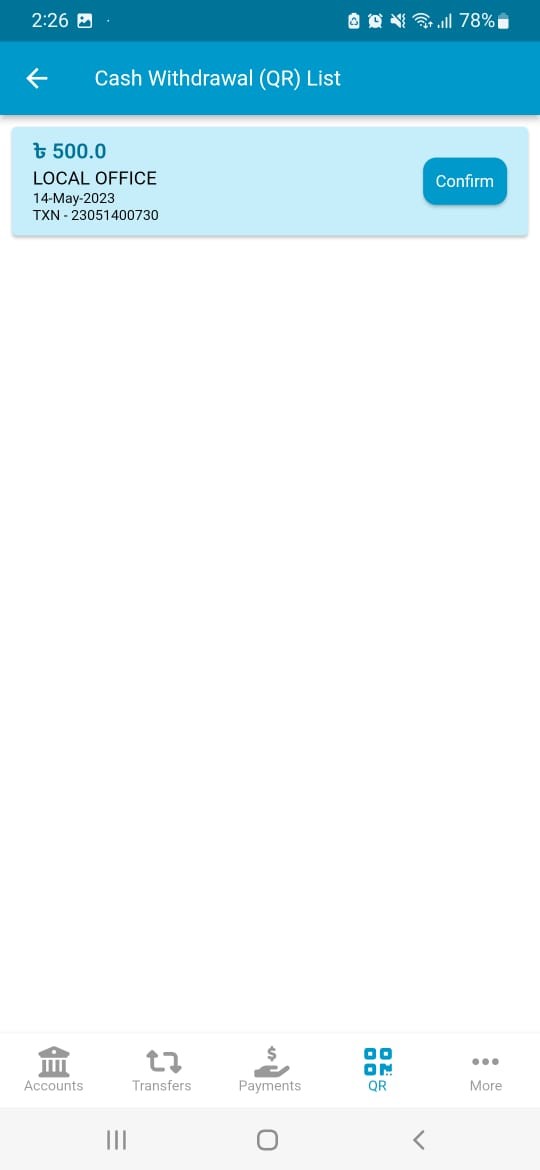
Step-2:
Description: Select Confirm for the cash withdrwal. আপনার লেনদেনের তালিকা থেকে নির্বাচন করুন এবং Confirm চাপুন।
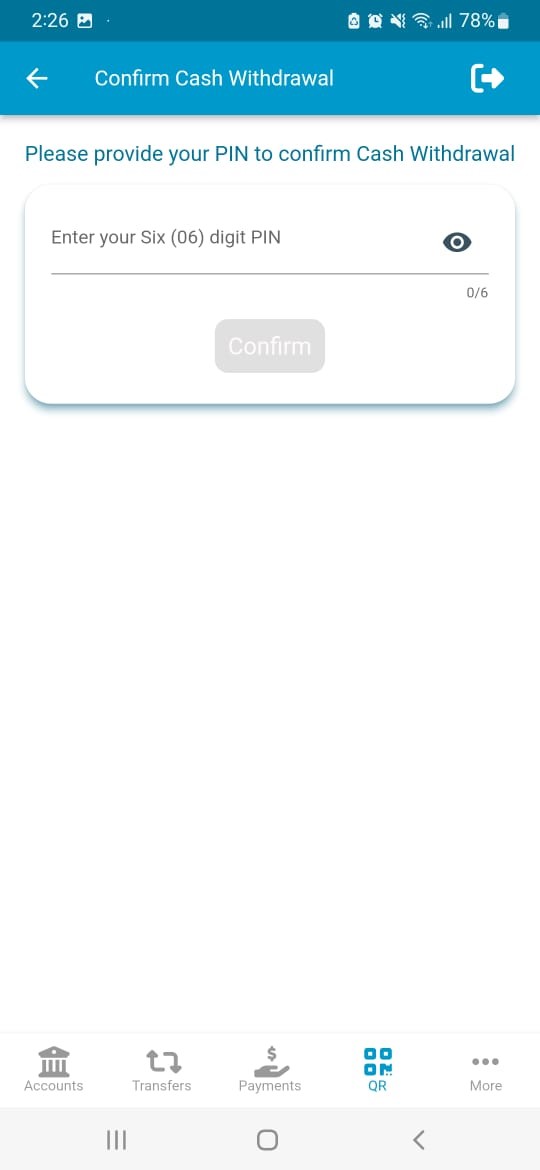
Step-3:
Description: Please input the PIN code and tap on the submit button. PIN Code (পিন কোড) ঘরে PIN নম্বর প্রবেশ করান এবং Submit (সাবমিট) চাপুন।
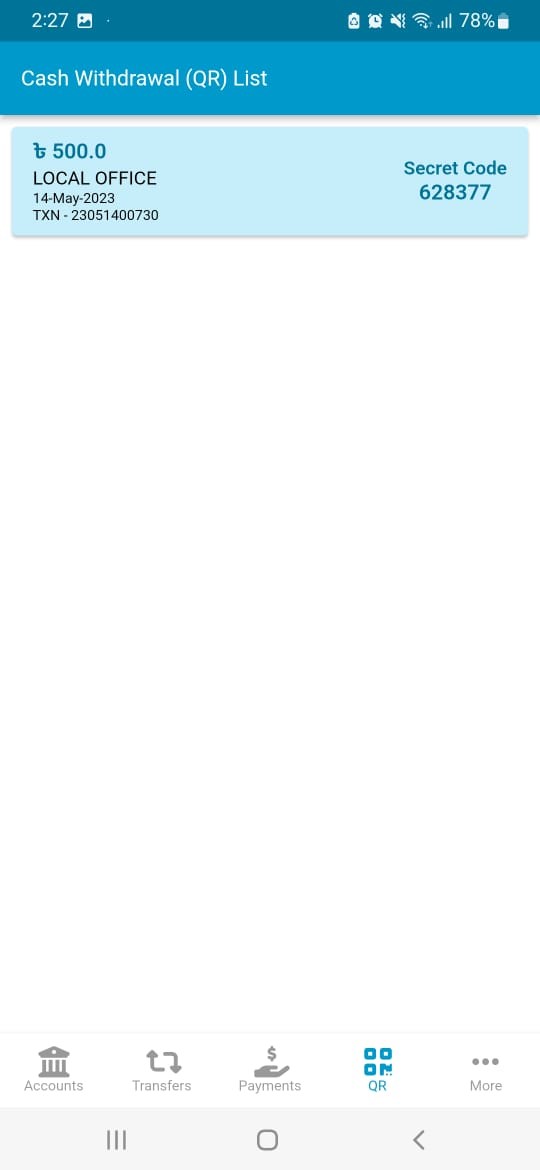
Step-4:
Description: Please provide the Secret Code to the cash officer and collect your cash. আপনার সিক্রেট কোডটি ক্যাশ অফিসারকে প্রদান করুন এবং সকল তথ্য সঠিক হলে আপনার নগদ টাকা সংগ্রহ করুন।
Step-5:
Description: Please select Continue if everything is ok. তথ্য সঠিক হলে Continue (হ্যাঁ) চাপুন। অন্যথায় (no) না চাপুন।
Step-6:
Description: User will get an OTP to his/her registered mobile number for completing the transaction. ব্যবহারকারী তাঁর নিবন্ধিত মোবাইল নম্বরে OTP সম্বলিত একটি SMS পাবেন। OTP এর নম্বরটি প্রবেশ করুন এবং Submit (সাবমিট) চাপুন।
Step-7:
Description: If the transaction is completed, user can see a success message with invoice on screen. To download the invoice, select Download, otherwise select OK. টাকা পাঠানোর প্রক্রিয়া সফল হলে সংক্ষিপ্ত রশিদ সহ একটি সফলতা বার্তা দেখতে পাবেন। সংক্ষিপ্ত রশিদটি সংরক্ষণের জন্য (Download) ডাউনলোড নির্বাচন করুন।
Step-8:
Description: If you choose to download you will get a PDF file of the invoice. সংক্ষিপ্ত রশিদটি ডাউনলোড করলে তা PDF আকারে আপনার ডিভাইসে সংরক্ষিত হবে।
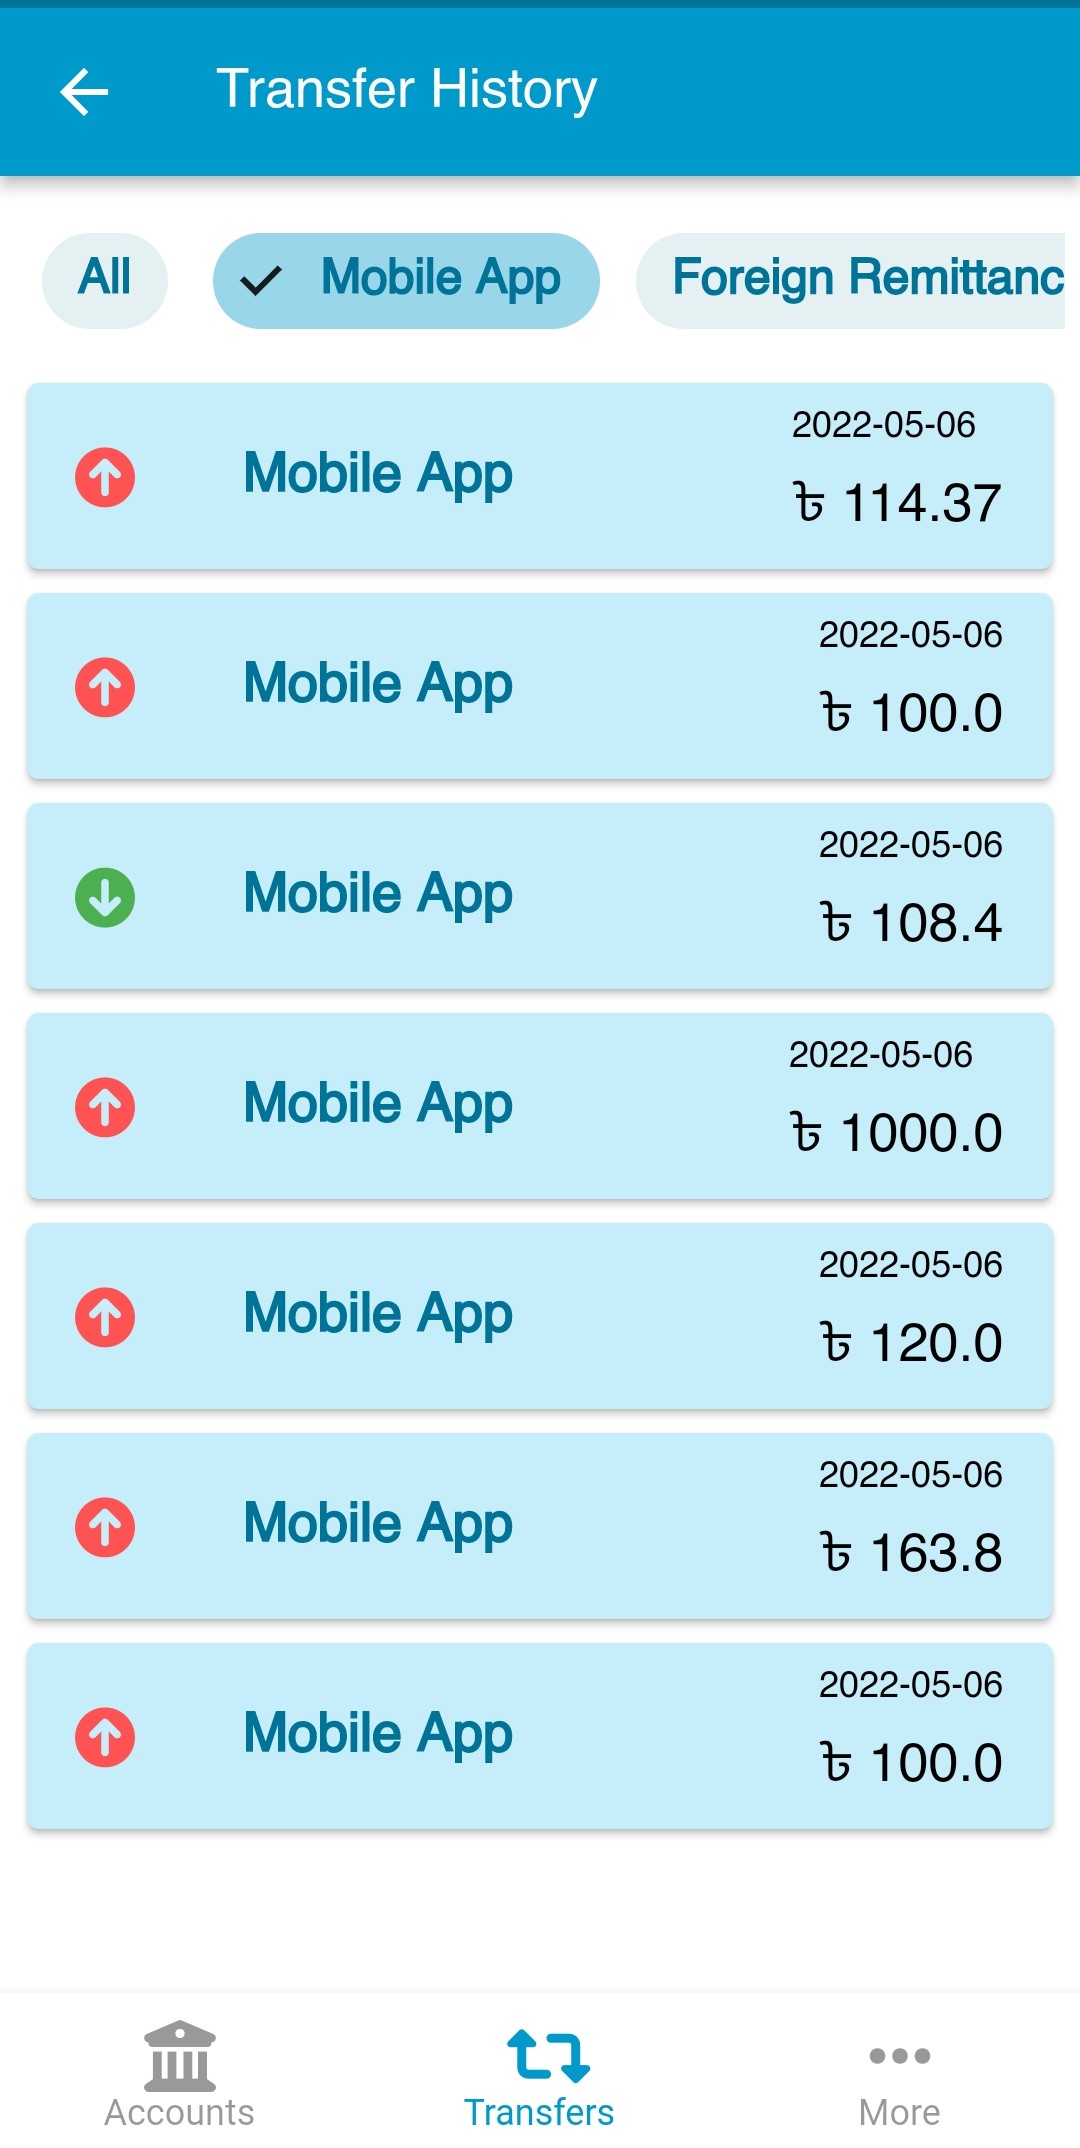
Step-1:
Description: Please tap on Transfer history section for recent transfer history of your account. আপনার একাউন্টের লেনদেনের সাম্প্রতিক ইতিহাস জানার জন্য Transfer History (ট্রান্সফার হিস্টোরি) অংশটি নির্বাচন করুন।
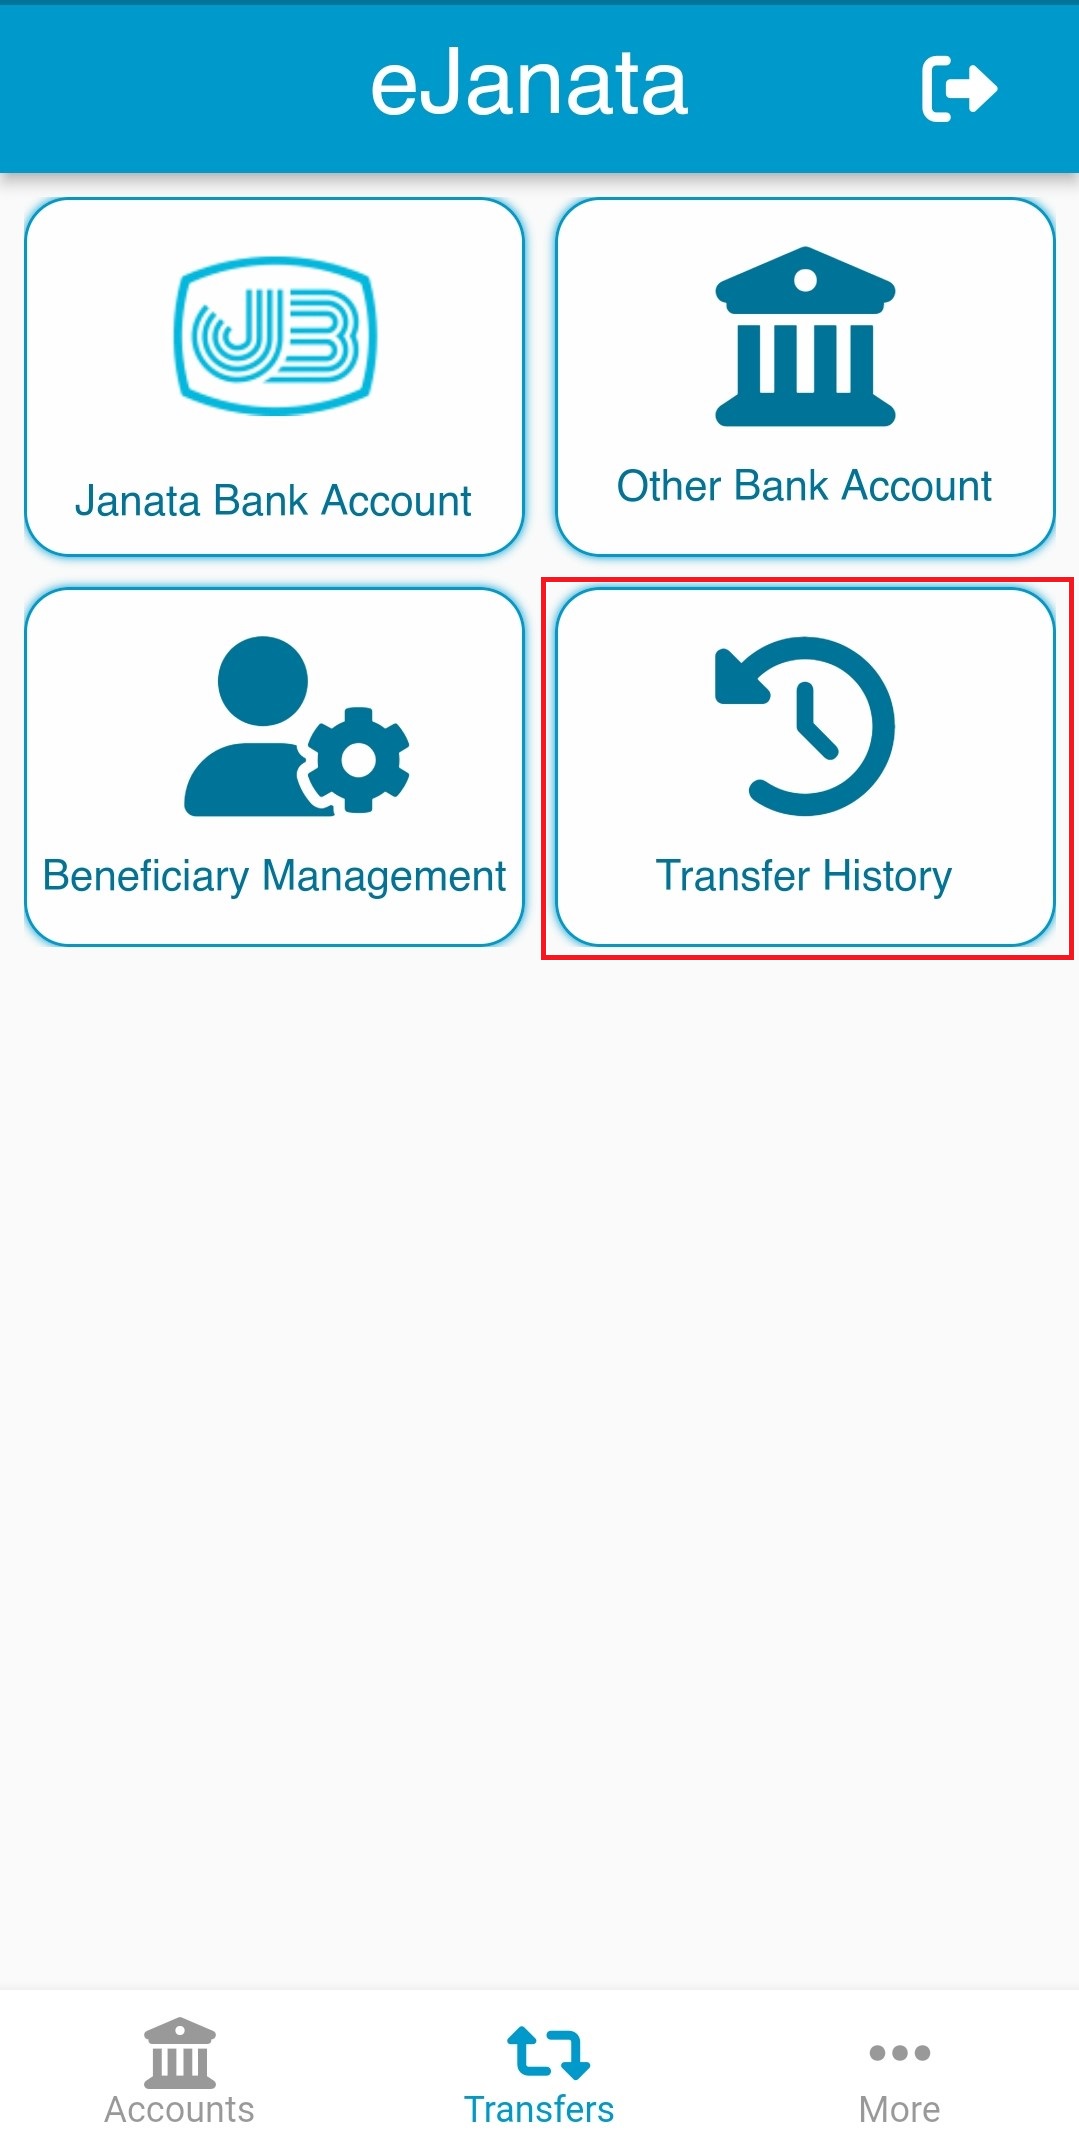
Step-2:
Description: User can see all transaction history including mobile app, foreign remittance, debit, credit etc. Transfer History (ট্রান্সফার হিস্টোরি) ট্যাবে ব্যবহারকারী তাঁর সকল লেনদেনের ইতিহাস (মোবাইল অ্যাপ, বৈদেশিক রেমিটেন্স, ডেবিট, ক্রেডিট ইত্যাদি সহ) দেখতে পাবেন।
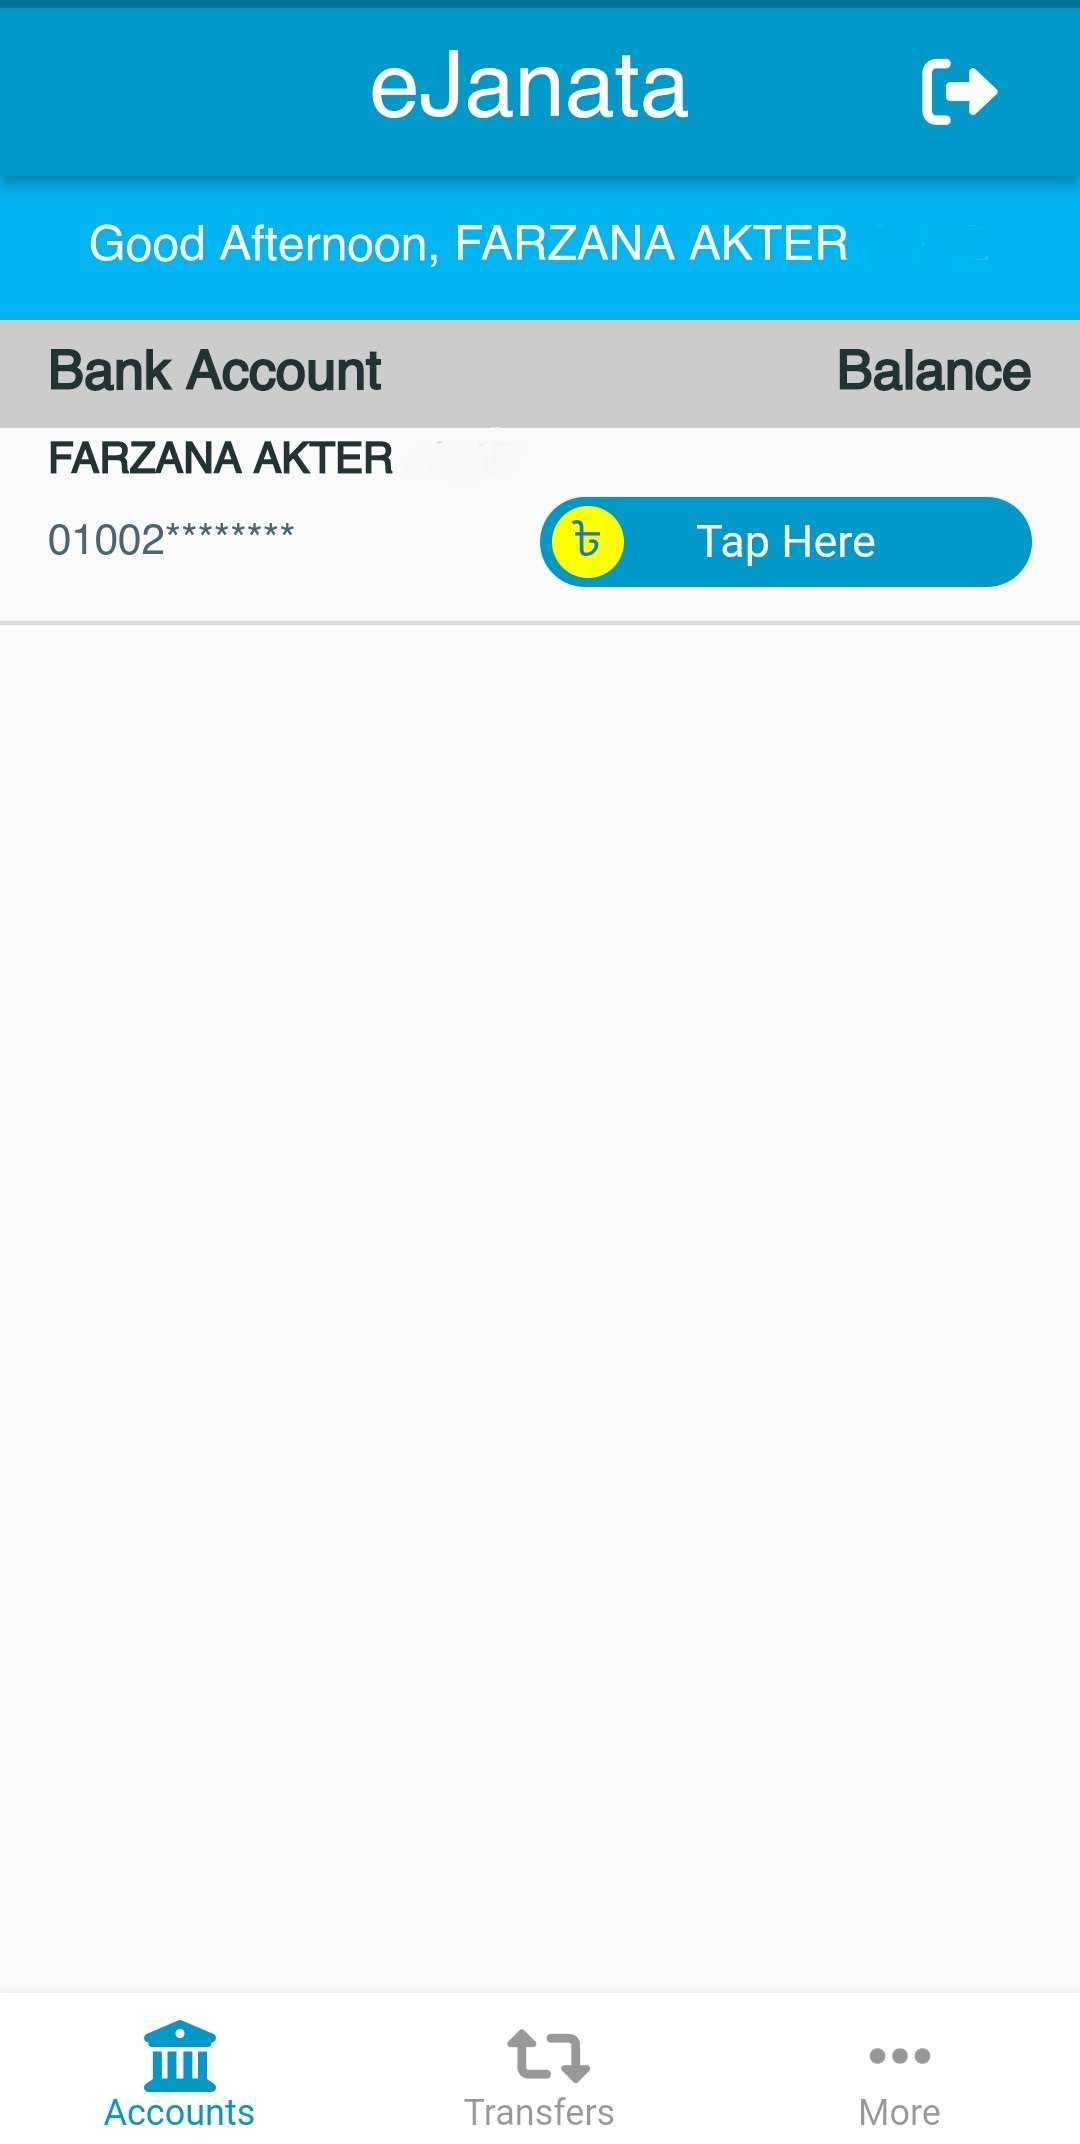
Step-1:
Description: To know the available account balance, please go to home screen and tap on Tap Here button. For the account statement please tap on account number. আপনার একাউন্টের বর্তমান স্থিতি জানতে দয়া করে মূল স্ক্রিন (Home Screen) থেকে Tap Here (আলতো চাপুন) এ স্পর্শ করুন। আপনার একাউন্টের বিস্তারিত বিবরণী জানতে একাউন্টের নামের উপর স্পর্শ করুন।
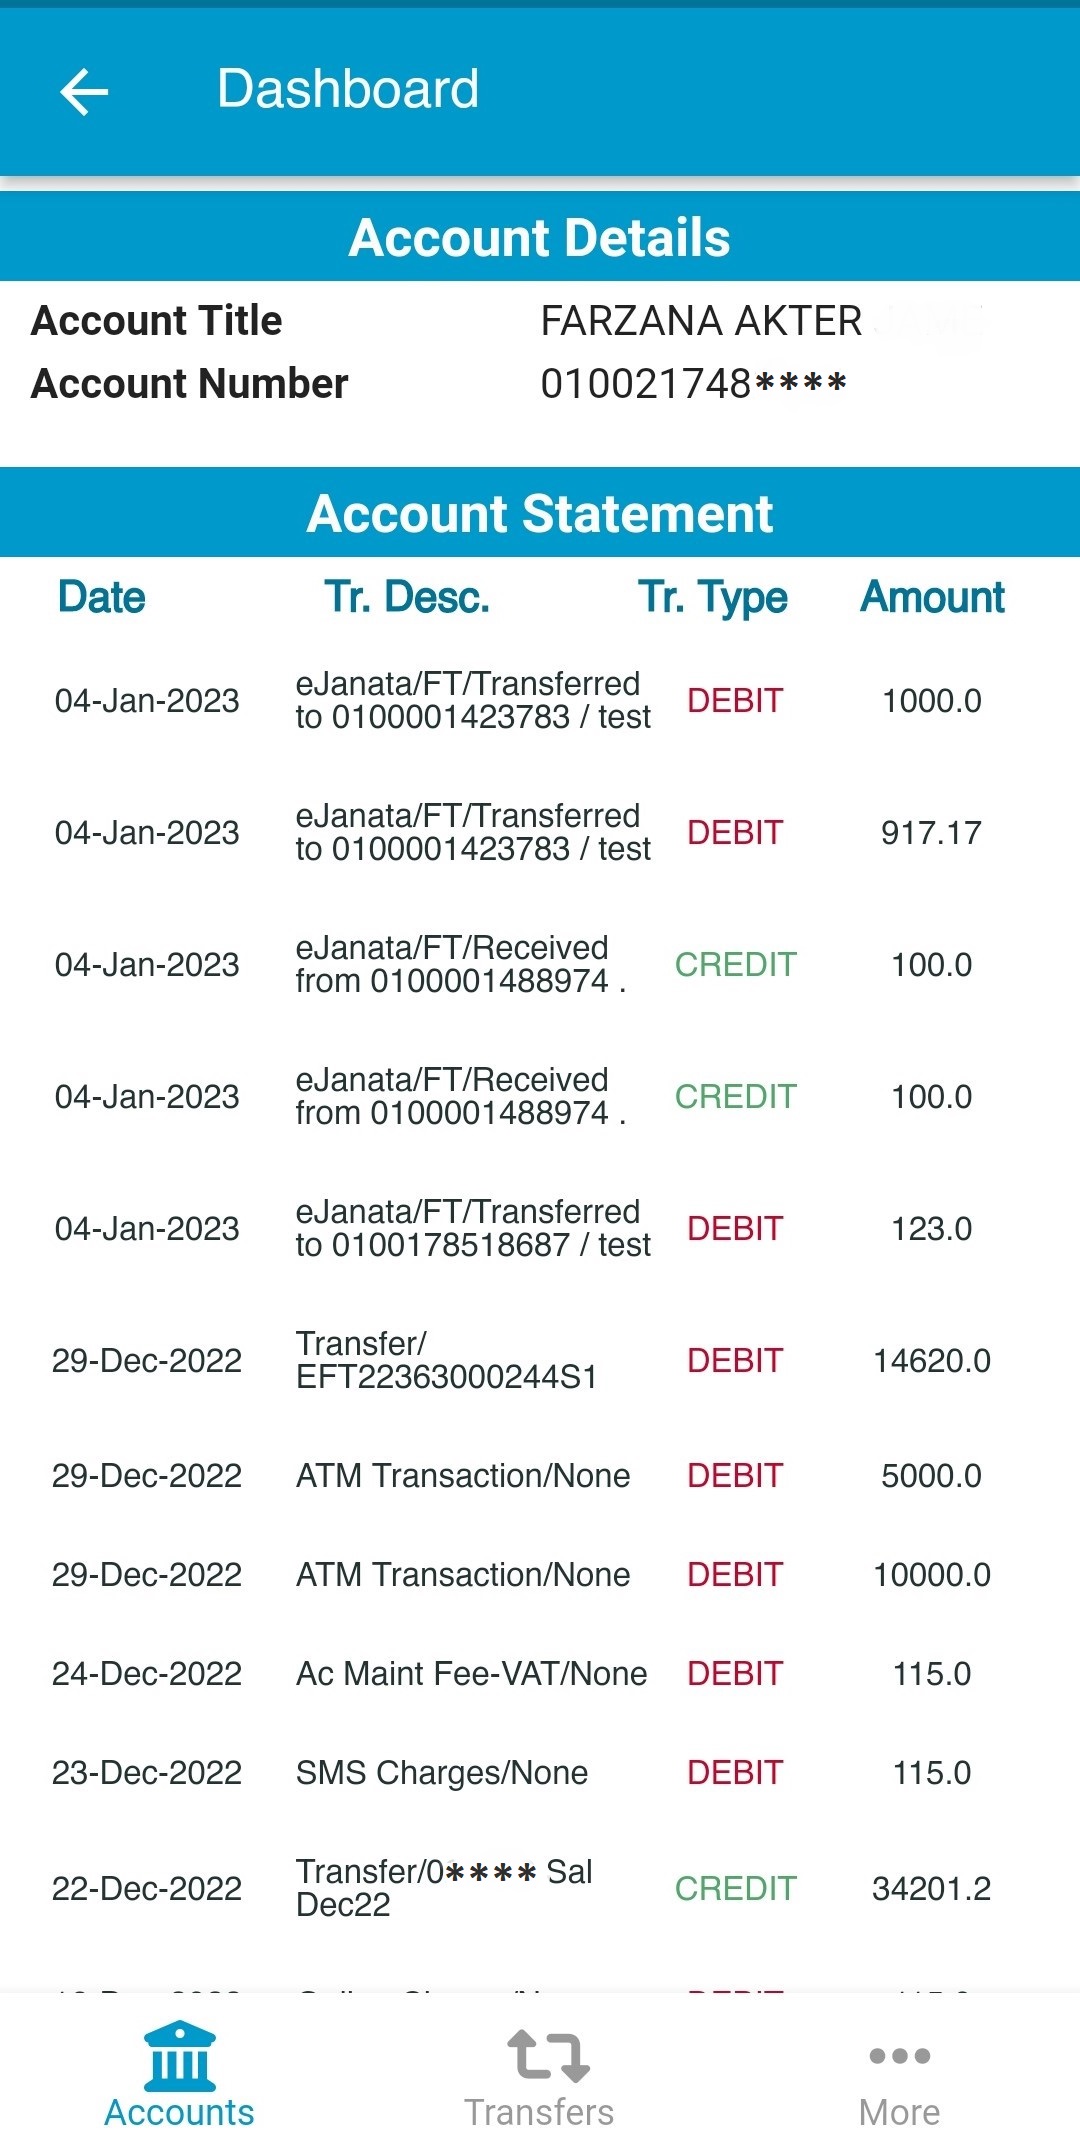
Step-2:
Description: User will get last 15 transaction details in account statement screen. এখানে আপনার একাউন্টের সর্বশেষ ১৫ টি লেনদেনের বিবরণী দেখতে পাবেন।
eJanata Logo core values formulated by using JBL motto (your committed partner in progress) and colour contrast casting from the brand guidelines.
eJanata ID number (eg. JB02441401) has two parts; here first part JB0 is the prefix and next part 2441401 is the Julian date generated by using the Julian date of 24 March 1972. This date is the day the father of the nation Bangabandhu Sheikh Mujibur Rahman was signed on and approved the Janata Bank.
বিশেষ দ্রষ্টব্যঃ ইজনতা এর সাপোর্ট ইমেইল helpdesk.ejanata@janatabank-bd.com এ মেইল করার ক্ষেত্রে আপনার ইউসার আইডি, মোবাইল নম্বর এবং একাউন্ট নম্বর উল্লেখ করুন। কোনোভাবেই আপনার পাসওয়ার্ড ইমেইলে উল্লেখ করবেন না।
| App |
Application; An application is a software program that's designed to perform a specific function directly for the user or, in some cases, for another application program. |
| ID |
Identification; Any official card or document with your name and photograph or other information on it that you use to prove who you are. |
| NID |
National Identity Card; The National Identity Card (জাতীয় পরিচয়পত্র) or NID card is a compulsory identity document issued to every Bangladeshi citizen upon turning 18 years of age. |
| OTP |
One Time Password; A one-time password (OTP), also known as a one-time PIN, is a password that is valid for only one login session or transaction, on a computer system or other digital device. |
| PIN |
Personal Identification Number; A secret number that a user memorizes and uses to authenticate his or her identity as part of multifactor authentication. |
| SIM |
Subscriber Identity Module; A smart card chip specialized for use in GSM equipment. |
| SMS |
Short Message Service; Commonly known as texting. It's a way to send text-only messages of up to 160 characters between phones. |